Oh, let me tell you about my love affair with baked crunchy chicken tacos. It started on a hectic Tuesday when I desperately needed dinner fast. My usual go-to recipes felt boring, and frying tacos? Too messy. That’s when I discovered baking them gives that perfect crunch without the greasy cleanup. Now these tacos are my weekly lifesaver!
What makes them special? Imagine tender, spice-rubbed chicken tucked into tortillas that bake up crispy like chips (but way sturdier). The oven does most of the work while you prep toppings, no babysitting a skillet. My kids go wild for the crunch, and I love that they’re lighter than fried versions but just as satisfying. After years of tweaking, this version hits all the right notes: easy, crispy, and packed with flavor that’ll make you forget takeout menus exist.
Trust me, once you try baking your tacos, you’ll never go back. The secret? A hot oven and tortillas that hug the filling just right. Let’s dive in!
If you love bold Tex-Mex flavors, don’t miss this baked chicken tacos recipe, a crispy, melty alternative packed with juicy chicken, seasoned to perfection, and perfect for any busy weeknight dinner rotation.
Table of Contents
Why You’ll Love These Baked Crunchy Chicken Tacos
Oh, where do I even start? These tacos are everything you want in a weeknight meal, and then some! Let me count the ways:
- Effortless crispy magic: That golden crunch comes straight from your oven, no messy frying required. Just fold, bake, and watch the tortillas transform into edible shovels for all those tasty toppings.
- Prep? What prep?: Season the chicken, toss it in the oven, and you’re halfway done. While it bakes, you’ve got time to chop toppings or, let’s be real, scroll through your phone guilt-free.
- Kid-approved (and parent-sanctioned): The crispy shell keeps fillings from falling out, a miracle for little hands. My crew fights over the extra-crunchy edges every time.
Seriously, these tacos are the culinary equivalent of a high-five. Easy, satisfying, and reliably delicious, what’s not to love?
Try pairing your tacos with this sweet and zesty peach mango salsa; it’s a refreshing topping that adds a tropical twist and works beautifully with the crunchy texture of baked shells.
Ingredients for Baked Crunchy Chicken Tacos
Okay, let’s talk ingredients, nothing fancy here, just simple stuff that packs a punch. I’ve learned a few tricks over the years, like using corn tortillas for that extra snap and shredding your own cheese for better meltiness. Here’s exactly what you’ll need to make these tacos sing:
- 2 boneless, skinless chicken breasts (about 1 lb total) go for thicker cuts so they stay juicy
- 1 tablespoon olive oil the glue for our spice rub
- 1 teaspoon chili powder smoky and just spicy enough
- 1 teaspoon cumin trust me, this is the flavor backbone
- 1/2 teaspoon garlic powder because everything’s better with garlic
- 1/2 teaspoon paprika for color and a subtle sweetness
- Salt and pepper to taste, but don’t skimp!
- 8 small corn tortillas they crisp up better than flour ones
- 1 cup shredded lettuce iceberg or romaine for crunch
- 1/2 cup diced tomatoes seeds removed so your tacos don’t get soggy
- 1/4 cup chopped cilantro fresh is a must here
- 1/2 cup shredded cheddar or Mexican blend cheese pre-shredded works, but freshly grated melts like a dream
- 1/4 cup sour cream or Greek yogurt if you’re feeling tangy
Pro tip: If you’re like me and love a little heat, toss in some diced jalapeños or a sprinkle of cayenne with the spices. And don’t forget the lime wedges, they’re the secret handshake to perfect tacos!
Print
Baked Crunchy Chicken Tacos
- Total Time: 50 minutes
- Yield: 8 tacos 1x
- Diet: Low Lactose
Description
A simple recipe for crispy baked chicken tacos with minimal prep and maximum flavor.
Ingredients
- 2 boneless, skinless chicken breasts
- 1 tablespoon olive oil
- 1 teaspoon chili powder
- 1 teaspoon cumin
- 1/2 teaspoon garlic powder
- 1/2 teaspoon paprika
- Salt and pepper to taste
- 8 small tortillas
- 1 cup shredded lettuce
- 1/2 cup diced tomatoes
- 1/4 cup chopped cilantro
- 1/2 cup shredded cheese
- 1/4 cup sour cream
Instructions
- Preheat oven to 375°F.
- Season chicken with olive oil, chili powder, cumin, garlic powder, paprika, salt, and pepper.
- Bake chicken for 25 minutes or until fully cooked.
- Shred chicken with a fork.
- Fill tortillas with shredded chicken.
- Fold tortillas and place them on a baking sheet.
- Bake for 10 minutes until crispy.
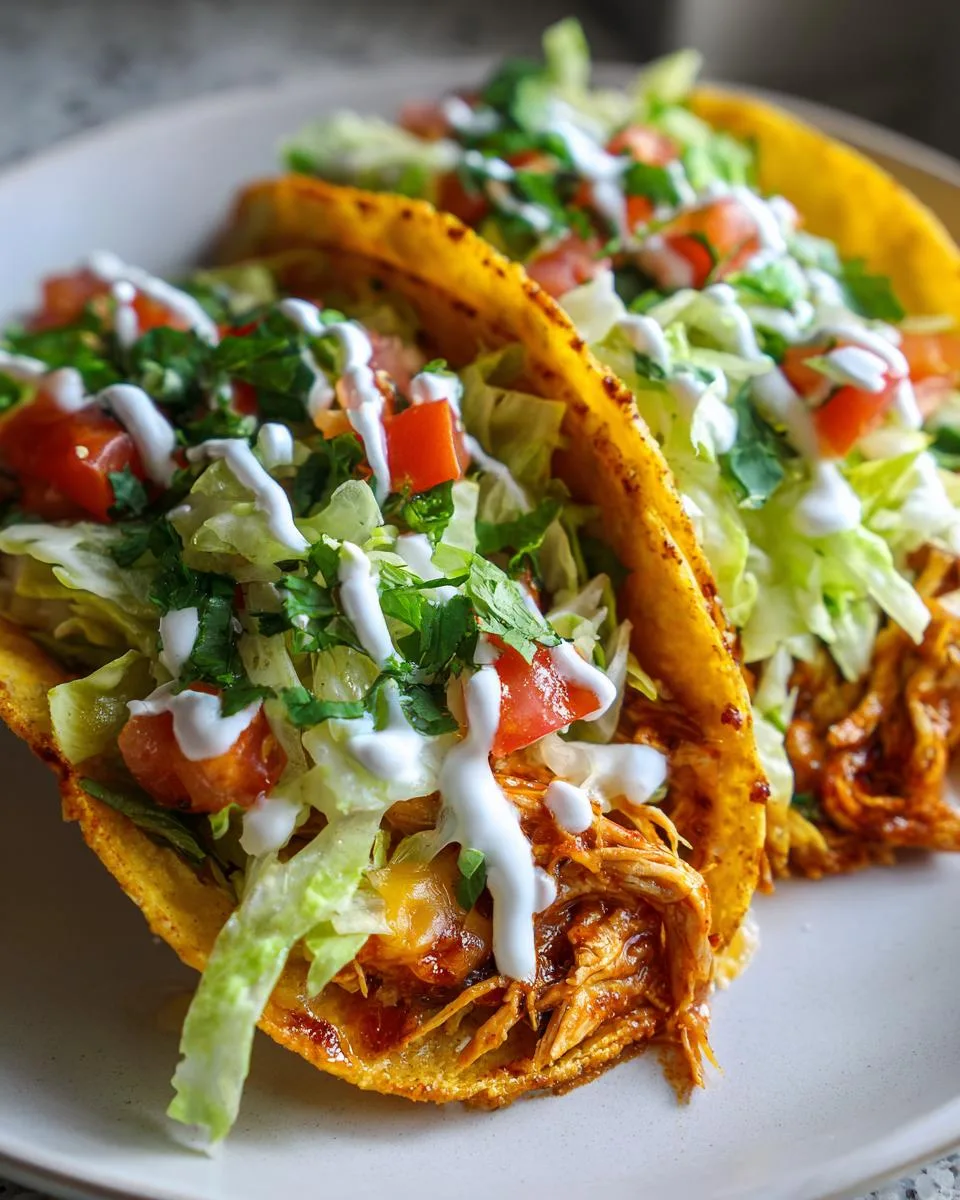
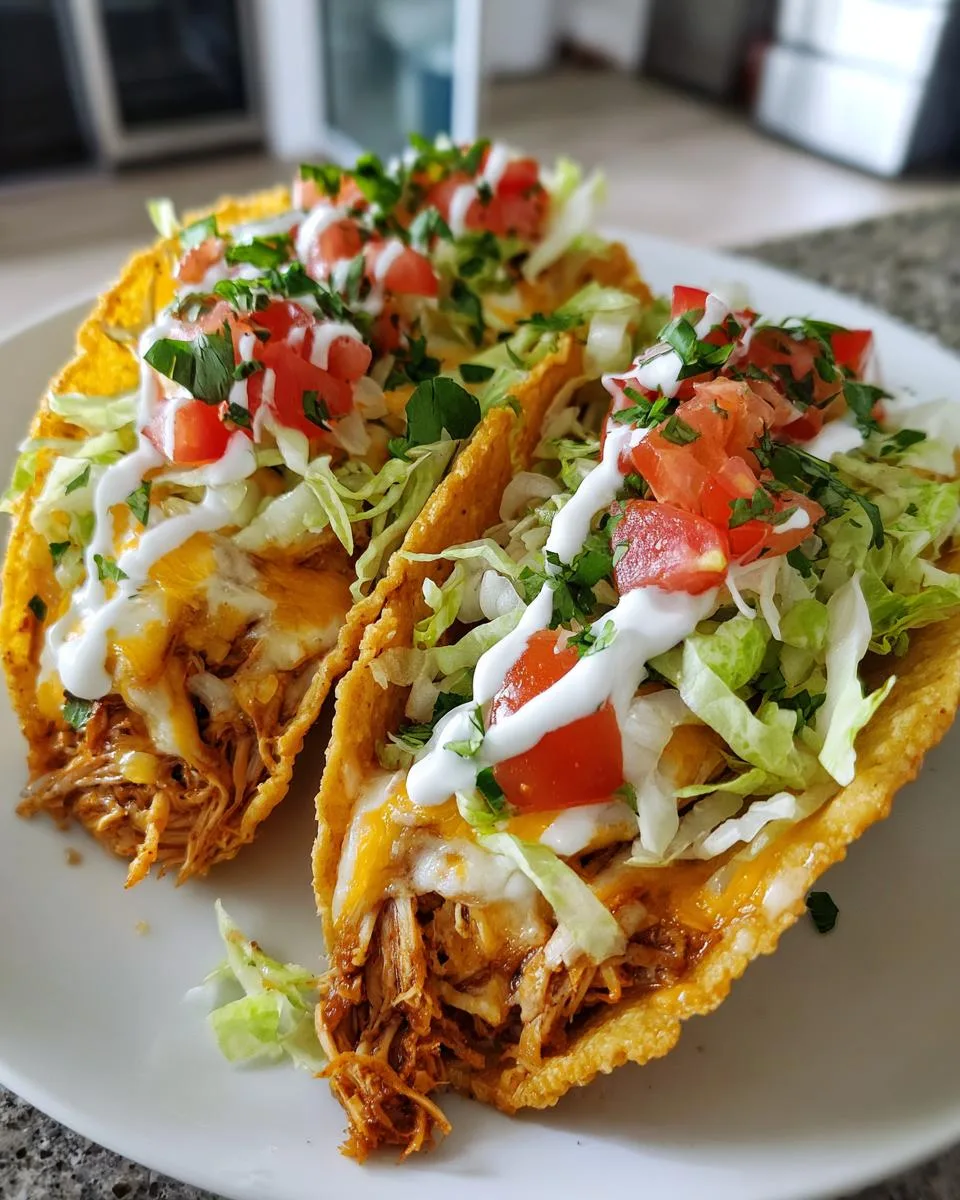
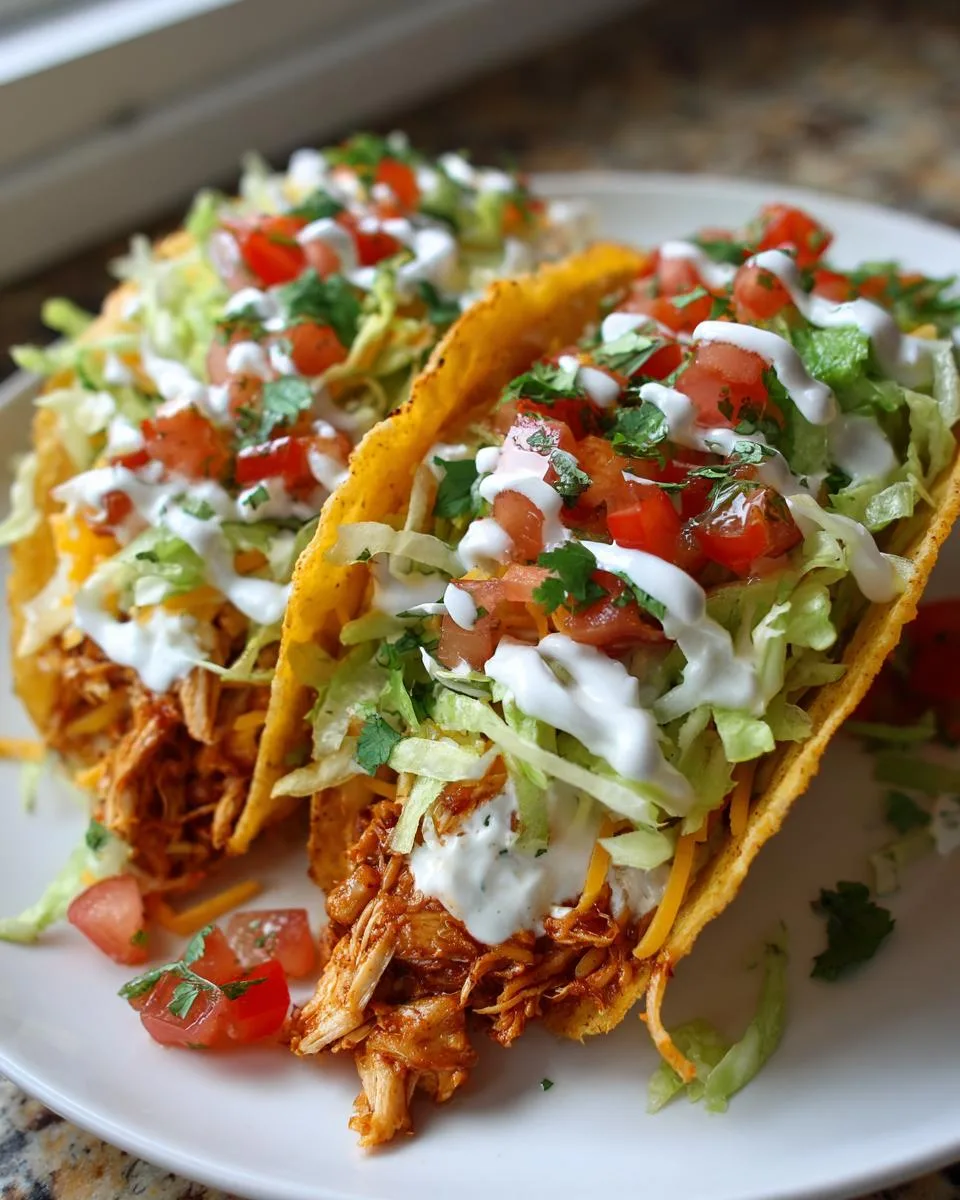
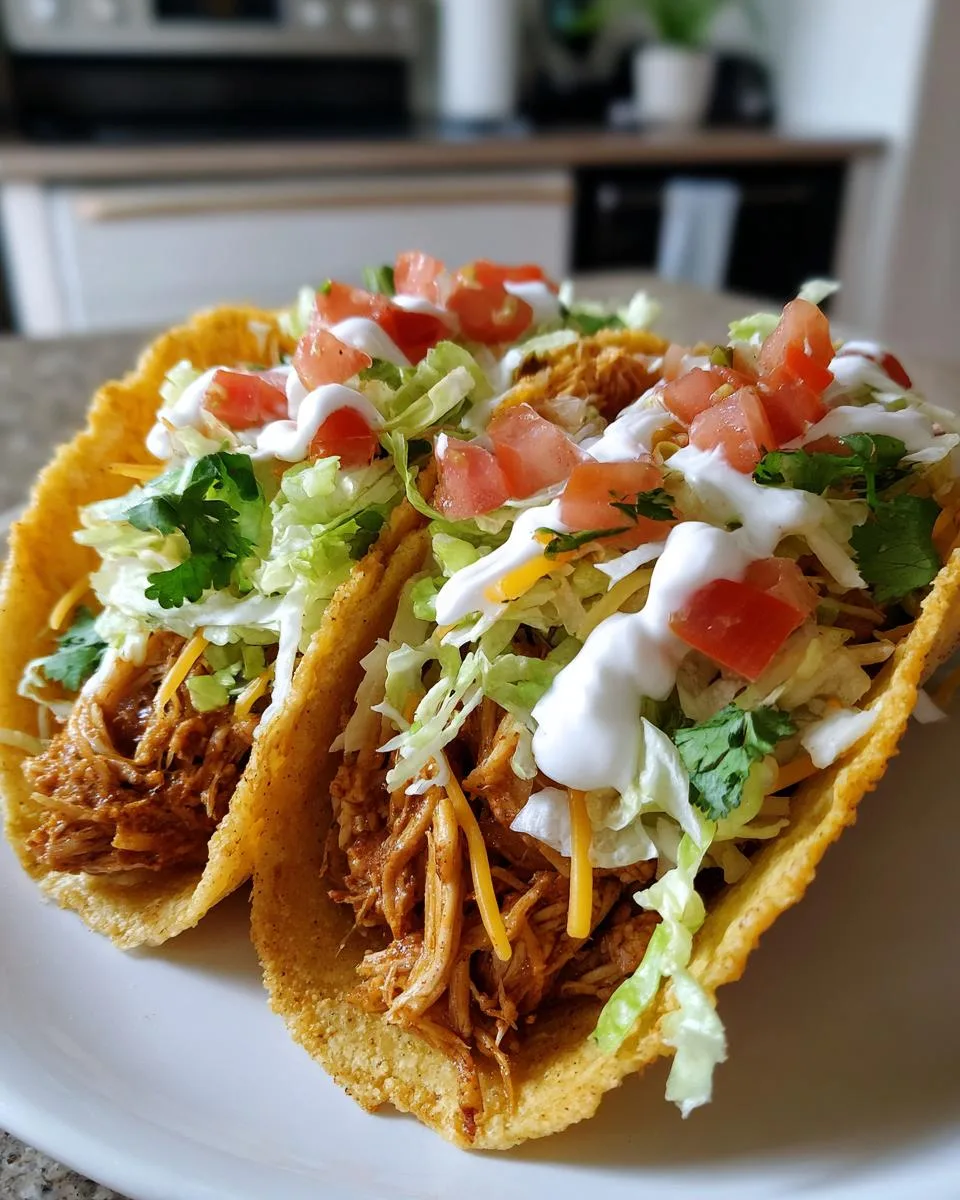
- Top with lettuce, tomatoes, cilantro, cheese, and sour cream.
Notes
- Use corn tortillas for extra crunch.
- Adjust spices to your taste.
- Store leftovers in an airtight container.
- Prep Time: 15 minutes
- Cook Time: 35 minutes
- Category: Main Dish
- Method: Baking
- Cuisine: Mexican
Nutrition
- Serving Size: 2 tacos
- Calories: 320
- Sugar: 2g
- Sodium: 450mg
- Fat: 12g
- Saturated Fat: 4g
- Unsaturated Fat: 6g
- Trans Fat: 0g
- Carbohydrates: 30g
- Fiber: 3g
- Protein: 22g
- Cholesterol: 60mg
Keywords: baked crunchy chicken tacos, easy taco recipe, crispy chicken tacos
How to Make Baked Crunchy Chicken Tacos
Alright, let’s get cooking! I promise this is easier than you think, just follow these steps and you’ll have tacos so crispy, you’ll hear the crunch from across the room. The key is letting the oven do all the heavy lifting while we focus on layering flavors.
Step 1: Season and Bake the Chicken
First things first, preheat that oven to 375°F. While it’s warming up, grab your chicken breasts and pat them dry with paper towels (this helps the spices stick better). Drizzle them with olive oil, I like to rub it in with my hands to make sure every inch is coated.
Now the fun part: mix all those gorgeous spices, chili powder, cumin, garlic powder, paprika, salt, and pepper, right on top of the chicken. Really massage it in there! Place the chicken on a baking sheet (I line mine with foil for easy cleanup) and pop it in the oven for about 25 minutes.
Watch out: Don’t crowd the chicken in the pan; give each breast some breathing room so they cook evenly. You’ll know they’re done when the internal temperature hits 165°F or the juices run clear.
Looking for something with a similar kick? These cheesy, comforting chicken enchiladas are a reader favorite, bringing that same spicy satisfaction in a saucy, baked format.
Step 2: Assemble and Crisp the Tacos
Once the chicken’s done, let it rest for 5 minutes (this keeps it juicy!), then shred it with two forks. Now comes the taco magic: Spoon the chicken onto tortillas, about 2-3 tablespoons per taco.
Important: Don’t overfill! Too much filling and your tacos won’t crisp properly.
Fold each tortilla in half like a taco should be, then arrange them on the baking sheet so they’re not touching. Give them space, these babies need airflow to get crunchy all over. Bake for 10 minutes until they’re golden and rigid.
Pro tip: Halfway through baking, peek at them. If they’re not browning evenly, rotate the pan. When they come out, let them sit for a minute before loading them up with toppings, this keeps the shells from getting soggy.
See? Easy as pie, except it’s tacos. And way more delicious. Now go pile on those fresh toppings and dig in!
Tips for Perfect Baked Crunchy Chicken Tacos
After making these tacos more times than I can count (seriously, my family requests them weekly), I’ve learned a few tricks that take them from good to “can I have thirds?” good. Here’s the inside scoop:
- Corn tortillas are non-negotiable – Flour tortillas just don’t get that signature crunch. Warm your corn tortillas for 10 seconds in the microwave first, it makes them more pliable so they won’t crack when folding.
- Spritz with oil before baking – A quick spray of cooking oil on the assembled tacos makes them crisp up like they’re fried. I use my Misto sprayer filled with avocado oil, but any cooking spray works.
- The dry chicken rule – Pat your cooked chicken dry with paper towels before shredding. That extra moisture will steam your tortillas instead of letting them crisp. Learned this the hard way after a batch of sad, floppy tacos!
- Two-stage topping – Add cheese right after baking so it melts into the hot chicken, then pile on cold toppings (lettuce, tomatoes) after. This keeps textures perfect, warm and melty inside, crisp outside, fresh and cool on top.
- Give them space – Crowding the baking sheet is the #1 reason tacos don’t crisp evenly. Leave at least 1/2 inch between each taco, if you need to bake in batches, it’s worth it!
One last thing: resist the urge to skip the 5-minute rest after baking. Those few minutes let the shells firm up so they don’t crack when you bite in. Trust me on this, it’s the difference between a taco that holds together and one that becomes a chicken salad!
For a complete meal, consider serving your tacos alongside this street corn chicken rice bowl, it’s a hearty side that turns any taco night into a full feast.
Ingredient Substitutions for Baked Crunchy Chicken Tacos
Listen, I get it, we don’t always have every ingredient on hand, or maybe you’re cooking for someone with dietary restrictions. The beauty of these tacos is how adaptable they are! Here are my tried-and-true swaps that keep the crunch intact while working with what you’ve got:
- No chicken? No problem! Use 1 can (15 oz) black beans, drained and mashed slightly, for a vegetarian version. Season them with the same spice mix, just warm them in a skillet first to blend flavors.
- Out of sour cream? Greek yogurt works like a charm in equal amounts (1/4 cup). It’s tangier, so I sometimes add a squeeze of lime to balance it. Vegan? Try cashew cream blended with a pinch of salt.
- Cheese swaps: Skip the dairy with nutritional yeast (2 tablespoons) for a nutty flavor, or use pepper jack if you want more heat. For meltability, Daiya’s vegan shreds actually work surprisingly well here.
- Tortilla alternatives: While corn tortillas are king for crunch, gluten-free almond flour tortillas crisp up nicely too, just bake them 2 minutes less to prevent burning.
- Spice adjustments: Out of chili powder? Mix 1/2 tsp smoked paprika + 1/4 tsp cayenne. No cumin? A dash of coriander gives a similar earthy note.
My favorite accidental discovery? Using leftover rotisserie chicken when I’m really short on time. Just shred 2 cups, toss with the spices and 1 tbsp oil, and bake for 5 minutes to warm through. The flavor’s different but still delicious, and hey, dinner’s ready in 15 minutes flat!
Remember: substitutions should make your life easier, not stress you out. As my abuela used to say, “The best taco is the one you actually make.”
Prefer a meatless version with all the crunch? These air fryer cauliflower tacos are a delicious vegetarian spin, offering bold flavor and satisfying texture with every bite.
Serving Suggestions for Baked Crunchy Chicken Tacos
Oh, the joy of building the perfect taco plate! Let me tell you how I take these baked crunchy chicken tacos from “yum” to “wow”, it’s all about the supporting cast. Here’s how we do taco night right at my house:
First, lime wedges are mandatory, that bright squeeze right before biting wakes up all the flavors. Then, I go for contrasts: creamy guacamole (my quick mash of 2 avocados + lime + salt) cools the spice, while pickled red onions (just soak thin slices in vinegar for 10 minutes) add tangy crunch.
For sides? Mexican rice cooked in chicken broth soaks up any runaway taco juices beautifully. When I’m feeling fancy, charred street corn (mayo, cotija cheese, and chili powder) steals the show. And for the kids? A simple black bean salad, just toss drained beans with corn, cilantro, and a glug of olive oil.
The secret? Keep toppings in little bowls so everyone can build their perfect bite. Watch how fast those crispy tacos disappear when you’ve got all the fixings laid out like a taco bar!
Storing and Reheating Baked Crunchy Chicken Tacos
Here’s the good news: these tacos actually keep surprisingly well! But, and this is a big but, only if you store them right. After one too many sad microwave-reheated taco tragedies, I’ve perfected the art of keeping that gorgeous crunch intact for leftovers.
For storing: Let the tacos cool completely (about 20 minutes) before packing them up. I layer them between sheets of parchment paper in an airtight container, this prevents sticking. The baked shells will keep like this for up to 3 days in the fridge. Important: Store toppings separately! Nothing turns tacos soggier faster than pre-added lettuce and tomatoes.
Reheating magic: That poor microwave is not your friend here. Instead, pop the tacos on a baking sheet in a 350°F oven for 5-7 minutes. They’ll crisp right back up! No oven? A toaster oven works even better, just watch them closely so they don’t get too dark. For extra insurance against sogginess, I sometimes spray them lightly with oil before reheating.
Pro tip: If you’ve got leftover filling but no assembled tacos, store the chicken separately and bake fresh tortillas when ready to eat. They’ll taste just-made every time!
Nutritional Information for Baked Crunchy Chicken Tacos
Okay, let’s talk numbers, because who doesn’t want to know they’re eating something delicious and decently wholesome? Now, full disclosure: these are estimates based on my exact recipe. Your numbers might dance a bit depending on tortilla thickness or how enthusiastically you pile on that cheese! (No judgment, I’ve been there.)
Here’s the breakdown per two tacos, because let’s be real, who stops at one?
- Calories: 320 (that’s less than most fast-food tacos!)
- Protein: 22g (thanks, chicken!)
- Carbohydrates: 30g (mostly from those glorious corn tortillas)
- Fiber: 3g (the lettuce and tomatoes help here)
- Sugar: 2g (just the natural stuff from veggies)
- Fat: 12g (but only 4g saturated, olive oil for the win)
- Sodium: 450mg (easy to reduce if you go lighter on the salt)
Now, if you’re like me and add an extra dollop of sour cream or an avalanche of cheese, obviously those numbers climb. But compared to fried tacos swimming in oil? These baked beauties are practically health food. I love that I can enjoy two (okay, sometimes three) without that heavy “why did I do this to myself” feeling afterward!
Remember: Nutrition is personal, adjust toppings to fit your needs. More veggies? Fewer carbs. Extra chicken? Protein boost. That’s the beauty of homemade, you’re the boss of your taco destiny.
Share Your Baked Crunchy Chicken Tacos
Nothing makes me happier than seeing your taco creations! Seriously, every time someone sends me a photo of their golden-brown tacos piled high with toppings, I do a little happy dance in my kitchen. Did you add extra jalapeños? Maybe swap in some unexpected toppings? I want to hear all about it!
Some of my favorite recipe tweaks have come from readers, like the genius who added chipotle powder to the spice mix (game changer!) or the mom who let her kids decorate their tacos with edible flowers. Your kitchen, your rules! Drop a comment below to tell me how your version turned out, or tag me on Instagram so I can admire your handiwork.
And hey, if something didn’t quite work? Tell me that, too! Maybe your tortillas cracked (been there) or the cheese didn’t melt right (done that). We’re all learning together, and every crumpled taco is just one step closer to taco perfection.
Now go forth and crisp those tortillas. I can’t wait to see what you create! And if you’re hosting game night or a casual party, these BBQ chicken nachos make the perfect crunchy, cheesy appetizer with a smoky-sweet twist.
FAQs About Baked Crunchy Chicken Tacos
Can I use flour tortillas instead of corn?
You can, but, and this is a big but, they won’t get nearly as crispy. Flour tortillas tend to stay soft and chewy when baked. If that’s all you have, try brushing them lightly with oil and baking an extra 2-3 minutes. But for that signature crunch? Corn tortillas are the way to go!
Why did my tacos turn out soggy?
Ah, the heartbreak of a limp taco! Usually it’s one of three things: overfilling (stick to 2-3 tbsp chicken per taco), wet toppings added too soon (wait until after baking!), or not baking them long enough. My golden rule? If the taco shell doesn’t hold its shape when you pick it up, it needs more oven time.
Can I make these ahead for a party?
Absolutely! Bake the chicken and prep toppings up to a day ahead, but assemble and crisp the tacos right before serving. For buffet situations, I keep the baked shells warm in a 200°F oven (uncovered) for up to 30 minutes, they stay remarkably crisp!
What’s the best way to reheat leftovers?
Repeat after me: no microwave! To revive leftover tacos, pop them in a 350°F oven for 5-7 minutes. For extra crispiness, spritz them lightly with oil first. They won’t be quite as perfect as fresh, but they’ll still put Taco Tuesday to shame.
Can I freeze these tacos?
Here’s the deal, you can freeze the filling beautifully for up to 3 months, but the assembled tacos don’t freeze well (the tortillas get weirdly leathery). My move? Double the chicken batch, freeze half, and bake fresh tortillas when the craving strikes. Dinner solved!
Still stumped? Drop your taco troubles in the comments, I’ve probably made that mistake already and can help!


