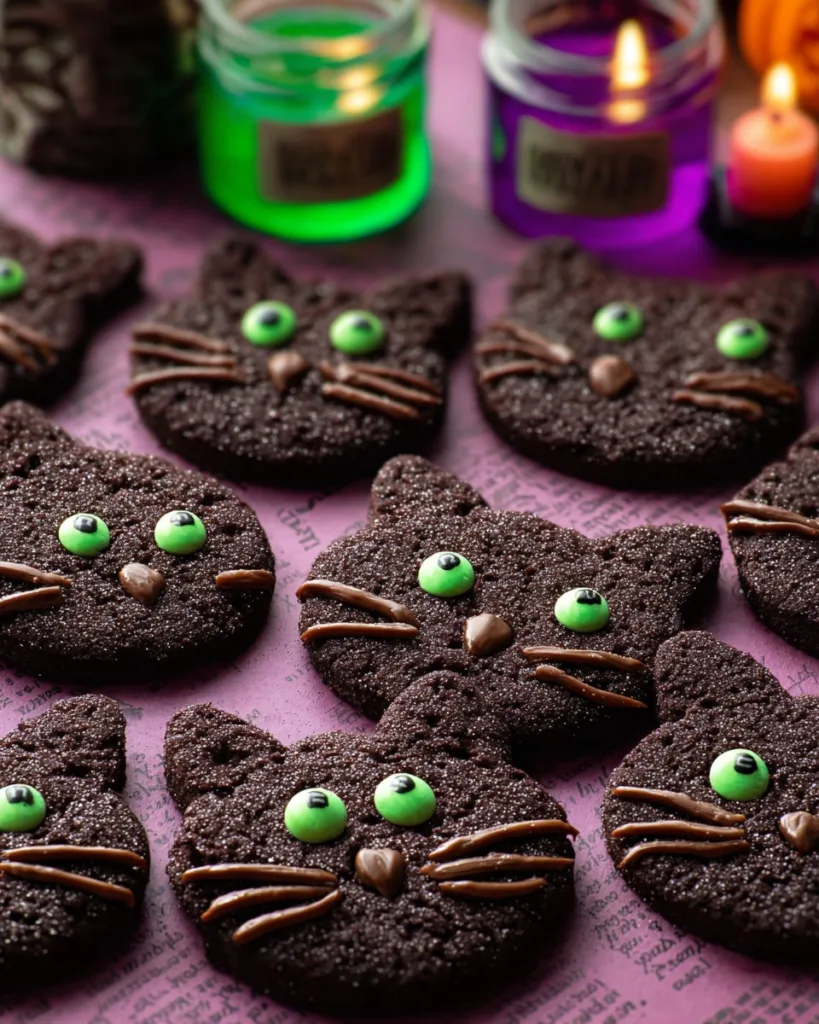
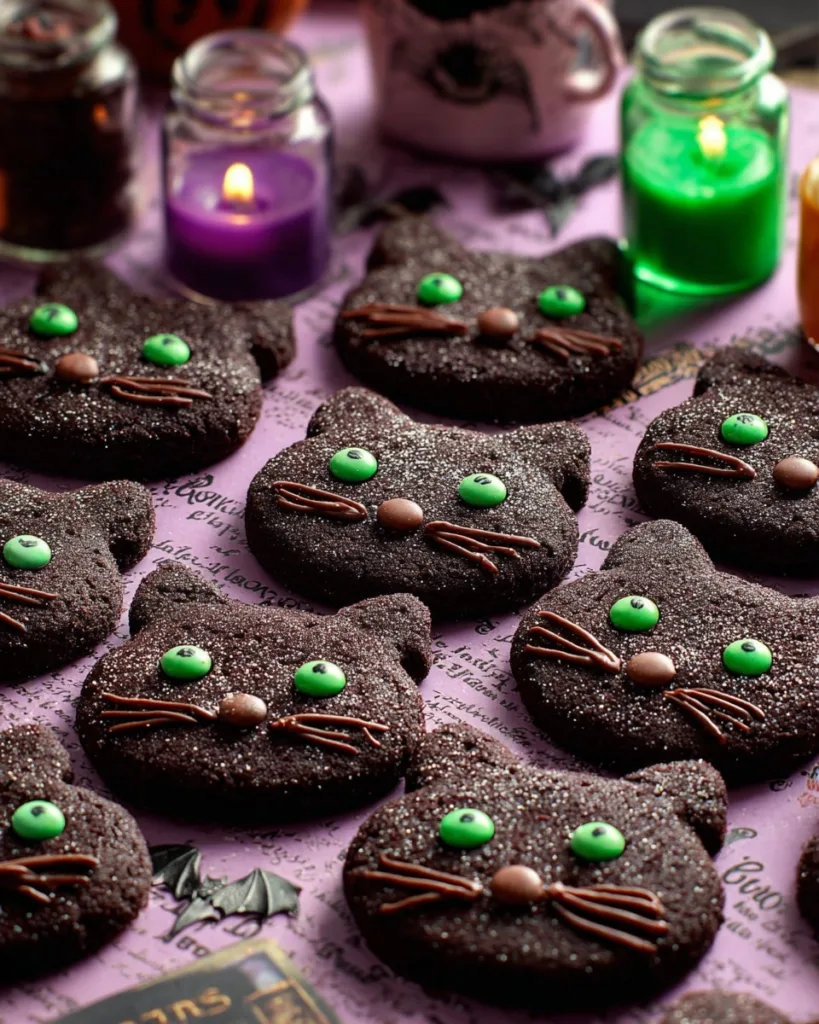
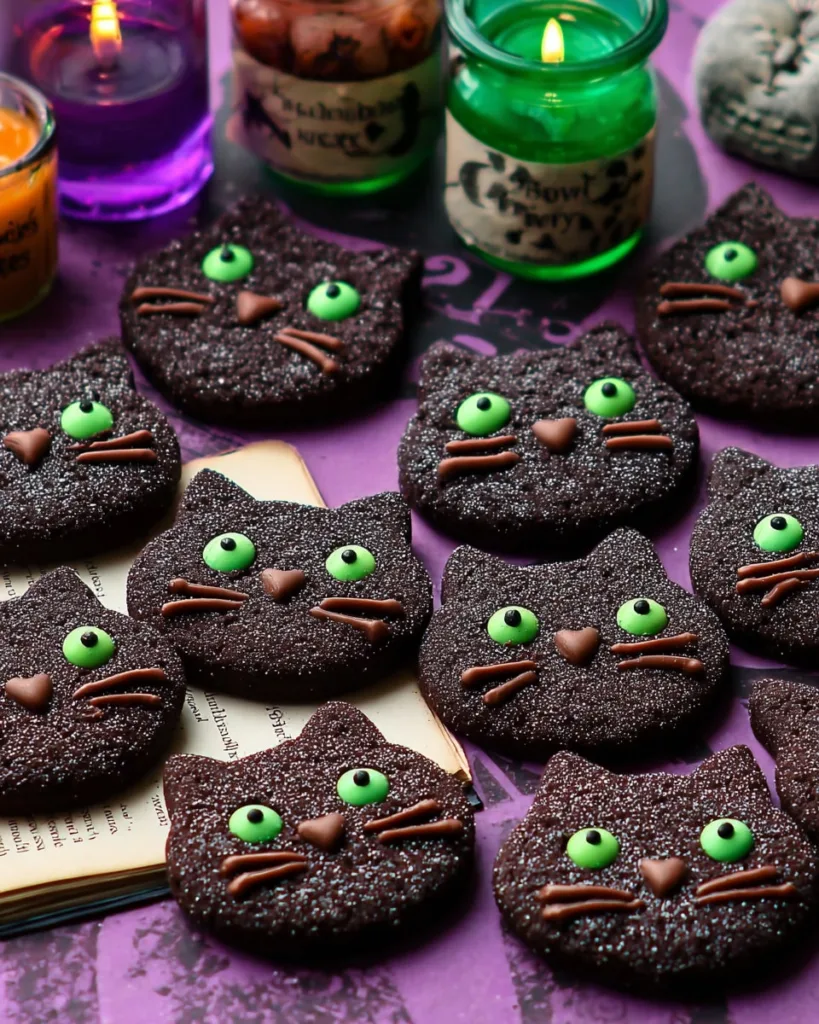
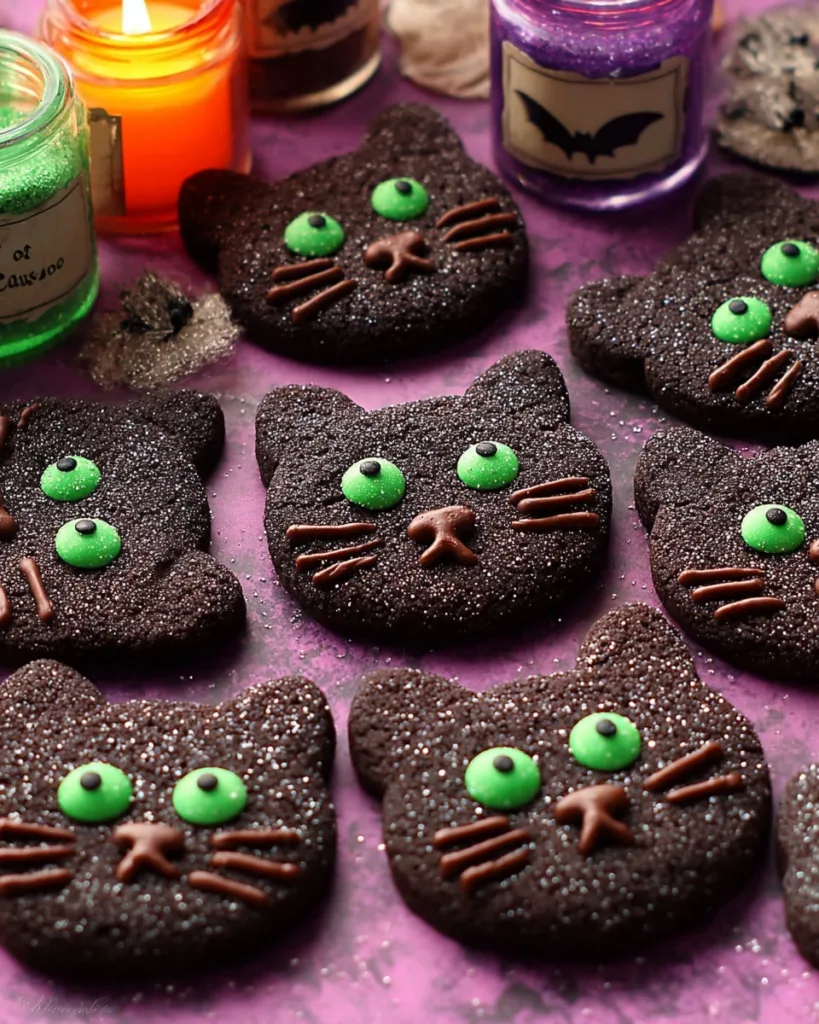
It’s just a bunch of Hocus Pocus… in the most delicious cookie form! If your Halloween isn’t complete without the Sanderson sisters, then you need to summon a batch of these magical Hocus Pocus Binx Cookies. Inspired by everyone’s favorite loyal black cat, this recipe creates incredibly soft, fudgy chocolate cookies that are the perfect canvas for a fun decorating project.
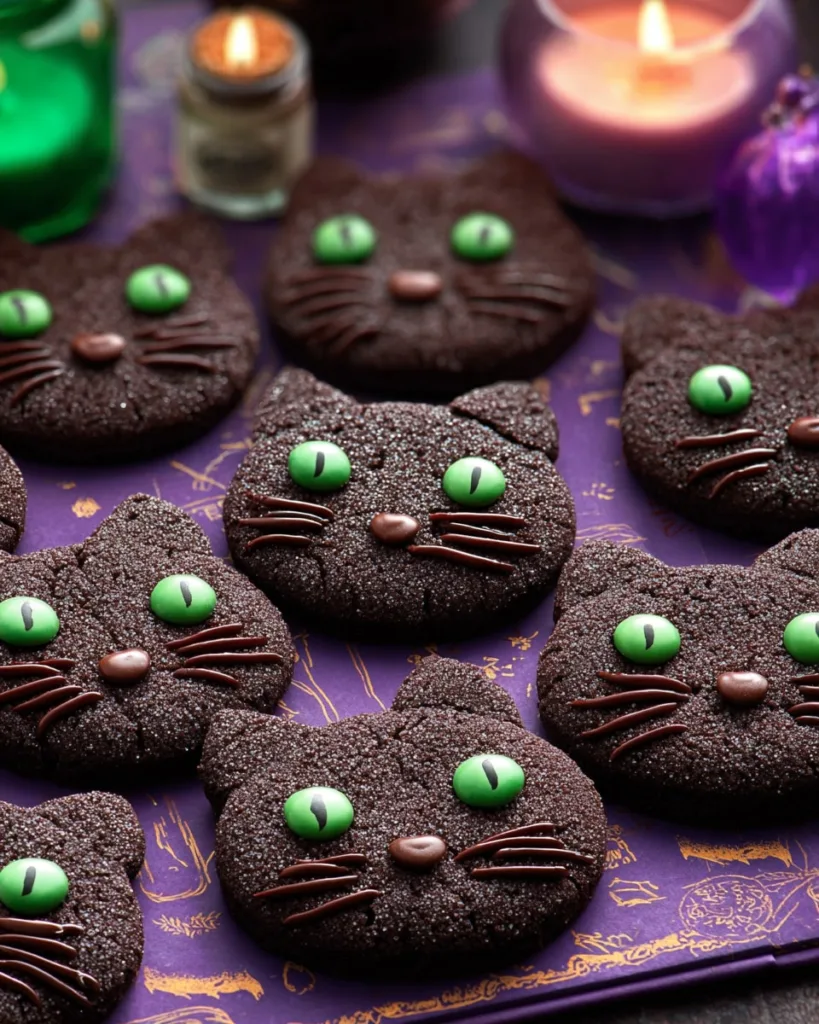
This recipe became a tradition in our house after my kids begged for a “Binx treat” during our annual Hocus Pocus movie marathon. Our first few attempts were hilariously wonky (more like disgruntled raccoons than heroic felines!), but we finally perfected this easy, no-chill dough. It uses black cocoa powder to achieve that perfect midnight fur color, with a sprinkle of sanding sugar for a touch of bewitching sparkle.
What makes these the ultimate Halloween treat? They perfectly capture the mischievous fun of the film. Each bite is rich and chocolatey, and decorating them with candy eyes and almond-slice ears is a spellbinding activity for kids and adults alike. Whether you’re hosting a spooky celebration or just need the perfect cookie for your movie night, these Binx cookies are pure magic.
Table of Contents
Why You’ll Love These Hocus Pocus Binx Cookies
These cookies aren’t just delicious, they’re an experience! Here’s why they’ve become my go-to Halloween treat year after year:
- Halloween magic made edible: With their jet-black color and playful cat faces, they capture Binx’s mischievous spirit perfectly. I love watching people’s faces light up when they see these on my dessert table!
- Fun for all ages: Kids adore decorating the cookies (and sneaking M&Ms), while adults appreciate the sophisticated chocolate flavor. It’s the rare recipe that keeps both my 8-year-old niece and foodie sister happy.
- Surprisingly simple: Despite their fancy look, these come together with basic baking tools. The dough is forgiving, and the decorations are easy to customize, no pastry chef skills required!
- Party-perfect: They travel well, stay fresh for days, and make fantastic edible favors. I’ve tied them in cellophane with black ribbon for the cutest “familiar” gifts.
Ingredients for Hocus Pocus Binx Cookies
Gathering the right ingredients is like assembling a witch’s potion, each element adds its own special magic! Here’s what you’ll need to bring these feline cookies to life:
- The Dry Team:
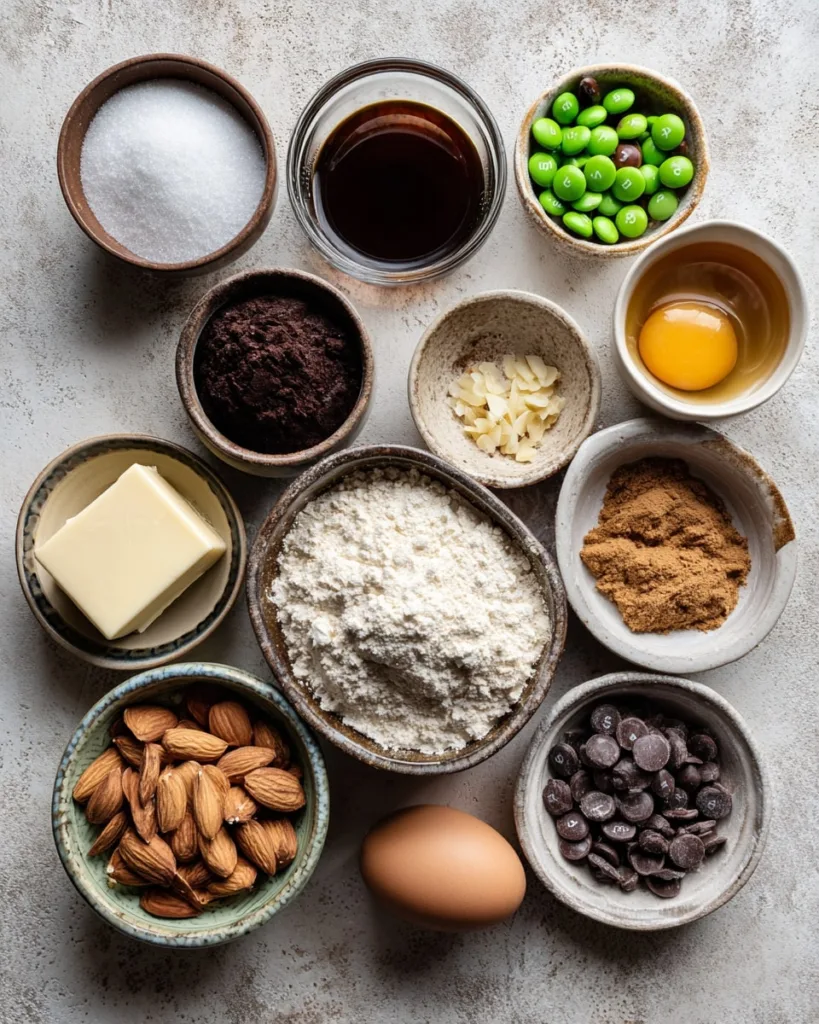
- 1 1/2 cups (180g) all-purpose flour (spooned & leveled)
- 1/4 cup (20g) black cocoa powder (for that deep midnight color!)
- 1/2 tsp baking soda
- 1/4 tsp kosher salt
- The Wet Crew:
- 1/2 cup (1 stick/113g) unsalted butter, softened (not melted, leave it out for 30 minutes)
- 3/4 cup (150g) granulated sugar
- 1/2 cup (105g) packed light brown sugar (press it firmly into your measuring cup)
- 1 large egg (straight from the fridge is fine)
- 1 tsp pure vanilla extract
- The Decorations:
- Sanding sugar for rolling (about 1/4 cup)
- 48 sliced raw almonds (for ears and whiskers)
- 1/4 cup semisweet chocolate chips (melted for details)
- 48 mini green M&M’s (pupils)
- 24 mini brown M&M’s (noses)
Pro Tip: Don’t skip the black cocoa powder, it’s what gives Binx his signature dark fur look! Regular cocoa works in a pinch, but your cookies will be more “tabby cat” than “midnight familiar.” Find black cocoa online or in specialty baking stores (I get mine from the local spice shop). The extra hunt is worth it when you see those spooky-dark cookies come out of the oven!
Equipment Needed
No cauldron required, just a few basic kitchen tools to whip up these magical cookies! Here’s what I always grab:
- Mixing bowls: One medium for dry ingredients, one large for creaming butter and sugar (my trusty stainless steel set never lets me down)
- Electric mixer: A hand mixer works perfectly, though I’ve used a wooden spoon when desperate (just expect an arm workout!)
- Baking sheets: Two rimmed pans lined with parchment paper (no sticking, easy cleanup, witchcraft!)
- Cookie scoop: A 1.5-tablespoon scoop makes uniform dough balls, but a tablespoon measure works too
- Piping bag: For the chocolate details, or grab a zip-top bag and snip the tiniest corner (my hack when I can’t find my piping tips)
Bonus helpers: A small paintbrush for nudging almond slices into place, and extra parchment for my inevitable “oops, that whisker’s crooked” fixes!
How to Make Hocus Pocus Binx Cookies
Okay, let’s turn that dough into a whole litter of Binx cookies! Trust me, it’s easier than outrunning the Sanderson sisters, just follow these steps:
- Mix the dry ingredients: In your medium bowl, whisk together the flour, black cocoa powder, baking soda, and salt. I like to sift the cocoa to avoid lumps, nobody wants a gritty familiar!
- Cream the butter and sugars: In your large bowl, beat the softened butter, granulated sugar, and brown sugar with your mixer on medium until light and fluffy (about 2 minutes). Scrape down the sides, those sneaky sugar pockets love to hide!
- Add wet ingredients: Beat in the egg and vanilla until just combined. The mixture might look a little curdled, totally normal! It’ll come together when you add the dry ingredients.
- Combine everything: Gradually add the dry ingredients to the wet, mixing on low until no flour streaks remain. The dough will be thick and slightly sticky, perfect for shaping!
- Chill the dough: Cover the bowl and refrigerate for at least 30 minutes (up to 2 days). This step is crucial, it prevents flat, spread-out cats and makes the dough easier to handle. Pro tip: If you’re impatient like me, pop it in the freezer for 15 minutes instead!
- Prep for baking: Preheat your oven to 350°F (175°C) and line baking sheets with parchment paper. Pour sand sugar into a small bowl; you’ll need about 1/4 cup for rolling.
- Shape the bodies: Use your cookie scoop to portion 24 dough balls (about 1.5 tablespoons each). Roll each into a smooth ball, then roll in sanding sugar to coat. Place on baking sheets 2 inches apart and flatten gently into 2-inch circles with your palm or a glass.
Shaping and Decorating the Cookies
Now for the fun part, bringing Binx to life! Work with one cookie at a time so the dough stays cool:
- Ears: Pinch off two pea-sized dough pieces per cookie. Roll into balls, coat with sugar, and press onto the top edges of each circle. Gently pinch the tops to form triangles, they’ll soften slightly while baking.
- Eyes: Press two almond slices into each cookie, pointed ends facing inward like cat eyes. If they won’t stick, dab a tiny bit of water on the backs first.
- Bake: 8-10 minutes until edges are set but centers still look slightly soft. They’ll firm up as they cool! Let them rest on the pan for 5 minutes before transferring to a wire rack, almond ears are fragile when hot.
- Final touches: Once completely cool, melt chocolate chips and pipe pupils onto the almonds (a toothpick works too). Add green M&M’s for eyes, a brown one for the nose, and two chocolate whiskers per side. Voilà, instant familiars!
Troubleshooting tip: If your dough gets too soft while shaping, freeze the baking sheet for 5 minutes before adding decorations. And if cookies spread too much? Your butter was probably too warm. Next time, chill the shaped cookies for 10 extra minutes before baking.
Tips for Perfect Hocus Pocus Binx Cookies
After making these cookies more times than I can count (okay, maybe 17 times last October alone), I’ve picked up some tricks to ensure your Binx cookies turn out purr-fect every time:
- Butter temperature is key: Too soft and your cookies will spread into puddles; too cold and they won’t cream properly. I do the “finger test”, it should leave a slight indent without sinking all the way through.
- Don’t overmix the dough: Once you add the dry ingredients, mix just until combined. Overworked dough makes tough cookies, and Binx deserves better than that!
- Rotate your pans: Halfway through baking, swap the top and bottom sheets for even browning. My oven has hot spots that could rival a witch’s cauldron!
- Sanding sugar swap: No fancy sugar? Granulated works fine, just pulse it in a blender for 10 seconds to make it finer. Or for extra sparkle, mix in a pinch of edible glitter (because magic!).
- Almond alternatives: If nuts are a no-go, use extra dough to shape pointy ears, or pipe chocolate triangles instead. I’ve even seen creative souls use black licorice!
Remember: Even “imperfect” Binx cookies taste amazing. So what if one eye’s wonky? Call it his “I just saw the Sanderson sisters” expression!
Storing and Serving Suggestions
These Binx cookies stay deliciously fresh for days, if they last that long! Here’s how to keep your feline treats in purr-fect condition:
- Room temperature storage: Once decorated, stack cookies between parchment paper in an airtight container. They’ll stay soft and tasty for up to 3 days (though mine usually disappear by Halloween night!).
- Freezer magic: Shape and freeze unbaked dough balls for up to 1 month, just add 1-2 extra minutes to the bake time straight from frozen. Perfect for last-minute “Oh no, I need witchy cookies!” emergencies!
- Serving ideas: Pair with cold milk (Binx’s favorite) or spooky drinks like “witches’ brew” punch. I love arranging them on a black cake stand with dry ice for a dramatic Halloween dessert table!
Pro tip: Store extra chocolate-decorated cookies in a single layer, the designs stay crisp that way. Trust me, I learned this after the Great Whisker Smudge Incident of 2021!
Nutritional Information
Each of these mischievous Binx cookies clocks in at about 220 calories, with 8g fat (4g saturated) and 15g sugar – not bad for a magical treat! Keep in mind, these are estimates – your actual numbers might wiggle a bit depending on your ingredient brands and how generously you apply that sanding sugar (no judgment here!). They’re definitely an occasional indulgence, but hey, Halloween only comes once a year!
FAQs About Hocus Pocus Binx Cookies
Can I use regular cocoa powder instead of black cocoa?
Absolutely! Your cookies will have more of a “milk chocolate” look than Binx’s midnight fur, but they’ll still taste delicious. For a happy medium, try mixing half regular cocoa and half black cocoa.
Help, my dough is crumbly! What do I do?
No panic needed! Just add 1 teaspoon of milk at a time until the dough comes together. I’ve saved many batches this way, usually it means the flour measurement was a touch heavy or the butter wasn’t quite soft enough.
Any way to make these vegan?
You bet! Swap the butter for dairy-free butter sticks, use a flax egg (1 tbsp ground flax + 3 tbsp water), and choose vegan M&Ms. The dough might be slightly softer, so chill it longer before shaping.
My cookies spread too much, what went wrong?
Usually means the butter was too soft or the dough wasn’t chilled enough. Next time, try freezing the shaped cookies for 10 minutes before baking. And resist the urge to peek, opening the oven door causes temperature drops that make cookies spread!
Can I skip the almonds for allergies?
Of course! Pipe chocolate triangles for ears instead, or use thin pretzel sticks for whiskers. One creative reader even used black licorice laces, genius!
Why These Hocus Pocus Binx Cookies Are the Best
These Hocus Pocus Binx Cookies are the perfect Halloween treat for fans of the classic movie. With their adorable black cat design, soft cookie texture, and festive details, they’re both fun to make and delicious to eat. Perfect for Halloween parties, movie nights, or spooky bake sales, these cookies bring a touch of magic to every bite. Even better, they’re simple enough that the whole family can help decorate.
If you’re looking for a creative and tasty way to celebrate Halloween, this recipe is a must-try! Give it a go and let me know how yours turn out in the comments. Don’t forget to follow along on Facebook, Instagram, and Pinterest for even more festive recipe inspiration.
More Halloween Recipes You’ll Love
If you loved these Hocus Pocus Binx Cookies, don’t miss out on these other fun and spooky Halloween treats. They’re easy to make, family-friendly, and guaranteed to wow at any party:
Each recipe is a festive favorite that pairs perfectly with your Hocus Pocus Binx Cookies, helping you create the ultimate Halloween spread.
Print
Hocus Pocus Binx Cookies
- Total Time: 1 hour 45 minutes
- Yield: 24 cookies 1x
- Diet: Vegetarian
Description
These playful cat-shaped cookies are inspired by Binx from Hocus Pocus. Soft, chocolatey, and decorated with candy eyes and whiskers, they’re a fun Halloween treat that kids and adults will love.
Ingredients
- 1 1/2 cups all-purpose flour (180 g)
- 1/4 cup black cocoa powder (20 g)
- 1/2 teaspoon baking soda
- 1/4 teaspoon kosher salt
- 3/4 cup granulated sugar (150 g)
- 1/2 cup unsalted butter, softened (1 stick)
- 1/2 cup packed light brown sugar (105 g)
- 1 large egg
- 1 teaspoon pure vanilla extract
- Sanding sugar for rolling
- 48 sliced raw almonds
- 1/4 cup semisweet chocolate chips
- 48 mini green M&M’s
- 24 mini brown M&M’s
Instructions
- In a medium bowl, whisk together flour, cocoa powder, baking soda, and salt.
- In a large bowl, beat granulated sugar, butter, and brown sugar with an electric mixer until creamy. Add the egg and vanilla, mixing until combined. Slowly add dry ingredients and beat until just blended. Cover and refrigerate dough for at least 30 minutes, or up to 2 days.
- Preheat oven to 350°F. Line two baking sheets with parchment paper. Using a medium cookie scoop, scoop 24 balls of dough. Roll into 1-inch balls, coat with sanding sugar, and place 2 inches apart on baking sheets. Flatten each into a 2-inch circle.
- For ears, roll small pieces of dough into 1/2-inch balls, coat with sanding sugar, and attach two to the top edge of each circle. Pinch slightly to form triangle shapes.
- Place two almond slices on each cookie for eyes, pointed ends facing inward.
- Bake 8 to 10 minutes, until edges are set. Cool on the pan for 5 minutes, then transfer to a wire rack to cool completely.
- Melt chocolate chips in a microwave-safe bowl in 10-second intervals, stirring until smooth. Transfer to a piping bag or zip-top bag with a small tip. Pipe chocolate dots in the center of almond slices, add green M&M’s for pupils. Pipe a dot under the eyes and attach a brown M&M for the nose. Pipe two whiskers on each side. Let chocolate set before serving.
Notes
- Make Ahead Tip: Cookies can be made up to 3 days ahead and stored in an airtight container at room temperature.
- Prep Time: 10 minutes
- Cook Time: 10 minutes
- Category: Halloween
- Method: Baking
- Cuisine: American
Nutrition
- Serving Size: 1 cookie
- Calories: 220 kcal
- Sugar: 15g
- Sodium: 50mg
- Fat: 8g
- Saturated Fat: 4g
- Unsaturated Fat: 3g
- Trans Fat: 0g
- Carbohydrates: 35g
- Fiber: 2g
- Protein: 3g
- Cholesterol: 20mg
Keywords: Hocus Pocus Binx Cookies, Halloween cookies, chocolate cookies, Binx-inspired cookies


