Oh my goodness, let me tell you about the first time I made this Black Velvet Layer Cake – it was love at first bite! I’ll never forget how my kitchen looked like a mad scientist’s lab with all that black gel food coloring. But when I pulled those dark, mysterious layers out of the oven… wow. Just wow.
This isn’t your average chocolate cake – it’s something special. That deep, rich black color makes it perfect for Halloween, elegant dinners, or anytime you want to impress. And the taste? The perfect balance of moist, tender crumb with a hint of cocoa that plays so nicely with the tangy cream cheese frosting.
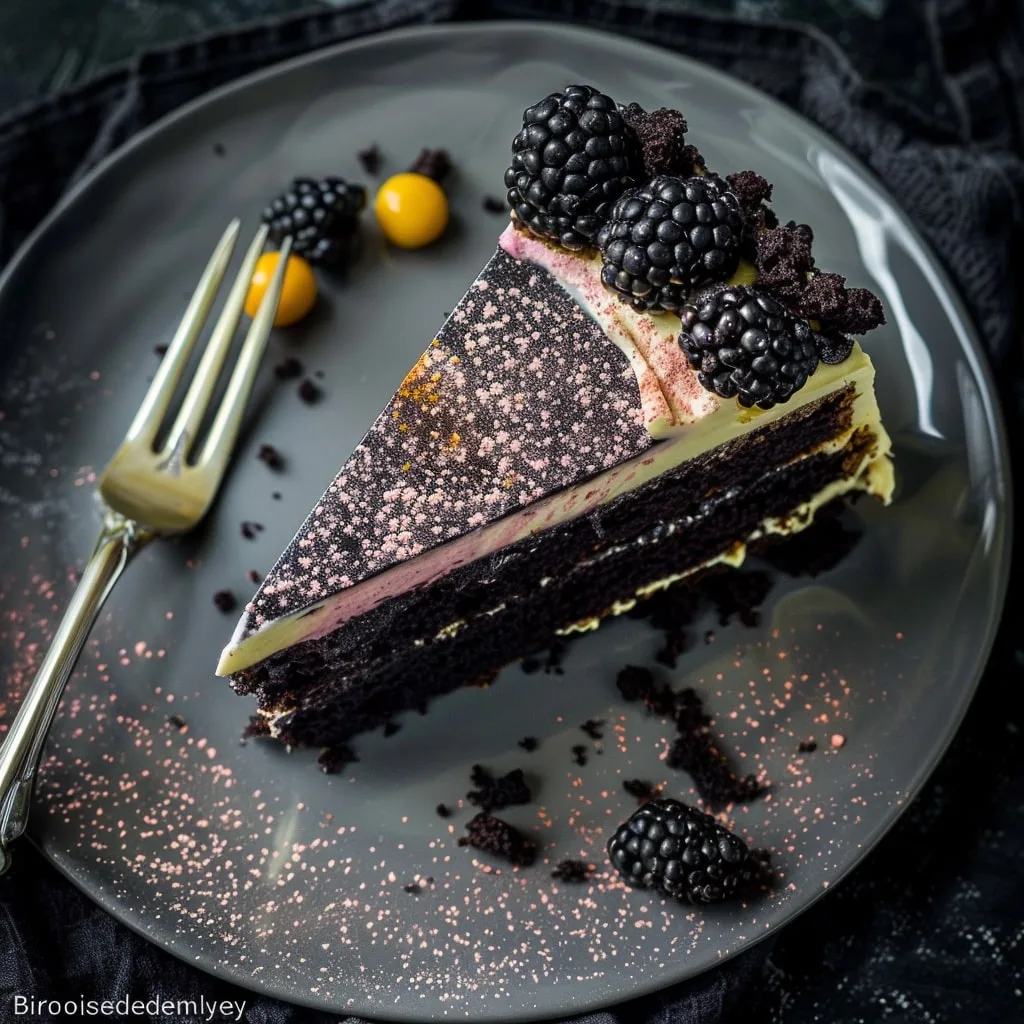
I remember bringing this to my niece’s birthday party last year – all the kids went wild for the “goth cake” (their words, not mine!). But here’s the secret: despite its dramatic appearance, this cake comes together surprisingly easily. Just wait until you see people’s faces when you slice into it – those jet-black layers against the snowy white frosting are absolute showstoppers!
Why You’ll Love This Black Velvet Layer Cake
Listen, this isn’t just another cake recipe – this Black Velvet Layer Cake is going to become your new go-to showstopper! Here’s why:
- That dramatic black color – It’s pure baking magic how a few drops of gel coloring transforms ordinary cake into something so striking
- Moist texture for days – The buttermilk and oil keep this cake tender and fresh, even after refrigeration
- Perfect flavor balance – Just enough cocoa to complement the vanilla, without being overly chocolatey
- Foolproof decorating – The cream cheese frosting is so forgiving, even if your layers aren’t perfectly level
- Endless versatility – Dress it up for special occasions or keep it simple for everyday treats
Trust me, once you see how people react to this cake, you’ll be making it all the time. My neighbor still talks about the one I brought to the block party last summer!
Essential Ingredients for Black Velvet Layer Cake
Okay, let’s talk ingredients – because every great cake starts with the right stuff! After making this Black Velvet Layer Cake more times than I can count, I’ve learned exactly what works (and what doesn’t). Here’s your shopping list with all my little notes:
- 4 large eggs, room temperature and separated – This is crucial! Cold eggs don’t whip properly. I leave mine out for at least an hour before baking.
- 2 ½ cups (300g) all-purpose flour – Spoon and level it, friends. No packing!
- ½ cup (60g) cornstarch – Our secret for that ultra-tender crumb.
- 3 tablespoons (22g) unsweetened cocoa powder – Use natural, not Dutch-process for the right flavor.
- 1 teaspoon salt – Don’t skip this – it balances all the sweetness.
- 1 teaspoon baking soda – Fresh is best – check the expiration date!
- ½ cup (113g) unsalted butter, softened – I mean really soft – you should leave a fingerprint when pressed.
- 2 cups (400g) granulated sugar – Regular white sugar works perfectly here.
- ⅔ cup (160mL) vegetable oil – This keeps our cake moist for days.
- 3 teaspoons vanilla extract – Splurge on the good stuff – it makes a difference.
- 2 teaspoons distilled white vinegar – Sounds weird, but trust me, it works magic with the baking soda.
- 3 teaspoons black gel coloring – Liquid won’t give you that deep black we want.
- 1 cup (240mL) buttermilk – The tang is essential for authentic flavor.
Ingredient Substitutions & Notes
No buttermilk? No problem! Here are my tried-and-true swaps when you’re in a pinch:
- Buttermilk substitute: Mix 1 cup milk with 1 tablespoon lemon juice or vinegar. Let it sit 5 minutes until slightly thickened.
- No gel coloring? You’ll need about 1 ounce of liquid black, but the color won’t be as intense. Add it to the wet ingredients first.
- Allergic to eggs? I’ve had success with ¾ cup unsweetened applesauce instead of eggs – though the texture changes slightly.
- Short on time? You can use store-bought cream cheese frosting, but homemade is SO much better.
A word about the food coloring – that gel really is key. I made the mistake of using liquid once and ended up with a sad gray cake. Learn from my mistake!
Equipment You’ll Need for Black Velvet Layer Cake
Before we dive into mixing, let’s gather our tools – because nothing’s worse than realizing halfway through that you’re missing something crucial! Here’s what I always have ready when making my Black Velvet Layer Cake:
- Stand mixer or handheld electric mixer – Your arms will thank you when creaming that butter and sugar!
- Two 8-inch round cake pans – Not 9-inch! The smaller size gives us those perfect tall layers.
- Sifter or fine mesh strainer – For getting rid of any lumps in our dry ingredients.
- Rubber spatulas – One for folding, one for scraping – I always use two to keep things tidy.
- Cake strips (optional but awesome) – These help bake perfectly flat layers – no dome to trim!
- Cooling racks – Essential for letting our cakes cool properly before frosting.
Pro tip from my many kitchen messes: line those pans with parchment circles too – it makes cake release foolproof! Now let’s get baking.
How to Make Black Velvet Layer Cake
Alright, let’s get our hands dirty – well, not literally, unless you’re as messy as I am with food coloring! Making this Black Velvet Layer Cake is easier than you might think, especially if you follow my step-by-step guide. I’ve made every mistake possible so you don’t have to!
Preparing the Cake Batter
First things first – preheat that oven to 350°F (177°C). Now let’s tackle the batter:
Start by separating those eggs – yolks in one bowl, whites in another. Use your mixer to whip the whites to soft peaks (they should hold their shape but still flop over when you lift the beater). Set these aside – they’re our secret weapon for a light texture!
Now sift together all the dry ingredients – flour, cornstarch, cocoa powder, salt, and baking soda. I know sifting seems old-school, but trust me, it makes all the difference in getting that smooth, lump-free batter.
In your mixing bowl, cream the butter and sugar until it’s light and fluffy – about 3 minutes on medium speed. Then add the oil, egg yolks, vanilla, vinegar, and that magical black gel coloring. The batter will look like something from a witch’s cauldron at this point – embrace it!
Here’s the key part: alternate adding the dry ingredients and buttermilk, starting and ending with dry. Mix just until combined after each addition – overmixing is the enemy! Finally, gently fold in those whipped egg whites with a rubber spatula. You’ll see the batter transform into this gorgeous, airy black cloud.
Baking and Cooling the Layers
Divide that beautiful black batter evenly between your prepared pans – I like to use a kitchen scale for precision. Smooth the tops gently, then pop them in the oven.
Set your timer for 22 minutes, but don’t wander off! Ovens vary, and ours needs to bake for 22-24 minutes total. The cakes are done when:
- A toothpick inserted comes out with moist crumbs (not wet batter)
- The edges pull slightly away from the pan
- The top springs back when lightly pressed
Let the cakes cool in their pans for 10 minutes – this helps prevent sticking. Then turn them out onto cooling racks and let them cool completely before frosting. I know it’s tempting, but warm cakes + cream cheese frosting = melty mess!
Making the Cream Cheese Frosting
While those layers cool, let’s whip up that dreamy frosting. First rule: everything must be room temperature! Cold cream cheese equals lumpy frosting – and nobody wants that.
Beat the cream cheese and butter together until perfectly smooth – about 2 minutes on medium speed. Gradually add the powdered sugar, then the vanilla and salt. Beat until it’s light and fluffy, scraping down the bowl as needed.
Want to get fancy? Reserve about ⅓ cup of frosting for each layer and tint it with gel coloring (I love deep purple or red for contrast). When assembling, pipe a frosting “dam” around each layer’s edge before adding the colored filling – it creates this gorgeous surprise when sliced!
Pro tip: If your frosting seems too soft, pop it in the fridge for 15 minutes before using. Hot kitchens can make it a bit melty – been there!

Decorating Your Black Velvet Layer Cake
Now comes the fun part – turning this Black Velvet Layer Cake into a total showstopper! Let me share my favorite decorating tricks that always get gasps from my guests.
First, level your cooled cake layers if needed – a serrated knife works perfectly for this. Place your first layer on a cake stand or plate, then pipe that frosting dam I mentioned earlier around the edge. This creates a little well for your colored filling – it’s like a delicious surprise waiting inside each slice!
Spread your tinted frosting inside the dam, then gently place the next layer on top. Repeat until all layers are stacked. Now for the crumb coat – a thin layer of frosting all over to seal in crumbs. Pop it in the fridge for 15 minutes to set before adding your final coat.
For decorations, I love keeping it simple to let that dramatic black color shine. Some of my go-to garnishes:
- Fresh blackberries or raspberries clustered on top
- Edible gold leaf flakes for a luxe touch
- Chocolate shavings or curls
- A dusting of powdered sugar through a stencil
Remember – the messier your hands get, the more fun you’re having! My last tip? Step back and admire your masterpiece before slicing. That first reveal of those striking black layers is pure baking magic.
Tips for the Perfect Black Velvet Layer Cake
After more midnight baking experiments than I care to admit, I’ve learned all the tricks for making this Black Velvet Layer Cake absolutely foolproof. Listen up – these are the tips that’ll save you from the disasters I’ve survived!
First, that black color – it’s all about the gel food coloring. Liquid just won’t give you that rich, deep black we’re after. Add it slowly and mix well – I like to add half, mix, then add more until I get that perfect inky shade. And don’t panic when your batter turns gray at first – it deepens as it bakes!
For the flattest layers (and prettiest cakes), try these tricks:
- Wrap damp cake strips around your pans – they slow down edge baking so everything rises evenly
- Rotate pans halfway through baking if your oven has hot spots
- Let cakes cool in their pans for exactly 10 minutes – any longer and they’ll steam
When making the frosting, temperature is everything. If your cream cheese or butter is even slightly cold, you’ll end up with lumpy frosting. I leave mine out overnight sometimes! And if your frosting gets too soft during decorating, just pop the whole cake in the fridge for 15 minutes to firm up.
One last golden rule: always chill your cake before slicing. That cream cheese frosting needs time to set, and a cold cake gives you those perfect, clean slices that show off those gorgeous black layers. Trust me – patience pays off with this beauty!
Serving and Storing Black Velvet Layer Cake
Okay, let’s talk about keeping this beauty fresh! Because let’s be honest – this Black Velvet Layer Cake is so good, you might not have leftovers (it disappears fast in my house). But just in case:
For storage, always refrigerate your cake – that cream cheese frosting needs to stay chilled. Cover it loosely with plastic wrap or use a cake keeper, and it’ll stay fresh for up to 3 days. Pssst – the flavors actually get better the next day!
When serving, take it out of the fridge about 30 minutes before you plan to eat. That little rest time lets the cake come to the perfect temperature – still cool, but not ice-cold. And please, whatever you do, don’t try to microwave it! The color can get weird and the frosting will melt into a sad puddle. Learned that one the hard way…
Black Velvet Layer Cake Nutritional Information
Let’s be real – we’re not eating cake for health food! But since you asked, here’s the scoop on one slice of this glorious Black Velvet Layer Cake (based on 12 servings):
- Calories: About 450 per slice
- Sugar: 40g (worth every sweet bite!)
- Fat: 22g
- Protein: 5g
Remember, these are estimates – your actual numbers might vary slightly based on exact ingredients and portions. Now go enjoy that cake guilt-free – life’s too short not to!
Black Velvet Layer Cake FAQs
I’ve gotten so many questions about this Black Velvet Layer Cake over the years – let me share the answers to the most common ones that pop up in my kitchen (and inbox)!
Can I use liquid food coloring instead of gel?
Technically yes, but you’ll need about 1 ounce of liquid black to get close to our deep color. The downside? It can throw off your batter consistency, and the color won’t be nearly as rich. Gel coloring is absolutely worth tracking down for this recipe!
Why did my cake sink in the middle?
Oh honey, we’ve all been there! Usually it’s one of three things: 1) Overmixing the batter (develops too much gluten), 2) Opening the oven door too early (causes temperature shock), or 3) Underbaking (check that toothpick comes out with moist crumbs, not wet batter).
Can I make this into cupcakes instead?
Absolutely! Fill liners 2/3 full and bake at 350°F for 18-20 minutes. You’ll get about 24 stunning black cupcakes – perfect for Halloween parties! Just reduce the frosting amount by half unless you love extra swirls.
Why vinegar in a cake recipe?
It sounds weird, but that vinegar reacts with the baking soda to give us the perfect rise. Plus, it helps enhance that beautiful dark color! You won’t taste it – promise.
How do I get the frosting so smooth?
Two secrets: 1) Make sure ALL your frosting ingredients are truly room temp, and 2) After your final coat, dip your spatula in hot water, dry it quickly, and use it to gently smooth the sides. Works like magic!
Share Your Black Velvet Layer Cake Creation
I’d absolutely love to see your Black Velvet Layer Cake masterpiece! Snap a photo and tag me on Instagram – nothing makes me happier than seeing your baking triumphs. And if you loved this recipe as much as I do, leave a review to help other bakers discover this showstopping cake. Happy baking, friends!
Print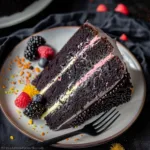
Black Velvet Layer Cake
- Total Time: 43 minutes
- Yield: 12 servings 1x
- Diet: Vegetarian
Description
A rich and moist Black Velvet Layer Cake with a striking dark color and smooth cream cheese frosting.
Ingredients
- 4 large eggs, room temperature and separated
- 2 ½ cups (300g) all-purpose flour
- ½ cup (60g) cornstarch
- 3 tablespoons (22g) unsweetened cocoa powder
- 1 teaspoon salt
- 1 teaspoon baking soda
- ½ cup (113g) unsalted butter, softened
- 2 cups (400g) granulated sugar
- ⅔ cup (160mL) vegetable oil
- 3 teaspoons vanilla extract
- 2 teaspoons distilled white vinegar
- 3 teaspoons black gel coloring
- 1 cup (240mL) buttermilk
- 8 ounces (225g) full fat block cream cheese, softened
- ½ cup (113g) unsalted butter, softened
- 3 ½ cups (420g) powdered sugar
- 2 teaspoons vanilla extract
- ⅛ teaspoon salt
- Gel food coloring (optional)
Instructions
- Preheat oven to 350°F (177°C). Grease and flour two 8″ round cake pans.
- Whip egg whites to soft peaks; set aside.
- Sift flour, cornstarch, cocoa powder, salt, and baking soda.
- Cream butter and sugar until fluffy. Add oil, egg yolks, vanilla, vinegar, and food coloring. Mix until combined.
- Alternate adding dry ingredients and buttermilk. Fold in egg whites.
- Divide batter between pans, bake for 22-24 minutes. Cool completely.
- Beat cream cheese and butter until smooth.
- Add powdered sugar, vanilla, and salt; beat until creamy.
- Optional: Tint ⅓ cup of frosting for each layer if desired.
- Layer and frost the cake, starting with a well of frosting to contain colored frosting between layers.
- Decorate as desired.
Notes
- Use gel food coloring for a deep black color.
- Ensure ingredients are at room temperature for best results.
- Store cake in the refrigerator if not serving immediately.
- Prep Time: 20 minutes
- Cook Time: 23 minutes
- Category: Dessert
- Method: Baking
- Cuisine: American
Nutrition
- Serving Size: 1 slice
- Calories: 450
- Sugar: 40g
- Sodium: 300mg
- Fat: 22g
- Saturated Fat: 10g
- Unsaturated Fat: 10g
- Trans Fat: 0g
- Carbohydrates: 60g
- Fiber: 1g
- Protein: 5g
- Cholesterol: 80mg
Keywords: black velvet cake, layer cake, cream cheese frosting, homemade cake, dessert recipe


