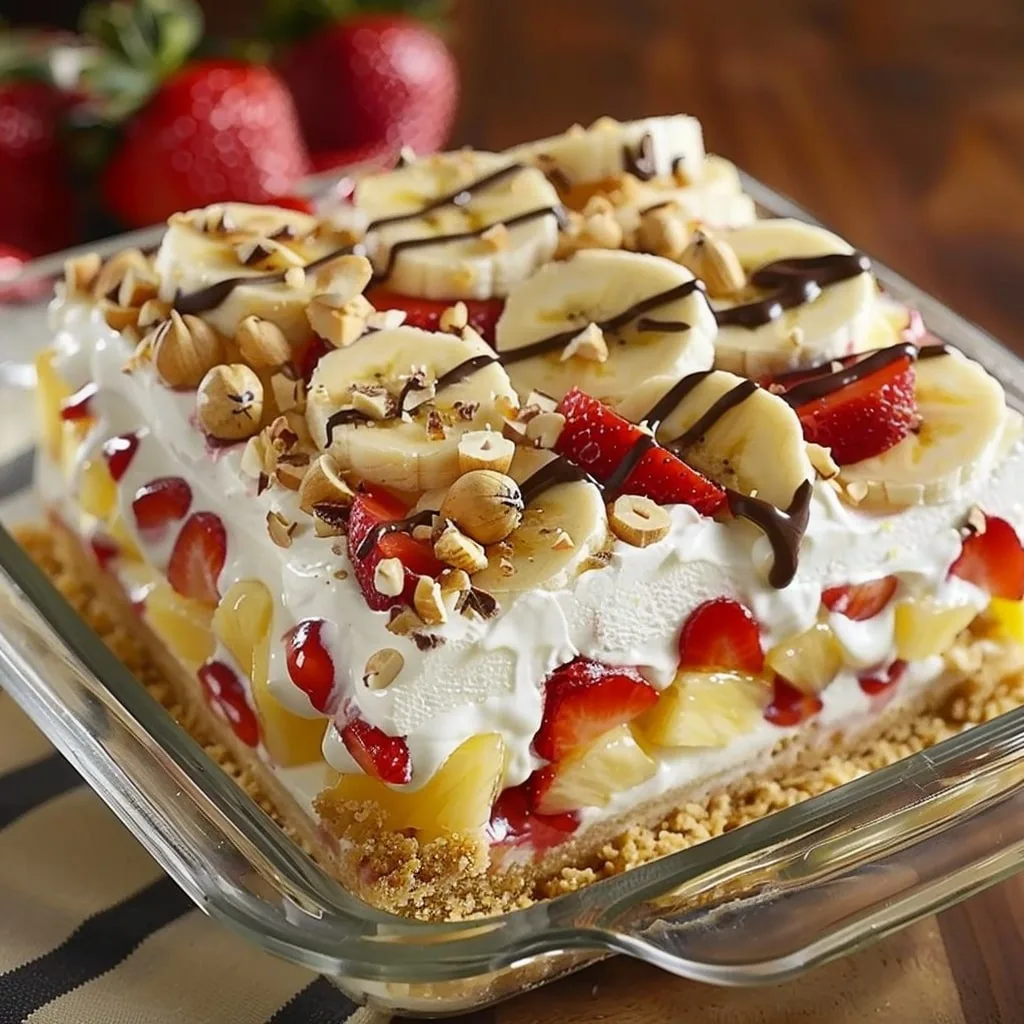
Oh my gosh, do you remember those sticky-sweet summer afternoons at the ice cream shop? The smell of waffle cones, that first glorious bite of a banana split with melty chocolate sauce dripping down your fingers? That’s exactly what this Banana Split Cake brings back for me – but here’s the best part: you don’t even need to turn on your oven!

This no-bake wonder became my go-to dessert when I needed something impressive fast (like that time my in-laws showed up unexpectedly – you know how that goes). Layers of buttery graham cracker crust, fluffy cream cheese filling, and all those fresh fruits come together in about 20 minutes of active work. Then just pop it in the fridge while you relax – the hardest part is waiting those four hours before slicing in!
What I love most is how this Banana Split Cake lets everyone customize their perfect bite. More strawberries? Extra nuts? Drown it in chocolate? You do you, friend. It’s basically summer on a plate, and trust me, it disappears faster than kids chasing the ice cream truck.
Table of Contents
Why You’ll Love This Banana Split Cake
Listen, I’ve made this cake more times than I can count, birthdays, potlucks, even just because it’s Tuesday, and let me tell you why it’s always a hit:
- No oven required: Perfect for those sweltering summer days when turning on the oven sounds like torture. Just mix, layer, and chill!
- Impressively easy: Seriously, if you can spread frosting and slice bananas, you’ve got this. My 8-year-old niece helps me make it now.
- Customizable to the max: Not a pineapple fan? Swap in peaches. Allergic to nuts? Skip ’em. Want extra chocolate? Drizzle away! It’s your dessert canvas.
- Crowd-pleaser magic: The combination of creamy, fruity, and crunchy hits all the right notes. Last summer, my neighbor literally licked her plate (I pretended not to notice).
- Make-ahead dream: Prep it in the morning, forget about it in the fridge, and voilà, dessert’s ready when you are. No last-minute stress!
It’s the kind of recipe that’ll have people begging you for the “secret,” and you’ll just smile and say “Oh, it’s nothing special” (while secretly knowing it totally is).
Banana Split Cake Ingredients
Okay, let’s talk ingredients! The magic of this Banana Split Cake comes from simple, fresh components that play together beautifully. I’ve made this enough times to know – quality matters here. Don’t skimp on the cream cheese or try to substitute margarine, okay? Trust me on this.
For the Crust:
- 2 cups graham cracker crumbs – about 16 full sheets crushed (I use a zip-top bag and rolling pin when I need stress relief)
- 1/3 cup unsalted butter, melted – the real stuff, please!
- 1 teaspoon salt – just a pinch to balance the sweetness
For the Dreamy Filling:
- 16 ounces cream cheese, softened to room temperature (leave it out for 2 hours – no shortcuts here!)
- 1/2 cup granulated sugar – not packed, just lightly spooned in
- 8 ounces Cool Whip, thawed (or homemade whipped cream if you’re feeling fancy)
- 1 teaspoon vanilla extract – the good kind with real vanilla beans
For the Toppings (aka the Fun Part):
- 3-4 ripe bananas, sliced right before assembling (brown spots = extra flavor!)
- 1 (20-ounce) can crushed pineapple, VERY well drained (I press mine in a sieve)
- 20 ounces fresh strawberries, hulled and sliced
- 8 ounces Cool Whip for the top layer
- 1/2 cup chopped hazelnuts (or walnuts if that’s what you’ve got)
- Chocolate sauce – because more chocolate is always the right answer
See? Nothing too crazy, just good ingredients treated right. Now let’s make some magic!
How to Make Banana Split Cake
Alright, let’s get down to business! Making this Banana Split Cake is seriously easy – I promise you won’t break a sweat. Just follow these simple steps, and you’ll have a showstopping dessert that’ll have everyone asking for seconds. The key is taking your time with each layer – no rushing the process!
Step 1: Prepare the Graham Cracker Crust
First things first – that buttery, crunchy base that holds everything together. In a medium bowl, mix together your graham cracker crumbs, melted butter, and salt until it looks like wet sand. I like to use my hands for this – there’s something satisfying about feeling the texture come together!
Now, press this mixture firmly into your greased 9×13-inch dish. And when I say firmly, I mean it! Use the bottom of a measuring cup or glass to really pack it down tight – this prevents crumbling when you slice it later. Pop it in the fridge to chill for about 20 minutes while you work on the filling. This quick chill helps set the crust so it doesn’t get soggy when we add the creamy layers.
Step 2: Make the Cream Cheese Filling
Here’s where the magic happens! In a large bowl, beat your room-temperature cream cheese (remember – no shortcuts here!), sugar, and vanilla extract until it’s completely smooth. I use my hand mixer on medium speed for about 2 minutes. Watch for any lumps – we want this silky smooth!
Now, gently fold in the Cool Whip. This is crucial – don’t overmix! Use a rubber spatula and fold just until combined. Overmixing will deflate the fluffiness, and we want that light, airy texture. The filling should be thick and dreamy, like clouds you could eat.
Spread this heavenly mixture evenly over your chilled crust. Smooth the top with your spatula – it doesn’t have to be perfect, but try to make it relatively even so all your slices look pretty.
Step 3: Layer the Fruits and Toppings
Time for the fun part! First, drain your pineapple really well – I press mine in a fine mesh sieve to get out every last drop of juice. Then spread it evenly over the cream cheese layer. Next come the strawberries – arrange them in pretty rows or just scatter them artistically!
Now, the bananas – slice them right before adding to prevent browning. I like to do this last so they stay fresh-looking. Arrange them however you like – sometimes I get fancy with patterns, other times I just toss them on when I’m in a hurry!
Top everything with that final layer of Cool Whip, then sprinkle with chopped hazelnuts. Finish with a generous drizzle of chocolate sauce – I like to zigzag it for a professional touch, but honestly, just pouring it straight from the bottle works too!
Step 4: Chill Before Serving
Here comes the hardest part – waiting! Cover your masterpiece with plastic wrap and refrigerate for at least 4 hours, but overnight is even better. This chilling time lets all the flavors meld together and gives you those perfect, clean slices when it’s time to serve.
When you’re ready, use a sharp knife dipped in warm water to cut neat squares. Watch everyone’s eyes light up when they see those beautiful layers – then prepare for the compliments to start rolling in!
Banana Split Cake Variations
One of the best things about this Banana Split Cake is how easily you can make it your own! Over the years, I’ve played around with so many variations – some intentional, some born from “Oops, I’m out of that ingredient” moments. Here are my favorite twists that still keep the spirit of the original:
Lighter Options
Want to cut some calories without losing flavor? Try swapping the Cool Whip for an equal amount of whipped Greek yogurt (just whip 2 cups plain Greek yogurt with 1/4 cup honey until fluffy). The tanginess actually complements the fruit beautifully! You can also use reduced-fat cream cheese – just make sure it’s still the brick kind, not the spreadable tub.
Gluten-Free & Nut-Free Versions
For my gluten-free friends, simply swap the graham crackers for gluten-free ones (I like the Schär brand) or even crushed gluten-free pretzels for a salty-sweet twist. Nut allergies? Skip the hazelnuts and add toasted coconut flakes instead – the texture is amazing!
Fruit Swaps
Not a pineapple person? Try drained mandarin oranges or peaches. Swap strawberries for raspberries in winter when berries are pricier. My cousin even uses sliced kiwi for a tropical vibe – just pat the slices dry first!
The possibilities are endless – that’s the beauty of this recipe. Once you master the basic technique, you can get creative and make it uniquely yours!
Storage & Reheating Instructions
Now, let’s talk about keeping your Banana Split Cake looking and tasting its best! I always cover mine tightly with plastic wrap or aluminum foil and pop it back in the fridge – it’ll stay perfect for up to 3 days this way. The bananas might get a little brown after day two, but a quick drizzle of fresh chocolate sauce hides that beautifully.
Important note: Do not freeze this cake! Trust me, I learned this the hard way – the texture turns weepy and sad when thawed. If you need to make it further ahead, just prep the crust and filling separately, then assemble the day you’re serving for fresh-as-can-be results.
Nutritional Information
Okay, let’s keep it real – this Banana Split Cake isn’t exactly health food, but everything in moderation, right? Here’s the nutritional breakdown per serving (based on slicing into 12 equal pieces):
- Calories: About 350 kcal
- Sugar: 25g (mostly from the natural fruits!)
- Fat: 18g (10g saturated from all that delicious cream cheese and butter)
- Protein: 5g (thanks, cream cheese!)
- Fiber: 3g (those graham crackers and fruits pull through)
Important note: These values are estimates based on the specific brands I use – your mileage may vary depending on ingredients. For example, using full-fat vs reduced-fat cream cheese will change the numbers slightly. I calculate using MyFitnessPal’s recipe builder with exact measurements.
If you’re watching certain nutrients, easy swaps can help – sugar-free chocolate sauce cuts the sugar, while Greek yogurt instead of Cool Whip reduces fat. But honestly? Sometimes you just need to enjoy dessert as dessert – life’s too short not to savor those creamy, fruity layers!
Banana Split Cake FAQs
After making this Banana Split Cake countless times (and fielding all my friends’ questions), I’ve gathered the most common queries – along with my hard-earned answers!
Can I use fresh pineapple instead of canned?
Absolutely! Fresh pineapple gives a brighter flavor, but you’ll need to pat it very dry after chopping. I lay the pieces between paper towels and gently press – excess juice is the enemy of our perfect crust!
How do I prevent a soggy crust?
Two words: drainage and patience. First, press your drained pineapple in a sieve (I sometimes even blot with paper towels). Second, don’t skip chilling the crust before adding filling – those 20 minutes make all the difference!
Can I make this ahead for a party?
You bet! Assemble it the night before – the flavors actually improve as they mingle. Just wait to add the final chocolate drizzle until right before serving so it stays pretty.
Why does my cream cheese filling have lumps?
Room temperature cream cheese is key! If yours is still chilly, microwave it in 10-second bursts until slightly soft. And always beat the cream cheese alone before adding other ingredients.
What’s the best way to slice clean pieces?
Dip your knife in hot water and wipe between cuts. The warmth glides through the layers without dragging.
Pro tip: Cut straight down rather than sawing back and forth.
Still have questions? Drop them in the comments – I’m happy to troubleshoot your Banana Split Cake adventures!
Final Thoughts
There you have it, my ultimate Banana Split Cake recipe that never fails to impress! I can’t wait for you to try this summer favorite in your own kitchen. When you do, snap a photo of your creation and tag me on Instagram. I love seeing all the creative ways people customize theirs!
Remember, baking (or in this case, no-baking) should be fun and stress-free. If your layers aren’t perfectly even or your chocolate drizzle goes rogue, don’t sweat it. Some of my best cakes happened when I stopped worrying about perfection and just enjoyed the process.
Now go make some sweet memories with this cake. I’m betting it’ll become your new go-to dessert just like it did for me!
Print
Banana Split Cake
- Total Time: 4 hours 20 minutes
- Yield: 12 servings 1x
- Diet: Vegetarian
Description
A no-bake dessert with layers of graham cracker crust, cream cheese filling, fresh fruits, and toppings.
Ingredients
- For the Crust:
- 2 cups graham cracker crumbs
- 1/3 cup unsalted butter, melted
- 1 teaspoon salt
- For the Filling:
- 16 ounces cream cheese, at room temperature
- 1/2 cup granulated sugar
- 8 ounces Cool Whip
- 1 teaspoon vanilla extract
- For the Toppings:
- 3 to 4 bananas, sliced
- 1 (20-ounce) can crushed pineapple, drained
- 20 ounces strawberries, sliced
- 8 ounces Cool Whip
- 1/2 cup hazelnuts, chopped
- Chocolate sauce
Instructions
- Prepare the Crust:
- In a bowl, mix graham cracker crumbs, melted butter, and salt.
- Press into a greased 9×13-inch dish.
- Chill in the refrigerator.
- Make the Filling:
- Beat cream cheese, sugar, and vanilla until smooth.
- Fold in Cool Whip.
- Spread over the crust.
- Layer the Toppings:
- Arrange bananas, pineapple, and strawberries.
- Top it Off:
- Spread Cool Whip over the fruit.
- Drizzle chocolate sauce and sprinkle hazelnuts.
- Chill and Serve:
- Refrigerate for at least 4 hours or overnight.
- Slice and serve.
Notes
- Use ripe bananas for better flavor.
- Drain pineapple well to avoid excess moisture.
- Chill for best results.
- Prep Time: 20 minutes
- Cook Time: 0 minutes
- Category: Dessert
- Method: No-Bake
- Cuisine: American
Nutrition
- Serving Size: 1 slice
- Calories: 350 kcal
- Sugar: 25g
- Sodium: 200mg
- Fat: 18g
- Saturated Fat: 10g
- Unsaturated Fat: 6g
- Trans Fat: 0g
- Carbohydrates: 45g
- Fiber: 3g
- Protein: 5g
- Cholesterol: 40mg
Keywords: banana split cake, no-bake dessert, cream cheese dessert, fruit cake


