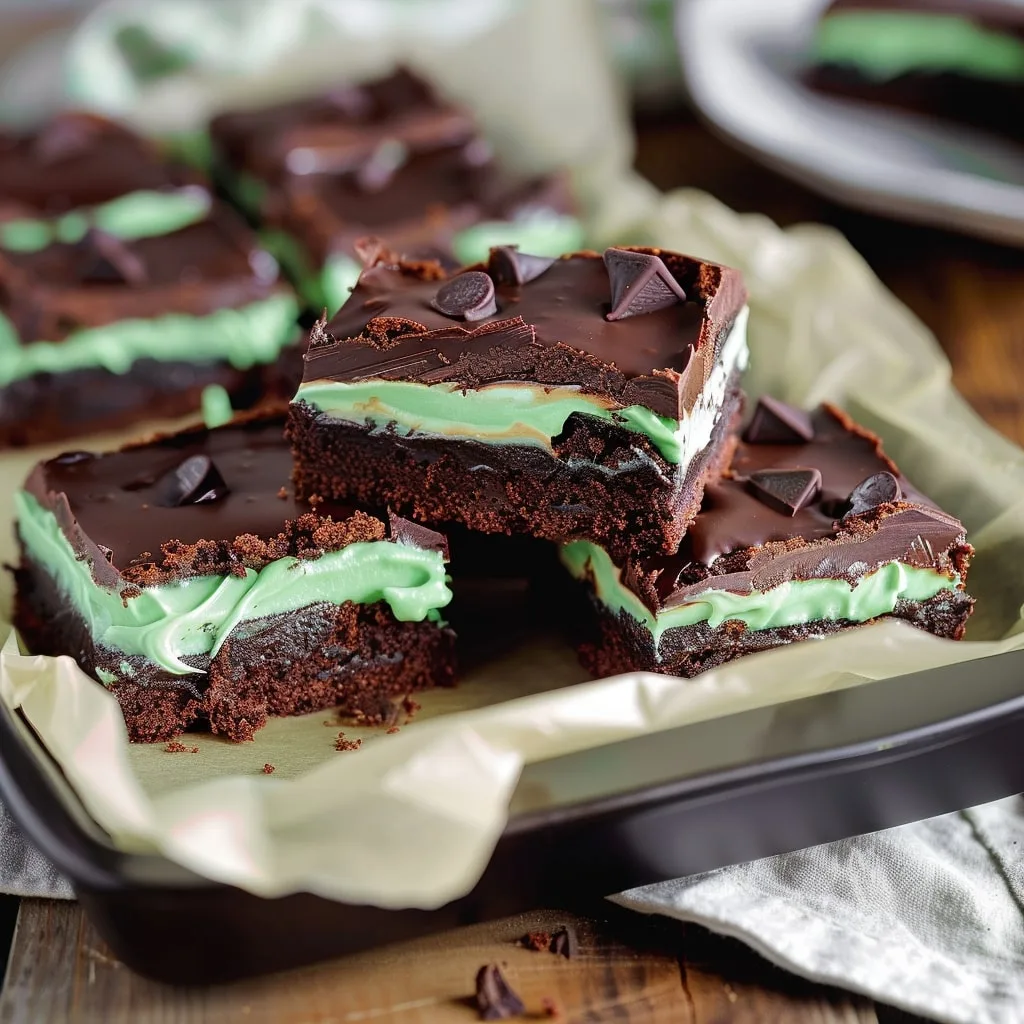
There’s something magical about the combination of chocolate and mint that makes my mint brownies absolutely irresistible. I still remember the first time I made them for a friend’s birthday party, they disappeared in minutes, and I’ve been tweaking the recipe ever since to get that perfect balance of rich chocolate and cool, refreshing mint.

After years of baking these for family gatherings, holiday parties, and just because-Tuesdays, I’ve learned all the little tricks to make them foolproof. The secret? A fudgy brownie base, a creamy mint filling that melts in your mouth, and a glossy chocolate ganache that ties it all together. Trust me, one bite and you’ll understand why these mint brownies have become my most requested dessert.
What I love most is how adaptable they are, whether you’re serving them at a fancy dinner or sneaking a square with your afternoon coffee, they always hit the spot. And don’t worry, even if you’re not an experienced baker, my step-by-step instructions will guide you to mint brownie perfection.
Table of Contents
Why You’ll Love These Mint Brownies
Let me tell you why these mint brownies have become my go-to dessert for every occasion (and sometimes just because I deserve a treat):
- That unbeatable chocolate-mint combo: The rich, fudgy brownie base paired with the cool, creamy mint layer is pure magic, like your favorite thin mints but even better because you made them yourself.
- Surprisingly simple: Don’t let the layers scare you! I’ve streamlined the steps so even beginner bakers can nail these. (My 12-year-old niece makes them now!)
- Always a crowd-pleaser: These disappear at parties faster than I can refill the platter. Perfect for St. Patrick’s Day, Christmas cookie swaps, or when you need to bribe your book club friends.
- Make-ahead dream: They actually taste better after chilling overnight, so no last-minute dessert stress. Bonus: They freeze beautifully for emergency sweet tooth moments.
Seriously, once you try these mint brownies, you’ll understand why my friends keep “forgetting” to return their Tupperware, they’re hoping I’ll send more home with them!
Ingredients for Mint Brownies
Gathering the right ingredients is half the battle when making these mint brownies, trust me, I’ve learned the hard way that substitutions can change everything! Here’s exactly what you’ll need, separated by layer so you can prep like a pro. (Pro tip: Measure everything before you start, it makes the process so much smoother.)
For the Brownie Base:
- 1/2 cup unsalted butter (1 stick), cut into pieces, cold butter just won’t melt right!
- 4 ounces unsweetened chocolate, chopped (I like Baker’s brand for consistent results)
- 1/4 cup Andes creme de menthe baking chips (optional but oh-so-worth it for extra minty pockets)
- 1 1/4 cups granulated sugar (don’t pack it, just level it off)
- 1 teaspoon vanilla extract (the real stuff, please, imitation just tastes sad)
- 1/2 teaspoon mint extract (this is where the magic happens, I prefer McCormick)
- 2 large eggs, room temperature (cold eggs can make your batter seize up, 30 minutes on the counter does the trick)
- 1/2 cup all-purpose flour (65 grams if you’re weighing, scoop and level to avoid dense brownies)
- 1/4 teaspoon salt (balances the sweetness perfectly)
For the Mint Filling:
- 1/2 cup unsalted butter (another stick), softened (leave it out for 2 hours, no shortcuts here!)
- 2 cups confectioners’ sugar (sifted if yours is lumpy)
- 1/2 teaspoon mint extract (yes, more mint, this layer should sing!)
- 1 tablespoon water (just enough to make it spreadable)
- 4 drops green gel food coloring (liquid makes the filling runny, I swear by AmeriColor mint green)
For the Chocolate Ganache:
- 1 cup heavy whipping cream (none of that half-and-half business, go big or go home)
- 1 cup bittersweet chocolate (8 ounces, chips or chopped bar both work, but Ghirardelli 60% cacao is my favorite)
- 1/2 cup Andes creme de menthe baking chips (optional topping that makes them look bakery-perfect)
See? Nothing too fancy, just quality ingredients treated right. (And yes, that’s three sticks of butter total. I never said these were health food!)
Ingredient Substitutions & Variations
One of my favorite things about these mint brownies is how easily you can tweak them to suit your taste or what’s in your pantry! Here are my favorite swaps and creative twists:
- Peppermint for mint extract: If you prefer a sharper mint flavor, use peppermint extract instead – just reduce to 1/4 teaspoon as it’s stronger.
- Gluten-free option: Swap the all-purpose flour with your favorite 1:1 gluten-free blend (I’ve had great results with Bob’s Red Mill).
- Nutty addition: Fold 1/2 cup chopped walnuts or pecans into the brownie batter for extra crunch.
- Dairy-free version: Use vegan butter and coconut cream instead of heavy cream – the ganache might be slightly softer but just as delicious.
- Color variations: Skip the green food coloring for a natural look, or go wild with red for Christmas mint brownies!
- Chocolate changes: Dark chocolate lovers can use all bittersweet chocolate in both layers for an intense flavor.
The beauty is in the customization – make them your own! Just promise me you’ll try the original version first so you know what perfection tastes like.
Equipment You’ll Need
Now, let’s talk tools! You don’t need anything fancy for these mint brownies, but a few key items make the process so much easier. Here’s what I always grab from my kitchen:
- 8-inch or 9-inch square baking dish (glass or metal both work, I prefer metal for crispier edges)
- Parchment paper (for easy lifting, trust me, you’ll thank me later)
- Double boiler or microwave-safe bowl (I use my trusty glass mixing bowl for melting chocolate)
- Electric mixer (a hand mixer works great for the mint filling)
- Rubber spatula (for scraping every last bit of that delicious batter)
That’s really it! Just everyday kitchen essentials to make magic happen.
How to Make Mint Brownies
Alright, let’s get to the fun part – making these dreamy mint brownies! I know layered desserts can seem intimidating, but I promise it’s just a series of simple steps with delicious rewards. I’ll walk you through each part slowly – just follow along and don’t skip the cooling times (I know it’s tempting!).
Preparing the Brownie Base
First things first – that rich, fudgy foundation our mint brownies need. Here’s exactly how I do it:
Start by preheating your oven to 325°F (not 350° – trust me, the lower temp prevents dry edges). While that heats up, line your baking pan with parchment paper, leaving some overhang on two sides. This little trick will save you so much frustration later when it’s time to slice!
Now, melt your butter and chocolate together. I use a glass bowl over a pot of barely simmering water (double boiler style), stirring occasionally until it’s smooth as silk. If you’re using the microwave, do 30-second bursts at 50% power, stirring between each – chocolate burns easily! Toss in those Andes baking chips now if you’re using them – they’ll melt right in.
Remove from heat and whisk in the sugar. Let it cool for about 2 minutes (so we don’t cook the eggs!), then add vanilla and mint extracts. Crack in the eggs one at a time, mixing well after each – you’ll see the batter go from grainy to gloriously glossy. Finally, gently fold in the flour and salt until just combined (no overmixing – we want fudgy, not tough!).
Pour into your prepared pan and bake for 25-30 minutes. The top should look set, and a toothpick will come out with moist crumbs (not wet batter). Let it cool COMPLETELY in the pan – about 1 hour. I know, I know – but rushing this step leads to minty mudslides!
Making the Mint Filling
While your brownies cool, let’s whip up that dreamy mint layer that makes these brownies special. This is where things start smelling amazing!
In a medium bowl, beat the softened butter with an electric mixer until it’s light and fluffy – about 2 minutes. Gradually add the powdered sugar, about 1/2 cup at a time, mixing well after each addition. The mixture will look dry at first – that’s normal! Add the mint extract and water, then keep beating until it transforms into a smooth, spreadable consistency.
Now for the fun part – add those 4 drops of green gel food coloring. I like to start with 3, mix, then add more if needed. You’re aiming for a soft mint green – not neon! Once it’s perfectly tinted, spread it evenly over your cooled brownies. I find an offset spatula works best for this. Pop the whole pan in the fridge for at least 15 minutes to set up while you make the ganache.
Adding the Chocolate Ganache
The crowning glory! This shiny chocolate blanket takes our mint brownies from good to “oh my goodness, did you really make these?!”
Place your chopped chocolate (or chips) in a heatproof bowl. In a small saucepan, heat the heavy cream over medium heat until it just starts to simmer around the edges – don’t let it boil! Pour the hot cream over the chocolate and let it sit undisturbed for 2 minutes. This patience pays off – the heat gently melts the chocolate. After 2 minutes, whisk slowly from the center outward until you’ve got the smoothest, shiniest ganache you’ve ever seen.
Let it cool for about 10 minutes – we want it thick enough to stay put but still pourable. Then slowly pour over the mint layer, tilting the pan to spread it evenly. If you’re using those extra Andes mints, sprinkle them on top now – they’ll set into the ganache as it cools. Resist the urge to touch! Back in the fridge it goes.
Chilling and Slicing
Here’s the hardest part: waiting! But trust me, letting these mint brownies chill for at least 30 minutes (I prefer an hour) makes all the difference. The ganache sets, the layers firm up, and you’ll get those perfect clean slices.
When it’s finally time, lift the whole slab out using the parchment paper and place it on a cutting board. Run a sharp knife under hot water, dry it, and make your cuts – rewarming the knife between slices keeps things neat. I like to cut them small (they’re rich!) into about 32 squares. If any pieces stick, just lick your fingers – chef’s privilege!
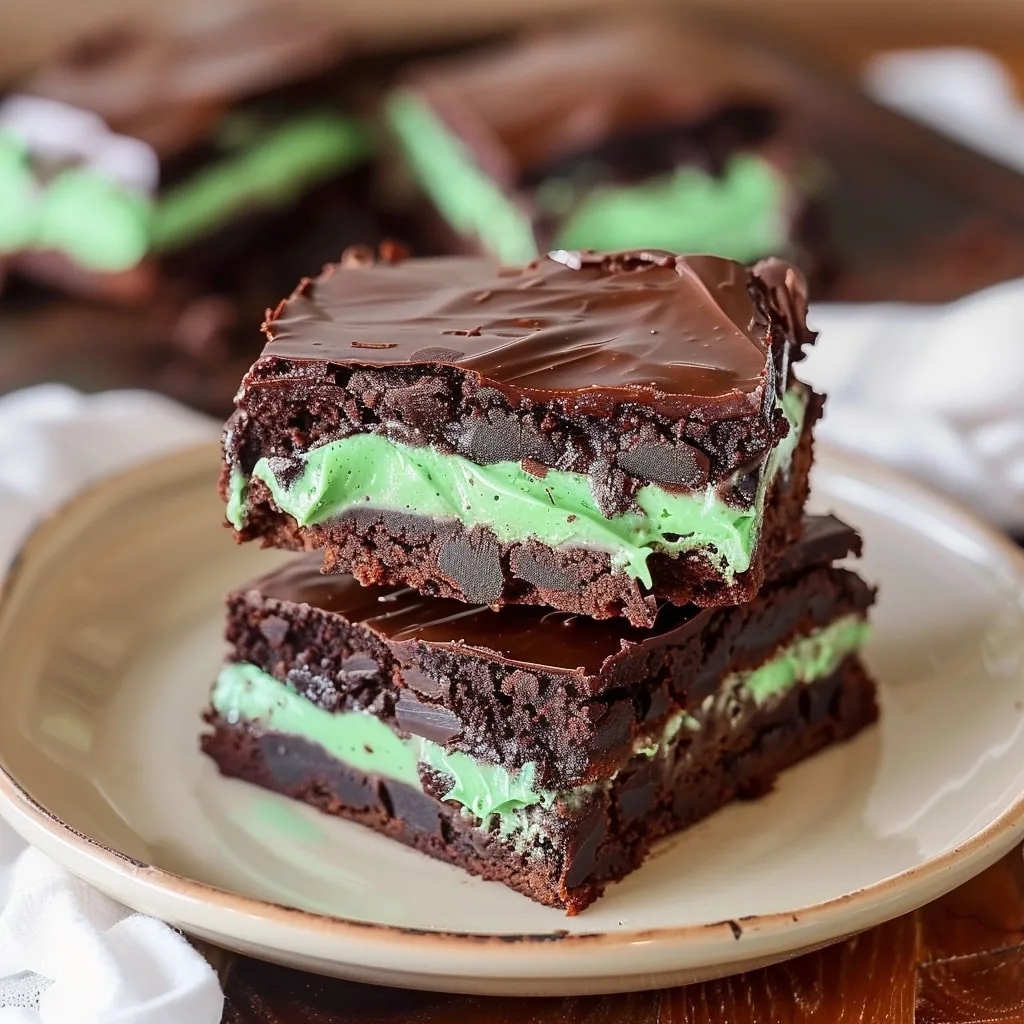
Now step back and admire your masterpiece. That gorgeous layer cake of fudgy chocolate, cool mint, and glossy ganache is your reward. Go ahead, take that first bite – you’ve earned it!
Tips for Perfect Mint Brownies
After making these mint brownies more times than I can count, I’ve picked up some tricks that make all the difference between good and “oh my gosh, how did you make these?” Here are my can’t-live-without tips:
- Gel food coloring is your friend – Liquid food coloring makes the mint layer runny (ask me how I know!). Gel gives that perfect pastel green without thinning your filling.
- Don’t peek while baking! That oven light is there for a reason. Opening the door causes temperature swings that can give you unevenly baked brownies.
- The toothpick lie – Your brownies are done when the toothpick has a few moist crumbs, not clean. They’ll keep cooking as they cool.
- Hot knife magic – Dip your knife in hot water and dry it before each slice for clean cuts through that ganache. Wipe between slices for Instagram-worthy edges.
- Patience pays – I know it’s hard, but letting each layer cool completely prevents the mint from melting into the brownie and keeps your ganache shiny.
Follow these simple tricks, and you’ll have mint brownies that look and taste like they came from a fancy bakery!
Serving and Storing Mint Brownies
Here’s the best part – enjoying your mint brownies! I always serve them chilled – that cool, creamy mint layer tastes even more refreshing when it’s slightly cold. They’re perfect straight from the fridge with a glass of milk or a hot coffee for contrast.
For storage, keep them in an airtight container (I swear by my glass Snapware). At room temperature, they’ll stay fresh for about 3 days – if they last that long! For longer storage, refrigerate for up to a week. You can also freeze them for up to 3 months – just layer between parchment paper in a freezer-safe container. Thaw in the fridge overnight when that mint brownie craving hits!
Nutritional Information
Just so you know what you’re getting into with these decadent mint brownies! Nutritional values are estimates based on standard ingredients – your exact numbers may vary depending on brands and substitutions. Per serving (1 brownie):
- Calories: 222 kcal
- Fat: 14g (8g saturated)
- Carbohydrates: 25g
- Sugar: 20g
- Protein: 2g
No regrets though – every delicious bite is worth it!
Mint Brownies FAQs
Over the years, I’ve gotten all sorts of questions about these mint brownies – usually while people are shoving another piece in their mouth! Here are the answers to the ones I hear most often:
Can I freeze mint brownies?
Absolutely! These freeze like a dream. Just slice them first, then layer between parchment paper in an airtight container. They’ll keep beautifully for up to 3 months. When the craving hits, thaw overnight in the fridge – they’ll taste just as fresh!
How do I prevent cracks in the ganache?
Ah, the dreaded ganache cracks! The secret is letting it cool slightly (about 10 minutes) before pouring – too hot and it’ll crack as it sets. Also, make sure your mint layer is completely chilled first. If cracks do appear, just sprinkle extra Andes mints on top – nobody will notice!
Can I use peppermint instead of mint extract?
You sure can, but go easy! Peppermint extract is stronger – I’d start with 1/4 teaspoon in both layers and taste the filling before adding more. You want refreshing mint flavor, not toothpaste vibes!
Why did my mint layer melt into the brownie?
Been there! This happens when the brownie base isn’t completely cool before adding the mint filling. Those residual heat waves are sneaky! Next time, pop the baked brownies in the fridge for 30 minutes to speed up cooling – it makes all the difference.
Can I make these without eggs?
I’ve had success using flax eggs (1 tbsp ground flax + 3 tbsp water per egg) for vegan friends. The texture will be slightly denser but still delicious. Just don’t skip chilling time – the layers need it to set properly!
Got more questions? Ask away in the comments – I’m happy to help troubleshoot your mint brownie adventures!
Share Your Mint Brownies Experience
I’d love to hear how your mint brownies turned out! Did you add any fun twists? Snap a photo and tag me on Instagram. Nothing makes me happier than seeing your creations. Leave a comment below with your best tips or questions. And if you loved this recipe as much as I do, please share it with your fellow dessert lovers!
Print
Mint Brownies
- Total Time: 1 hour
- Yield: 32 servings 1x
- Diet: Vegetarian
Description
Delicious mint brownies with a creamy mint filling and rich chocolate ganache.
Ingredients
- Brownies:
- 1/2 cup unsalted butter (1 stick), cut into pieces
- 4 ounces unsweetened chocolate, chopped
- 1/4 cup Andes creme de menthe baking chips (optional)
- 1 1/4 cups granulated sugar
- 1 teaspoon vanilla extract
- 1/2 teaspoon mint extract
- 2 large eggs, room temperature
- 1/2 cup all-purpose flour (65 grams)
- 1/4 teaspoon salt
- Mint Filling:
- 1/2 cup unsalted butter (1 stick), softened
- 2 cups confectioners’ sugar
- 1/2 teaspoon mint extract
- 1 tablespoon water
- 4 drops green gel food coloring
- Chocolate Ganache:
- 1 cup heavy whipping cream
- 1 cup bittersweet chocolate (8 ounces), chips or block, roughly chopped
- Topping:
- 1/2 cup Andes creme de menthe baking chips (optional)
Instructions
- Brownies:
- Preheat oven to 325°F. Prepare an 8-inch or 9-inch baking dish by spraying with cooking spray and lining with parchment paper.
- Melt butter, chocolate, and baking chips (if using) together using a double boiler or microwave.
- Stir in granulated sugar, vanilla, and mint extracts.
- Add eggs one at a time, mixing well.
- Mix in flour and salt until smooth.
- Pour batter into pan and bake for 25-30 minutes. Cool completely.
- Mint Filling:
- Beat butter until fluffy.
- Add confectioners’ sugar, mint extract, water, and food coloring. Mix until creamy.
- Spread over cooled brownies. Refrigerate.
- Chocolate Ganache:
- Place chocolate in a bowl.
- Heat whipping cream until simmering.
- Pour cream over chocolate and let sit for 2 minutes. Whisk until smooth.
- Cool ganache for 10-20 minutes before pouring over mint layer.
- Sprinkle Andes mints (if using) after 10 minutes.
- Refrigerate brownies for at least 30 minutes before slicing.
Notes
- Cut into small pieces as they are very rich.
- Store leftovers in an airtight container.
- Prep Time: 30 minutes
- Cook Time: 30 minutes
- Category: Dessert
- Method: Baking
- Cuisine: American
Nutrition
- Serving Size: 1 brownie
- Calories: 222 kcal
- Sugar: 20 g
- Sodium: 30 mg
- Fat: 14 g
- Saturated Fat: 8 g
- Unsaturated Fat: 4 g
- Trans Fat: 0 g
- Carbohydrates: 25 g
- Fiber: 1 g
- Protein: 2 g
- Cholesterol: 40 mg
Keywords: mint brownies, chocolate mint dessert, homemade brownies


