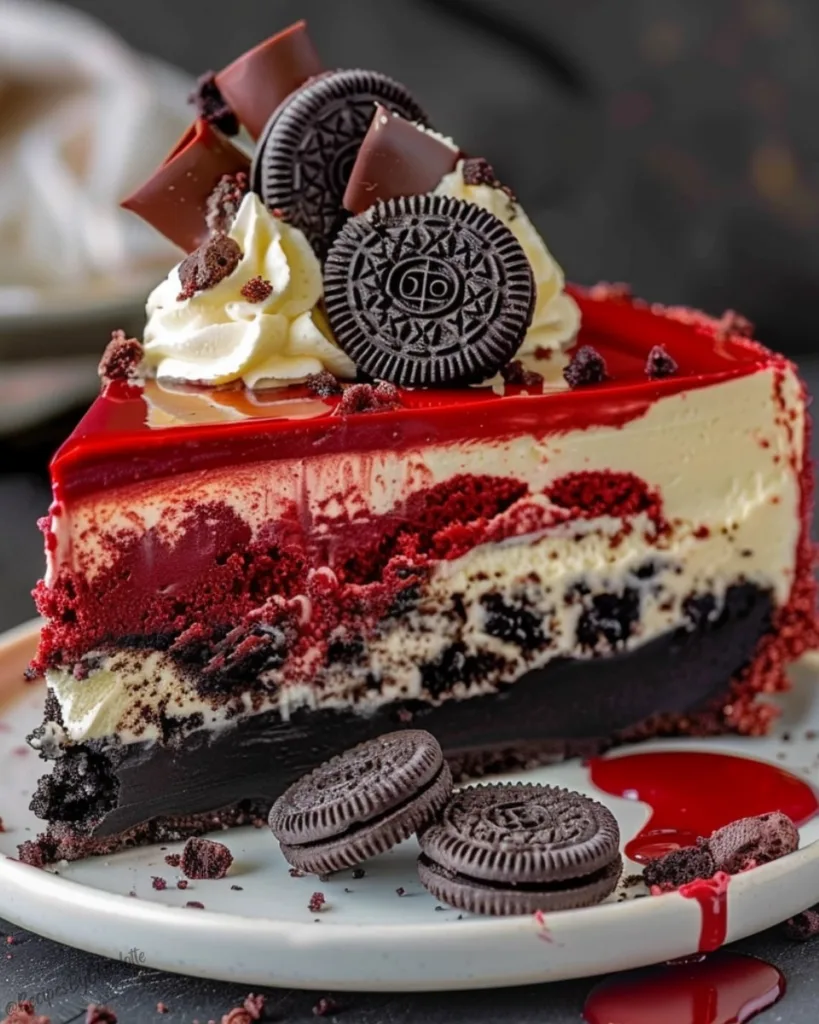
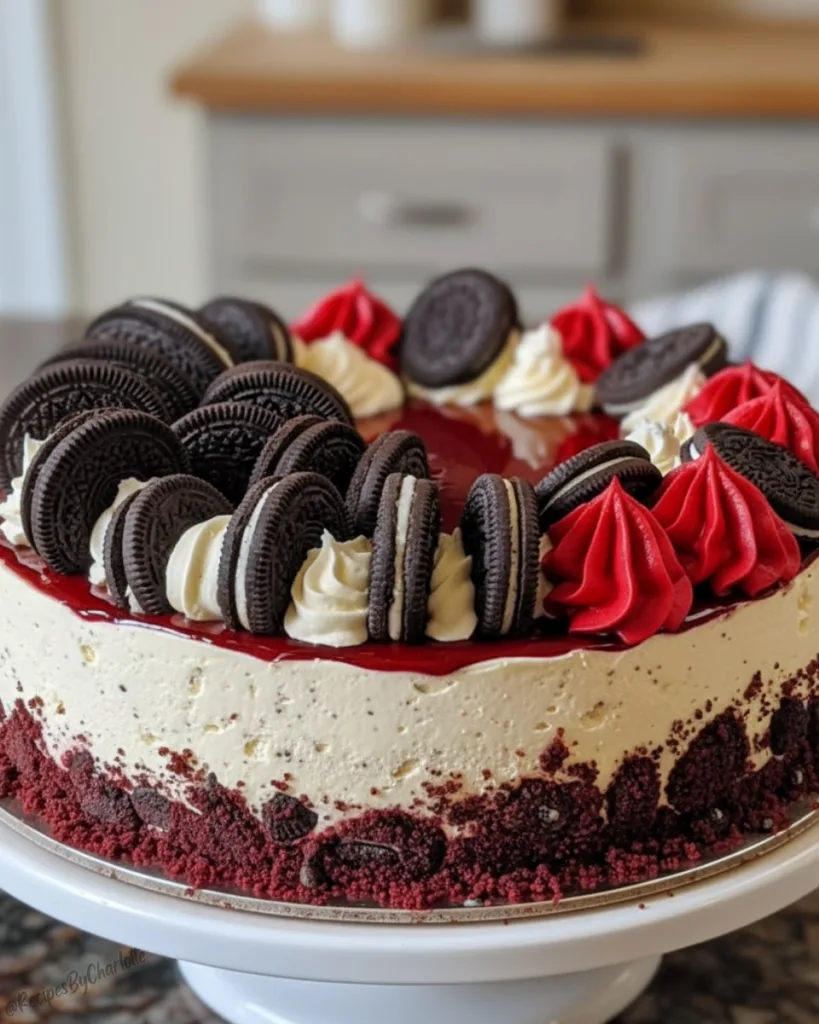
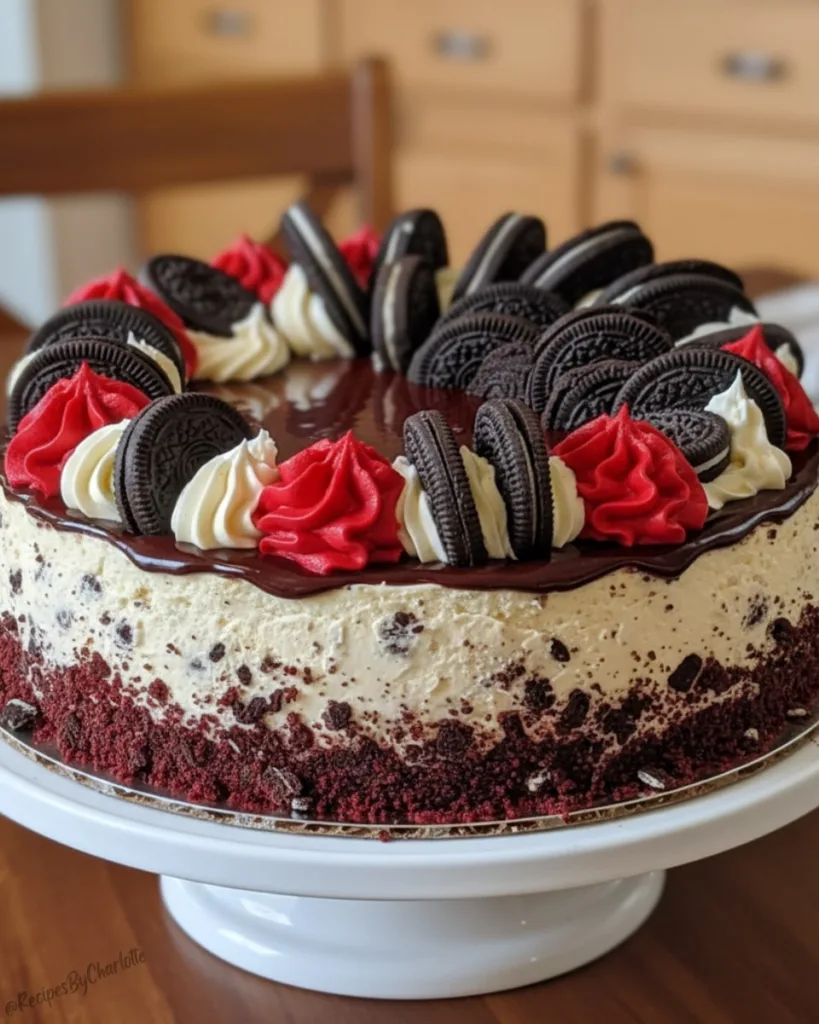
Red Velvet Oreo Cheesecake is a decadent showstopper that layers rich red velvet cake with creamy Oreo cheesecake for an unforgettable treat. I first baked it for my niece’s birthday, and the stunning red layers swirled with chocolatey Oreo chunks had everyone speechless, now it’s our family’s celebration staple, drawing oohs and aahs every time.
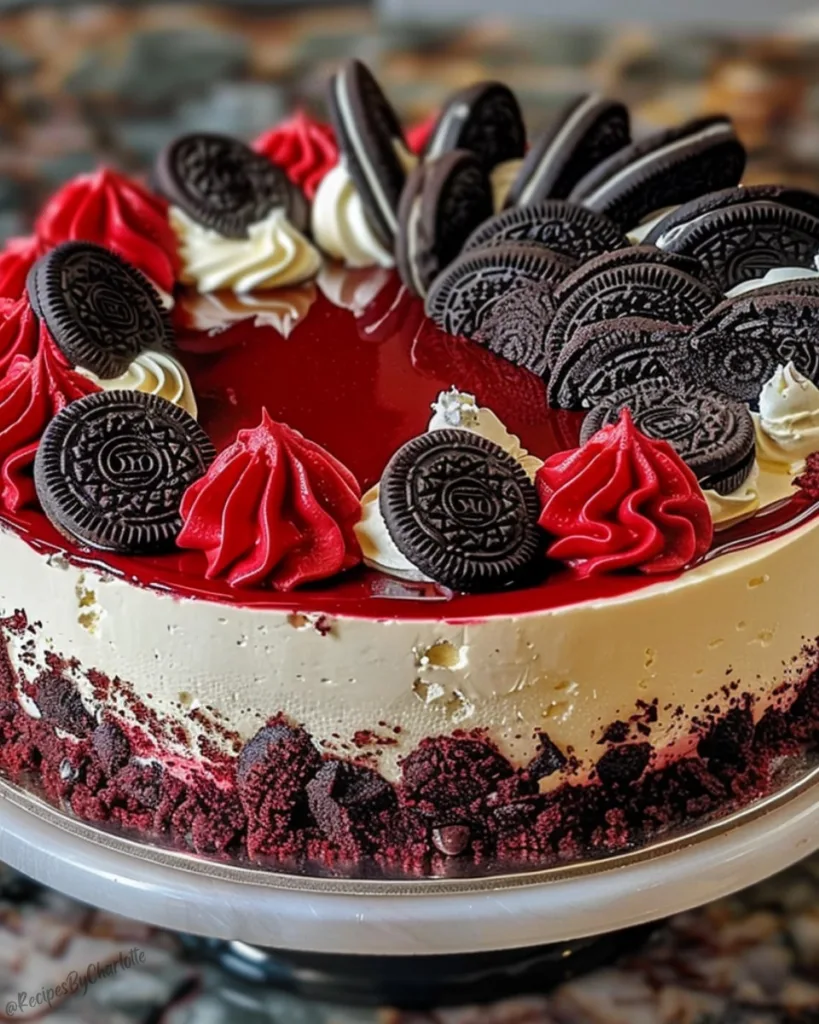
This no-water-bath recipe delivers silky texture with cocoa-tinged tang and cookie crunch, using room-temperature ingredients for lump-free perfection. The ganache topping seals the magic, making it ideal for parties or cozy indulgences.
One slice transports you to dessert heaven, creating joyful memories around the table.
Table of Contents
Why You’ll Love This Red Velvet Oreo Cheesecake
Trust me, this isn’t just another cheesecake recipe. Here’s why it’s become my go-to dessert for every special occasion:
- Total showstopper: That gorgeous red and black layered look always gets “wows” before anyone even takes a bite
- Perfect flavor combo: The tangy red velvet base balances beautifully with the sweet Oreo cheesecake filling
- Creamy dreamy texture: The slow-baked cheesecake layer is so smooth it practically melts in your mouth
- Crowd-pleaser magic: Combines two beloved classics into one unforgettable dessert
- Surprisingly simple: Looks fancy but uses straightforward techniques I’ll walk you through
I’ve lost count of how many times friends have begged me for this recipe after trying just one slice!
Red Velvet Oreo Cheesecake Ingredients
Gathering the right ingredients is the first step to cheesecake success. I learned the hard way that room temperature ingredients make all the difference, so take everything out of the fridge at least an hour before baking.
Here’s what you’ll need, grouped by each delicious layer:
For the Red Velvet Cake Base
- 1 1/2 cups all-purpose flour (spooned and leveled)
- 2 tsp unsweetened cocoa powder (the secret to that perfect red hue)
- 1/2 tsp salt
- 1/2 cup unsalted butter, room temperature
- 1 cup granulated sugar
- 1/2 cup sour cream, room temperature
- 1/4 cup vegetable oil
- 2 tsp pure vanilla extract
- 2 large eggs, room temperature
- 4 tsp red food coloring (I prefer gel for vibrant color)
- 2/3 cup buttermilk, room temperature
- 1 tsp baking soda
- 1 tsp white vinegar
For the Oreo Cheesecake Filling
- 10 Oreos, filling removed and wafers crushed (save that filling!)
- 24 oz full-fat cream cheese, room temperature (don’t even think about low-fat)
- Reserved Oreo filling from above
- 1 cup granulated sugar
- 1 tbsp cornstarch (or 3 tbsp all-purpose flour)
- 1 cup sour cream, room temperature
- 1 tbsp pure vanilla extract
- 3 large eggs + 1 egg yolk, room temperature
- 15 Oreos, roughly chopped
For Topping and Decoration
- 1 cup dark chocolate chips
- 1/2 cup heavy cream
- 1 can store-bought cream cheese frosting (my little shortcut)
- 8 Oreos, chopped for garnish
Pro tip: When separating Oreos, twist them gently to keep the wafers intact. Those little crumbs make all the difference in texture!
Equipment You’ll Need for Red Velvet Oreo Cheesecake
Don’t worry, you won’t need any fancy equipment to make this beauty. Here’s my trusty toolkit that never lets me down:
- 9-inch springform pan (essential for that clean release)
- 8-inch round cake pan (for the extra red velvet layer)
- Mixing bowls (I use one large and two medium)
- Electric mixer (hand or stand works great)
- Parchment paper (life saver for easy removal)
- Roasting pan (for the all-important water bath)
- Rubber spatula (for scraping every last bit of batter)
- Fine mesh sieve (for dusting crumbs if you’re fancy)
That’s it! Now let’s get baking.
How to Make Red Velvet Oreo Cheesecake
Okay, friends, here’s where the magic happens! I’ll walk you through each step just like I would if we were baking together in my kitchen. Don’t let the layers scare you; it’s really just about taking it one step at a time. And trust me, that first bite will make all the effort totally worth it!
Preparing the Red Velvet Cake Base
First things first, preheat your oven to 350°F and line both pans with parchment paper. I like to cut circles for the bottoms and strips up the sides, which makes removal so much easier! Now let’s make that beautiful red velvet base.
Whisk together the flour, cocoa powder, and salt in one bowl. In another bowl, cream the butter and sugar until it’s light and fluffy. This takes about 3-5 minutes with my mixer. Pro tip: Don’t rush this step! Those tiny air pockets in the creamed butter are what give the cake its perfect texture.
Now add the sour cream, oil, vanilla, eggs (one at a time!), and that gorgeous red food coloring. Mix until everything is fully combined and the batter is evenly colored. Alternatively, add the dry ingredients and buttermilk, starting and ending with the dry. Here’s the key: mix just until combined! Overmixing leads to a tough cake, and we want tender crumbs.
Lastly, stir together the baking soda and vinegar (it’ll fizz!) and quickly fold it into the batter. Pour most into your springform pan and the rest into the 8-inch pan. Bake for 18-20 minutes until a toothpick comes out clean. Let them cool completely. I know it’s hard to wait, but warm cake will melt our cheesecake filling!
Making the Oreo Cheesecake Filling
Time for my favorite part! Remember those Oreos we separated earlier? Crush the wafers into fine crumbs and set aside. Now beat the cream cheese with the reserved Oreo filling, sugar, and cornstarch until completely smooth. No lumps allowed! I usually scrape down the bowl a few times to make sure.
Add the sour cream and vanilla, mixing just until combined. Now for the eggs, this is crucial! Add them one at a time, mixing on low speed just until each one disappears into the batter. Overbeating here can cause cracks, so be gentle with your mixer.
Fold in those crushed Oreo wafers and chopped Oreos by hand. I like to save a handful of chopped cookies to sprinkle on top later. Pour this dreamy filling over your cooled red velvet base in the springform pan. Smooth the top with a spatula; it should look like a chocolate chip cloud!
Baking and Cooling the Cheesecake
Here’s where we get serious about preventing cracks. First, wrap the outside of your springform pan tightly with foil; we’re making a waterproof seal for our water bath. Place it in a roasting pan and carefully pour in hot water until it reaches halfway up the springform pan.
Bake at 300°F for about 1 hour and 30 minutes. The edges should be set, but the center should still have a slight jiggle. When it’s done, turn off the oven and crack the door open. Let the cheesecake cool gradually inside for 1 hour, this slow cooling is the secret to a smooth top!
After that hour, remove it from the water bath and let it come to room temperature. Then refrigerate overnight. I know, I know, the waiting is torture! But trust me, this patience pays off in creamy perfection.
Decorating the Red Velvet Oreo Cheesecake
Finally, the fun part! For the ganache, microwave the chocolate chips and heavy cream in 30-second bursts, stirring until smooth. Pour it over your chilled cheesecake and spread evenly. While it sets, crumble that extra red velvet cake from the 8-inch pan.
Gently press those moist red crumbs onto the sides of the cheesecake; they’ll stick beautifully to the ganache. For the finishing touch, pipe or spread on some cream cheese frosting and sprinkle with those reserved chopped Oreos. I like to arrange some whole Oreos around the top for dramatic effect.
Step back and admire your masterpiece! Now try not to eat the whole thing in one sitting, though I won’t judge if you do.
Tips for the Perfect Red Velvet Oreo Cheesecake
After making this cheesecake more times than I can count, I’ve learned a few tricks that guarantee success every time.
First, room temperature ingredients aren’t optional; cold cream cheese will leave lumps no matter how long you mix.
Second, that gradual cooling process is everything! Rushing it leads to cracks, and we want that smooth top. When spreading ganache, work quickly, but gently; it sets fast.
And here’s my secret: Run a knife under hot water before slicing for clean cuts. Oh, and save extra Oreos because someone always asks for “just one more little piece!”
Red Velvet Oreo Cheesecake Variations
I love playing around with this recipe to keep things interesting! For a winter twist, swap the dark chocolate ganache for white chocolate and add peppermint extract to the cheesecake filling.
Raspberry lovers can swirl seedless jam into the batter before baking; the tartness cuts through the richness beautifully. My nephew begged me to try a cookies and cream version once, so I used golden Oreos instead of regular ones and mixed crushed candy cane into the topping.
Honestly, as long as you keep that creamy cheesecake texture and red velvet base, the flavor possibilities are endless!
How to Store and Serve Red Velvet Oreo Cheesecake
Let me tell you how I keep this gorgeous cheesecake fresh and ready to impress. First rule: it must stay refrigerated! I learned this the hard way when I left a slice out overnight and woke up to a sad, soggy mess. Now I always store it in the fridge covered with plastic wrap or in an airtight container. The ganache topping actually helps seal in moisture, so it stays delicious for 3-4 days.
When serving, I take it out about 15 minutes before cutting to let the flavors shine. That little wait makes all the difference between good and “oh my goodness, what is this magic?” For clean slices, I run my knife under hot water between cuts. The contrast of cold, creamy cheesecake against the slightly softened edges is pure perfection.
Fun tip: If you need to make it ahead, you can freeze individual slices wrapped tightly in plastic and foil. Just thaw overnight in the fridge when cravings strike. But between you and me, this beauty rarely lasts long enough to test its full shelf life!
Red Velvet Oreo Cheesecake Nutrition (Per Slice, 1/12th)
Get a snapshot of this indulgent treat’s profile: Estimates vary by brands and portions.
| Nutrient | Amount (approx.) | % Daily Value* |
|---|---|---|
| Calories | 658 | 33% |
| Total Fat | 37g | 47% |
| Saturated Fat | 17g | 85% |
| Cholesterol | 161mg | 54% |
| Sodium | 420mg | 18% |
| Carbohydrates | 76g | 28% |
| Protein | 7g | 14% |
*Based on 2,000-calorie diet. Cream cheese adds protein: Oreos boost carbs.
Savor this special-occasion dessert in moderation for joyful moments with loved ones.
Red Velvet Oreo Cheesecake FAQs
Can I freeze Red Velvet Oreo Cheesecake?
Absolutely! I freeze slices all the time for when those cheesecake cravings hit. Wrap individual pieces tightly in plastic wrap, then foil. They’ll keep beautifully for up to 2 months. Thaw overnight in the fridge when you’re ready to enjoy. The texture stays perfect, just don’t try to thaw it in the microwave unless you want a melted mess!
How do I fix cracks in my cheesecake?
First, don’t panic! I’ve had cracks happen to the best of us. That’s why we make ganache, it’s the perfect cover-up! Just pour it over while slightly warm and let it fill those little imperfections. No one will ever know. For bigger cracks, crumble some of that extra red velvet cake and press it into the gap before adding ganache. It becomes a tasty “design feature” instead of a mistake.
What can I use if I don’t have buttermilk?
No buttermilk? No problem! My quick fix is adding 2 teaspoons of lemon juice or white vinegar to 2/3 cup regular milk. Let it sit for 5 minutes until it curdles slightly. Or you can use plain yogurt thinned with a bit of milk. The acidity is what really matters for that signature red velvet tang.
Can I make this without a springform pan?
You can, but I really recommend springform for easy serving. If you must use a regular pan, line it with parchment paper with extra hanging over the sides. After chilling, run a knife around the edges and use the parchment “handles” to lift it out carefully. Just know the sides won’t be as picture-perfect without that springform magic.
Why does my cheesecake filling have lumps?
Nine times out of ten, it’s because the cream cheese wasn’t room temperature enough. Cold cream cheese refuses to smooth out, no matter how long you mix! Next time, let it sit out for at least 2 hours before starting. If you’re stuck with lumps, you can strain the filling through a sieve before baking, tedious but worth it for that silky texture.
Decadent Red Velvet Desserts to Try
Enjoyed the rich flavors of Red Velvet Oreo Cheesecake? These indulgent treats showcase similar luxurious flavor and texture.
- Chocolate Chip Cookie Dough Brownie Bombs: Double the chocolate with cookie dough and fudgy brownies.
- Red Velvet Crinkle Cookies: Soft, vibrant cookies dusted with powdered sugar.
- Cheesecake Stuffed Chocolate Chip Cookies: Creamy cheesecake inside classic chocolate chip cookies.
- Mini Espresso Cheesecakes: Small bites with rich coffee flavor and smooth cheesecake.
Bake these next for elegant desserts that delight any special occasion or everyday indulgence!
Why Red Velvet Oreo Cheesecake Reigns Supreme
This Red Velvet Oreo Cheesecake recipe captivates with its stunning layers of cocoa-rich red velvet cake, creamy Oreo cheesecake, and glossy ganache, no water bath needed for flawless results. The cookie crunch balances tangy cream cheese for a decadent treat perfect for celebrations.
Bake this showstopper and share your creation in the comments below. Follow on Pinterest for more easy recipes!
Print
Red Velvet Oreo Cheesecake
- Total Time: 11 hours 50 minutes
- Yield: 12 servings 1x
- Diet: Vegetarian
Description
This stunning Red Velvet Oreo Cheesecake features a moist red velvet cake base, creamy Oreo cheesecake filling, rich ganache topping, and festive decorations for a show-stopping dessert.
Ingredients
- 1 1/2 cups all-purpose flour
- 2 tsp unsweetened cocoa powder
- 1/2 tsp salt
- 1/2 cup unsalted butter (room temperature)
- 1 cup granulated sugar
- 1/2 cup sour cream (room temperature)
- 1/4 cup vegetable oil
- 2 tsp pure vanilla extract
- 2 large eggs (room temperature)
- 4 tsp red food coloring
- 2/3 cup buttermilk (room temperature)
- 1 tsp baking soda
- 1 tsp white vinegar
- 10 Oreos (filling removed, wafers crushed)
- 24 oz full-fat cream cheese (room temperature)
- Oreo filling (from above)
- 1 cup granulated sugar
- 1 tbsp cornstarch (or 3 tbsp all-purpose flour)
- 1 cup sour cream (room temperature)
- 1 tbsp pure vanilla extract
- 3 large eggs + 1 egg yolk (room temperature)
- 15 Oreos (chopped)
- 1 cup dark chocolate chips
- 1/2 cup heavy cream
- 1 can store-bought cream cheese frosting
- 8 Oreos (chopped)
Instructions
- Preheat oven to 350°F. Line a 9-inch springform pan and an 8-inch round cake pan with parchment paper. Spray both with non-stick spray.
- In one bowl, whisk together flour, cocoa powder, and salt. Set aside.
- In another bowl, cream butter and sugar until light and fluffy, about 3-5 minutes.
- Mix in sour cream, vegetable oil, vanilla extract, eggs one at a time, and red food coloring until well combined and batter is fully colored.
- Gradually add dry ingredients alternately with buttermilk, starting and ending with dry ingredients. Mix until just combined.
- In a small bowl, stir baking soda and white vinegar together until it fizzes, then quickly fold into the batter.
- Divide batter between the prepared pans (most in springform pan). Bake for 18-20 minutes until a toothpick comes out clean. Cool completely.
- Crush 10 Oreo wafers into fine crumbs (save the filling). Set aside.
- Beat cream cheese, reserved Oreo filling, sugar, and cornstarch until completely smooth and no lumps remain.
- Add sour cream and vanilla extract, mixing until combined.
- Add whole eggs and egg yolk one at a time, mixing on low speed just until combined after each addition. Do not overmix.
- Fold in crushed Oreo wafers and chopped Oreos by hand.
- Pour cheesecake mixture over the cooled red velvet cake base in the springform pan. Smooth the top.
- Prepare a water bath: Wrap the outside of the springform pan tightly with foil. Place in a larger roasting pan.
- Place in preheated 300°F oven. Carefully pour hot water into the roasting pan until halfway up the springform pan.
- Bake for about 1 hour 30 minutes, until edges are set but center still jiggles slightly.
- Turn off oven, crack door open, and let cheesecake cool gradually in oven for 1 hour. Then cool to room temperature before refrigerating overnight.
- Microwave chocolate chips and heavy cream in 30-second intervals, stirring until smooth and glossy.
- Pour over chilled cheesecake and spread evenly. Let set in refrigerator.
- Crumble the reserved red velvet cake from the 8-inch pan and gently press crumbs onto the sides of the cheesecake.
- Pipe or spread store-bought cream cheese frosting on top and decorate with chopped Oreos.
Notes
- Use room temperature ingredients for smooth cheesecake batter.
- Cool gradually to prevent cracking.
- Decorate creatively for stunning presentation.
- Prep Time: 1 hour
- Cook Time: 1 hour 50 minutes
- Category: Dessert
- Method: Baking
- Cuisine: American
Nutrition
- Serving Size: 1 slice
- Calories: 520
- Sugar: 35g
- Sodium: 320mg
- Fat: 32g
- Saturated Fat: 18g
- Unsaturated Fat: 10g
- Trans Fat: 0.5g
- Carbohydrates: 50g
- Fiber: 2g
- Protein: 8g
- Cholesterol: 150mg
Keywords: Red Velvet Oreo Cheesecake, cheesecake recipe, red velvet dessert


