Butterfinger Poke Cake became a staple at my family gatherings after my aunt brought it to a summer cookout years ago. She watched everyone go back for seconds, then thirds, refusing to share her secret recipe until my cousin finally wore her down. Now it’s the dessert everyone requests for birthdays and holidays.

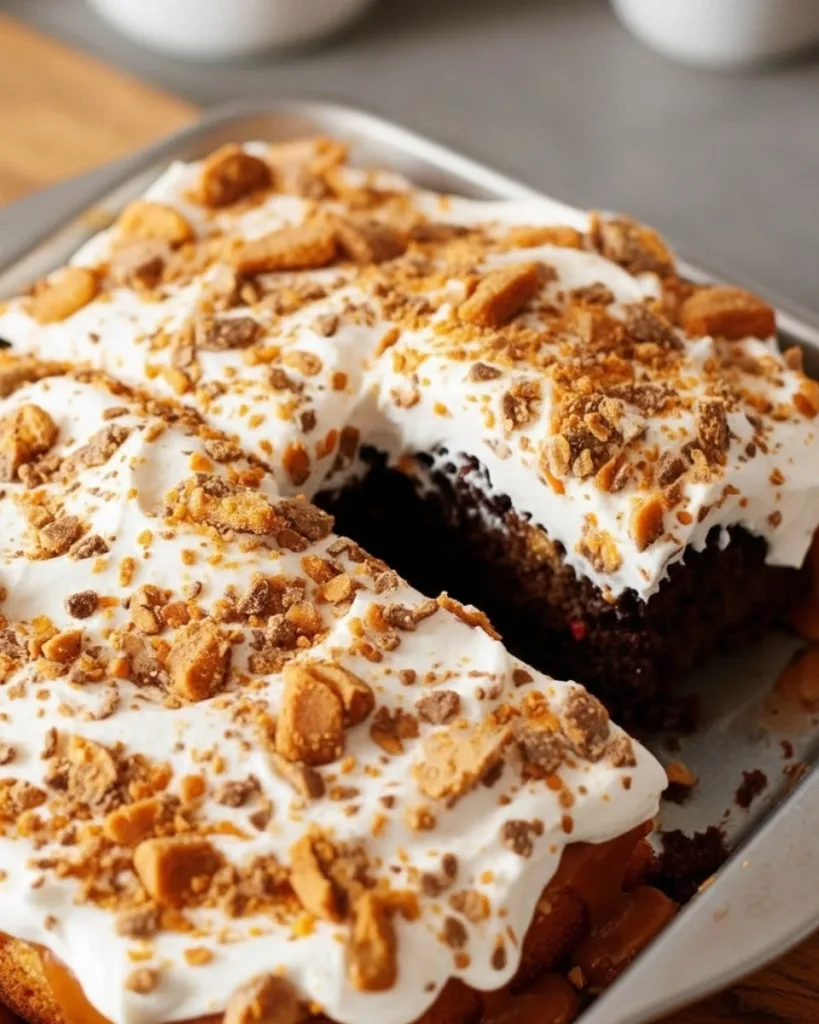
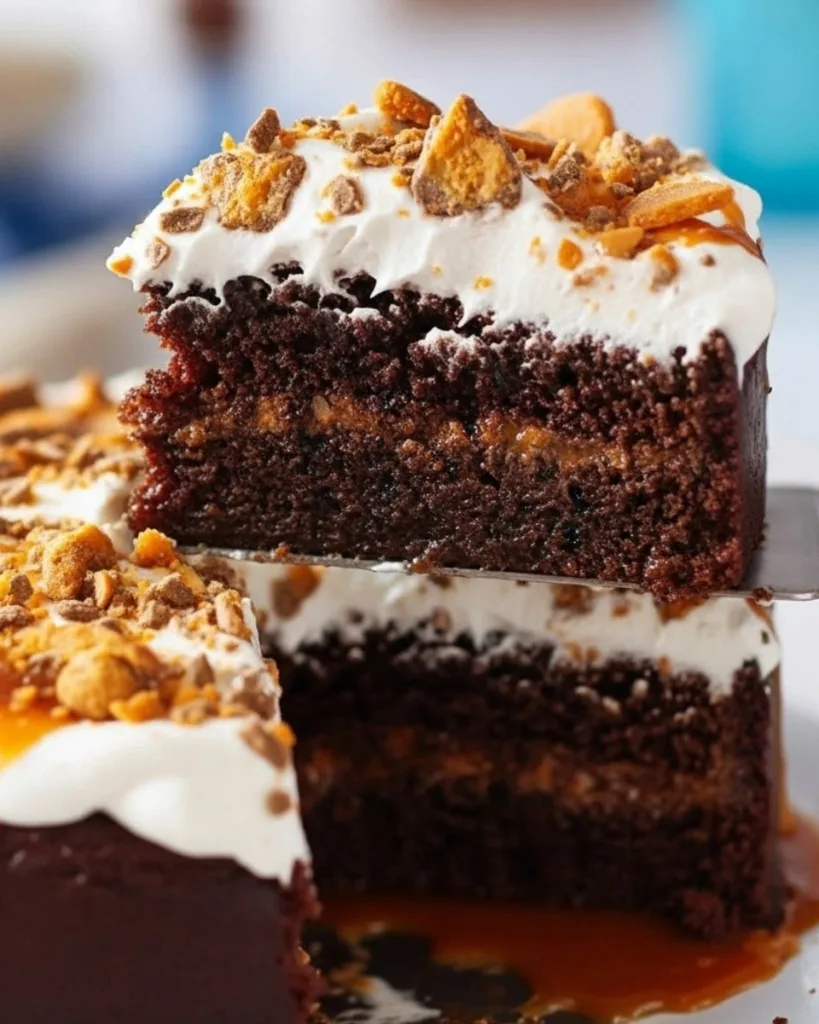
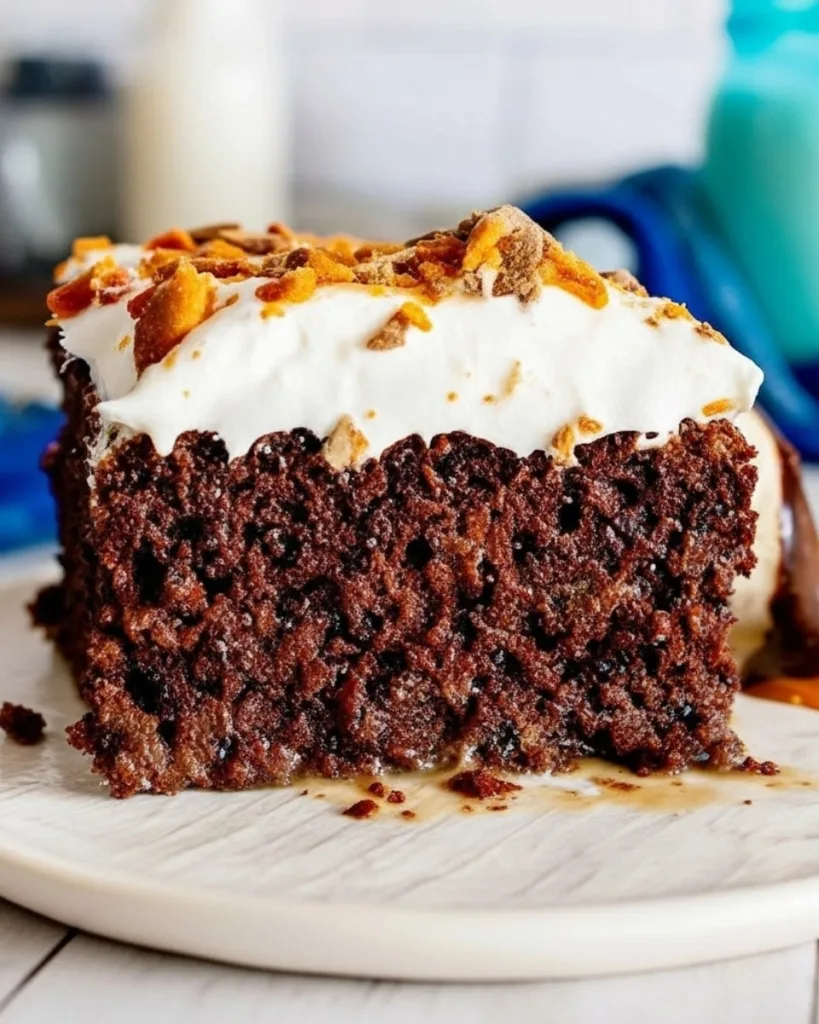
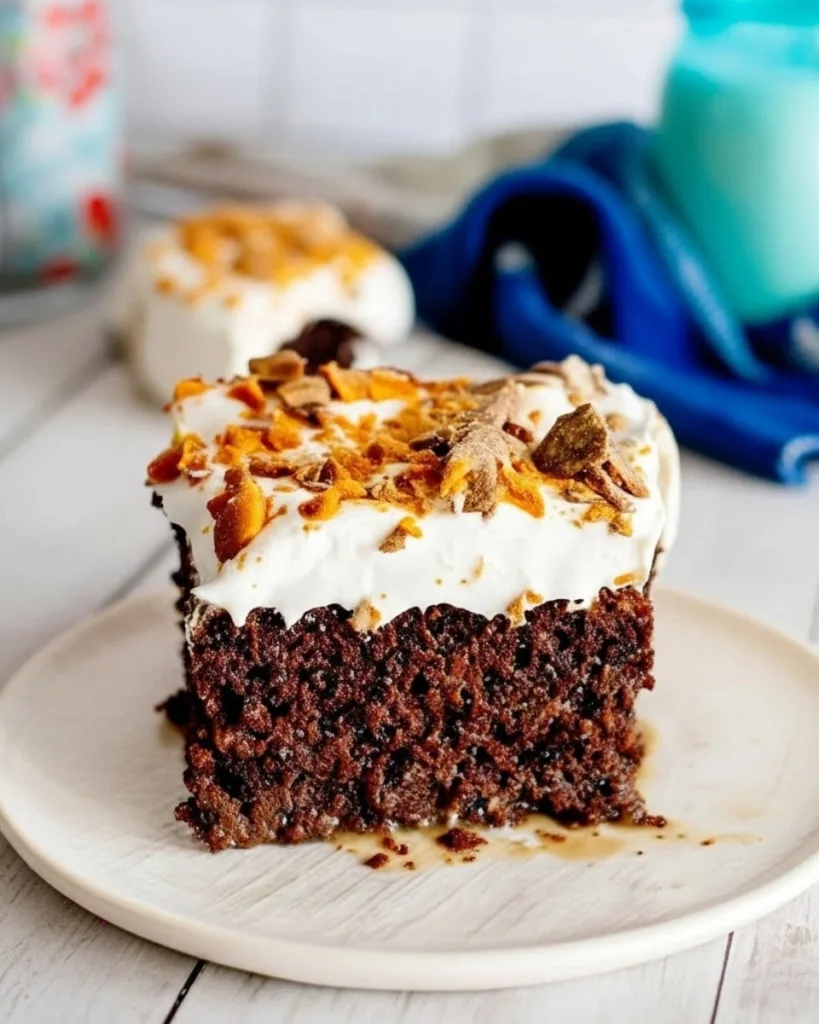
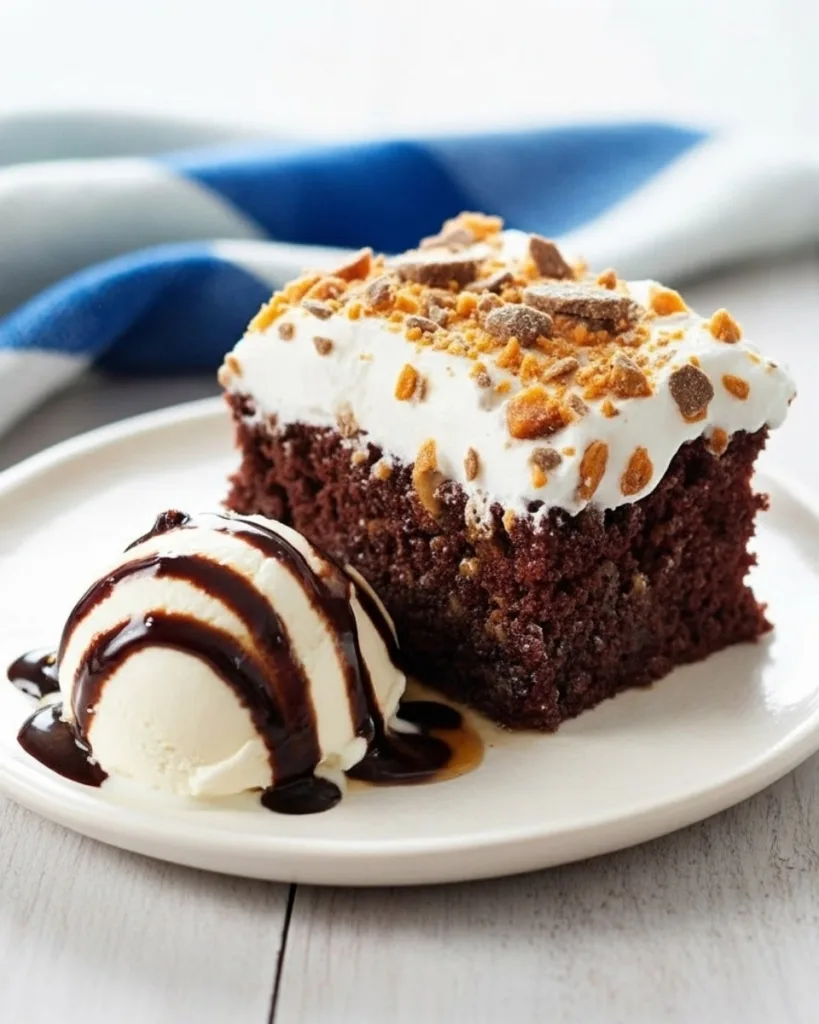
This cake transforms a simple box mix into something absolutely addictive. You bake a moist chocolate cake, poke holes throughout, then drench it in a mixture of sweetened condensed milk and caramel sauce. After it soaks in and gets nice and cold, you top everything with fluffy whipped cream and loads of crushed Butterfinger bars. That signature crunch against the soft, sweet cake creates the perfect bite every single time.
Table of Contents
Why You Will Love This Butterfinger Poke Cake Recipe
This Butterfinger Poke Cake delivers amazing flavor without complicated baking techniques. You start with a simple chocolate cake mix, which saves time and guarantees consistent results every time. The real magic happens after baking when you poke holes throughout the cake and drench it in sweetened condensed milk mixed with caramel sauce. This creates an incredibly moist texture that soaks up all those rich, sweet flavors.
The topping brings everything together perfectly. Fluffy whipped cream provides a light contrast to the dense, moist cake below. Then you add crushed Butterfinger candy bars on top, giving each bite that signature crunch everyone loves. The combination of soft cake, creamy filling, and crispy candy creates multiple textures in one dessert.
You can make this cake ahead of time, which helps during busy party prep. It actually tastes better after sitting overnight in the fridge because the flavors blend together more. Kids get excited about the candy bar pieces while adults appreciate the nostalgic peanut butter and chocolate combo. This recipe works great for birthdays, potlucks, family gatherings, or any time you want to impress guests with minimal effort. The entire process takes less than an hour of active work, making it perfect for busy home bakers.
Ingredients You’ll Need
For this Butterfinger Poke Cake, you’ll need a few simple pantry staples. Most of these ingredients are probably already in your kitchen, making this dessert super convenient to whip up.
For the Cake:
- 1 box (15.25 oz) yellow cake mix
- Eggs, oil, and water (as required by the cake mix package instructions)
For the Filling and Topping:
- 1 can (14 oz) sweetened condensed milk
- 1 jar (11.75 oz) caramel ice cream topping
- 1 container (8 oz) frozen whipped topping, thawed
- 4 full-size Butterfinger candy bars, crushed
Ingredient Notes & Substitutions
You can easily swap yellow cake mix for chocolate or marble cake mix if you prefer a richer chocolate base. The sweetened condensed milk creates that signature moist texture, so don’t substitute it with evaporated milk. They look similar but give completely different results.
For the whipped topping, Cool Whip works perfectly and stays stable longer than homemade whipped cream. However, you can make fresh whipped cream if you plan to serve the cake within a day or two. The caramel topping should be pourable, not thick caramel candies. Look for jarred ice cream toppings in the baking aisle. Feel free to use fun-size Butterfingers instead of full bars for easier crushing.
How to Make a Butterfinger Poke Cake?
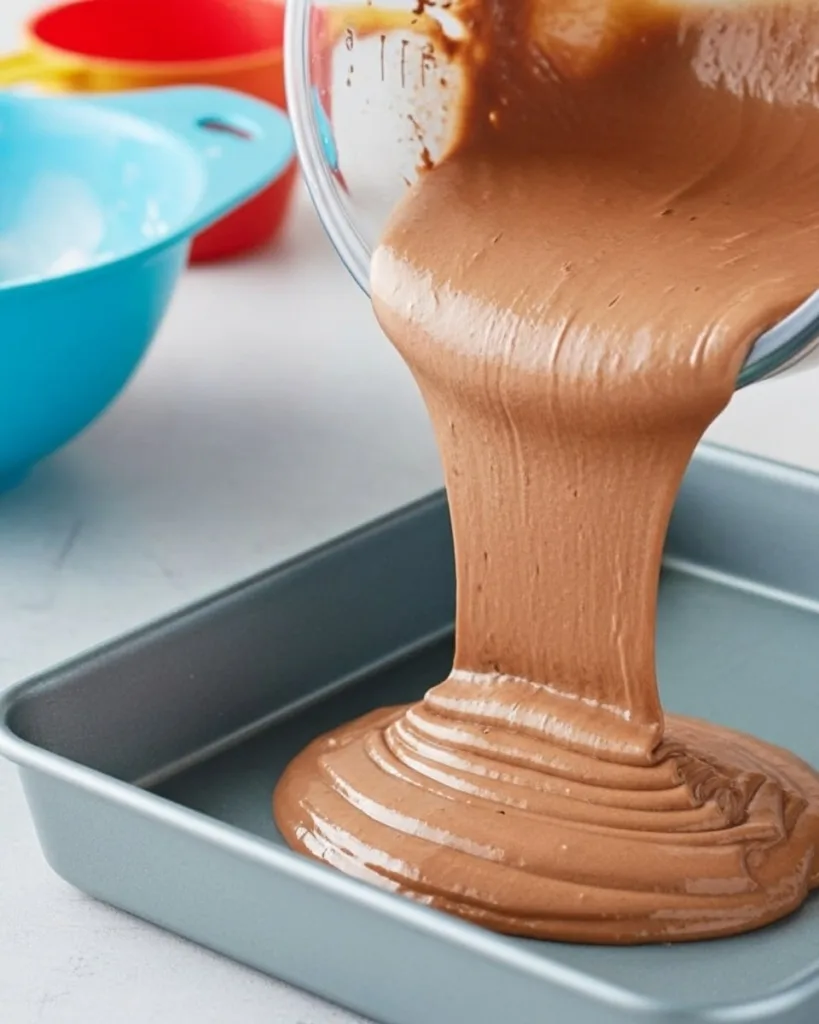
- Bake the Chocolate Cake: Begin by preparing a standard chocolate cake mix according to the package instructions. Use a 9×13 inch baking dish for an ideal size. Once baked, allow the cake to cool slightly.
- Poking Holes: With the cake still warm, use the end of a wooden spoon or a similar object to poke holes throughout the cake. These holes allow the next layers to seep into the cake, creating pockets of flavor.
- Add Caramel Sauce: Pour a rich, gooey caramel sauce over the cake, making sure it fills the holes. This adds a moist, sweet depth to the cake.
- Spread Peanut Butter Filling: In a separate bowl, mix smooth peanut butter with a little confectioners’ sugar and milk to create a creamy filling. Gently spread this over the cake.
- Top with Whipped Cream: Once the peanut butter layer settles, cover the cake with a layer of whipped cream, creating a light and fluffy top.
- Sprinkle Butterfinger Pieces: Crush Butterfinger candy bars into small pieces and sprinkle them generously over the whipped cream layer, adding a delightful crunch.
- Chill the Cake: Refrigerate the cake for a few hours to allow the layers to meld together beautifully.
Pro Tips for the Best Butterfinger Poke Cake
- Save half the crushed candy to sprinkle on top right before serving. This keeps those pieces extra crunchy instead of soft from sitting in the fridge.
- Freeze your Butterfinger bars for 30 minutes before crushing them. This prevents them from getting sticky and makes them break into perfect chunks instead of clumping together.
- Use a glass measuring cup with a spout to pour the caramel mixture. This gives you better control and helps the filling reach all the holes evenly without making a mess.
- Poke holes two-thirds of the way down, not all the way through. This keeps the filling from leaking out the bottom and ensures every bite stays moist without becoming soggy.
- Substitute milk for water and melted butter for oil in your cake mix. This creates a richer, denser crumb that holds up better to all that caramel soaking.
Fun Variations to Try
This Butterfinger Poke Cake recipe works as a base for countless delicious twists. Get creative and make it your own with these flavor combinations.
- Chocolate Lovers Version: Use chocolate cake mix instead of yellow and add chocolate pudding mix to the caramel filling for extra richness.
- Peanut Butter Overload: Mix 1/2 cup creamy peanut butter into the sweetened condensed milk before pouring it over the cake for deeper flavor.
- Candy Bar Swap: Replace Butterfingers with crushed Snickers, Reese’s Peanut Butter Cups, or Heath bars for completely different taste profiles.
- Coffee Twist: Add 2 tablespoons instant espresso powder to the caramel mixture for a sophisticated mocha flavor that complements the peanut butter.
- Individual Servings: Make this recipe in a muffin tin for portable poke cakes perfect for lunchboxes or parties.
- Salted Caramel Upgrade: Sprinkle flaky sea salt over the whipped topping before adding crushed candy for a sweet and salty contrast.
How to Store the Cake?
- Refrigeration: Keep the cake in the refrigerator, covered, for up to 5 days. The cold temperature helps maintain its moist texture and keeps the whipped cream stable.
- Freezing Option: For longer storage, you can freeze the cake. Wrap individual pieces in plastic wrap and store them in an airtight container. Thaw in the refrigerator before serving.
The Butterfinger Poke Cake is a testament to culinary creativity, blending classic flavors in a new and exciting way. Its rich texture and harmonious blend of ingredients make it a standout dessert that’s both satisfying and impressively delightful.
Can I Use Regular-Size Butterfingers Instead of Fun-Size?
Absolutely! Regular-size Butterfinger bars can be used in place of fun-size bars in this recipe. The key is to crush the Butterfingers into small, manageable pieces that blend well with the cake’s texture. Regular-size bars will yield more crushed candy, which means more of that delicious Butterfinger flavor in every bite. Make sure to crush the pieces evenly to maintain a consistent texture throughout the cake.
What’s the Best Peanut Butter to Use in This Recipe?
For the Butterfinger Poke Cake, the best peanut butter to use is a smooth, creamy variety. This type of peanut butter blends seamlessly into the filling, providing a rich, velvety texture without overpowering the other flavors. Avoid using chunky or natural peanut butters that separate, as they can affect the consistency of your filling. A standard, commercially available creamy peanut butter works best for a consistent, delicious result.
Can I Use Yogurt Instead of Sour Cream in the Cake?
Yes, you can substitute yogurt for sour cream in this cake recipe. Yogurt is a great alternative, offering a similar tang and moisture content. For best results, use plain, unsweetened Greek yogurt, as it’s thicker and closer in texture to sour cream. This swap won’t significantly alter the flavor of the cake but can make it slightly lighter in texture.
I Don’t Like Whipped Topping. What Can I Use Instead?
If whipped topping isn’t to your liking, there are several delicious alternatives you can use for your Butterfinger Poke Cake. One option is homemade whipped cream, which is easy to make and offers a fresher, richer taste. Another alternative is a mascarpone or cream cheese frosting, which provides a thicker, creamier texture and a slight tang that complements the cake’s flavors. You can sweeten and flavor these substitutes to suit your taste, tailoring your Butterfinger Poke Cake to your personal preferences.
Nutritional Information
Please note that the following nutritional information is an estimate and can vary depending on the specific brands of ingredients you use. Different cake mixes, caramel sauces, and candy bars will affect these values. These calculations are based on 12 servings per 9×13-inch cake.
| Nutrient | Per Serving (1 slice) |
|---|---|
| Calories | 350 kcal |
| Total Fat | 14g |
| Saturated Fat | 8g |
| Cholesterol | 45mg |
| Sodium | 420mg |
| Total Carbohydrates | 52g |
| Dietary Fiber | 1g |
| Sugars | 38g |
| Protein | 6g |
| Calcium | 140mg |
| Iron | 1.5mg |
Butterfinger Poke Cake FAQs
What is a Butterfinger Poke Cake?
A Butterfinger Poke Cake is a dessert that combines a moist chocolate cake with a rich filling, typically involving caramel and peanut butter, and topped with whipped cream and crushed Butterfinger candy bars. The cake is characterized by holes poked throughout, allowing the filling to seep in and create a moist, flavorful treat.
Can I make the Butterfinger Poke Cake ahead of time?
Yes, you can make the Butterfinger Poke Cake in advance. It’s actually recommended to prepare it at least a few hours before serving, as this allows the flavors to meld together. The cake can be stored in the refrigerator for up to 5 days.
Is it possible to make a gluten-free version of this cake?
Absolutely! To make a gluten-free Butterfinger Poke Cake, simply use a gluten-free chocolate cake mix and ensure that all other ingredients, including the Butterfinger bars, are gluten-free.
How many calories are in one piece of Butterfinger cake?
The calorie content in one piece of Butterfinger Poke Cake can vary depending on the specific recipe and serving size. On average, a standard serving (about 1/12th of a 9×13 inch cake) might contain anywhere from 350 to 500 calories. This estimate can change based on factors like the type of cake mix used, the amount of toppings and fillings, and the size of the slice. For a more accurate calorie count, it’s best to calculate based on the specific ingredients and quantities used in your recipe.
Time to Bake This Cake
This Butterfinger Poke Cake brings together everything you love about chocolate, peanut butter, and caramel in one simple dessert. The moist cake soaks up all that sweet filling while the crushed candy bars add the perfect crunch on top. You can mix and match ingredients based on what you have in your pantry, making it easy to customize for your taste.
Next time you need a crowd-pleasing dessert, give this recipe a try. It works great alongside other treats like Chocolate Peanut Butter Fudge Bars, No-Bake Peanut Butter Oatmeal Cookies, Chocolate Eclair Cake, or Banana Split Cake. Each one delivers big flavor without complicated techniques.
Want more easy dessert recipes and baking tips? Follow me on Instagram and Pinterest where I share new creations every week. Let’s keep making delicious memories together, one bite at a time.
Print
Butterfinger Poke Cake
- Total Time: 50 minutes (plus chilling time)
- Yield: 12 slices 1x
- Diet: Vegetarian
Description
This Butterfinger Poke Cake is an irresistible combination of moist yellow cake, creamy caramel, fluffy whipped topping, and crushed Butterfinger candy bars. It’s sweet, crunchy, and incredibly easy to make, perfect for birthdays, potlucks, or whenever you need a crowd-pleasing dessert.
Ingredients
For the Cake:
- 1 box (15.25 oz) yellow cake mix
- Eggs, oil, and water as required by the cake mix package
For the Filling & Topping:
- 1 can (14 oz) sweetened condensed milk
- 1 jar (11.75 oz) caramel ice cream topping
- 1 container (8 oz) frozen whipped topping, thawed
- 4 full-size Butterfinger candy bars, crushed
Instructions
- Bake the Cake: Prepare the yellow cake mix according to package directions. Bake in a greased 9×13-inch pan at 350°F for about 28-33 minutes, or until a toothpick inserted in the center comes out clean.
- Poke the Cake: Let the cake cool for 10 minutes, then use the handle of a wooden spoon to poke holes all over the top, spacing them about 1 inch apart.
- Add Caramel Mixture: In a medium bowl, whisk together sweetened condensed milk and caramel sauce until smooth. Pour evenly over the warm cake, spreading gently so it fills the holes.
- Cool & Chill: Allow the cake to cool completely for 30–45 minutes so the caramel soaks in.
- Top with Whipped Cream: Spread the thawed whipped topping evenly over the cooled cake.
- Add Candy Topping: Sprinkle crushed Butterfinger bars evenly on top. For extra caramel flavor, drizzle with a bit more caramel sauce if desired.
- Chill & Serve: Cover and refrigerate at least 1 hour before serving, 2-4 hours for the best flavor. Slice and enjoy!
Notes
Crush the Butterfinger bars in a sealed plastic bag using a rolling pin for the perfect mix of chunks and crumbs.
This cake tastes even better after chilling overnight.
Store leftovers covered in the fridge for up to 3 days. The candy softens slightly but stays delicious!
- Prep Time: 20 minutes
- Cook Time: 30 minutes
- Category: Dessert
- Method: Baking
- Cuisine: American
Nutrition
- Serving Size: 1 slice
- Calories: 350
- Sugar: 42g
- Sodium: 280mg
- Fat: 15g
- Saturated Fat: 8g
- Unsaturated Fat: 6g
- Trans Fat: 0g
- Carbohydrates: 52g
- Fiber: 1g
- Protein: 4g
- Cholesterol: 45mg
Keywords: butterfinger poke cake, caramel poke cake, candy bar dessert, easy make-ahead dessert


