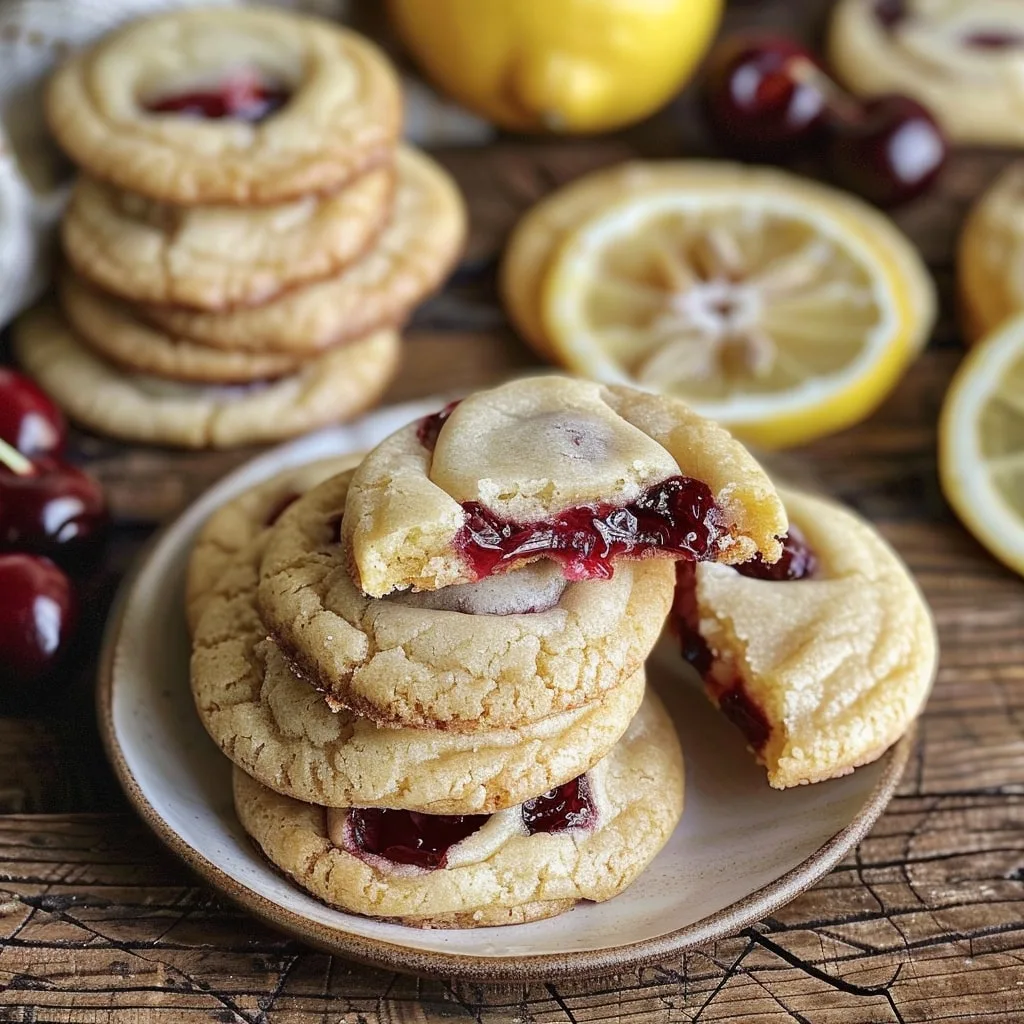
There’s something absolutely magical about that perfect sweet-and-tangy combination in baking, isn’t there? It’s that little zing that makes you close your eyes and say, “Wow.” Well, get ready, because these Cherry Lemon Cookies are the complete package. We’re talking about a ridiculously soft, buttery cookie that practically melts in your mouth. Tucked right in the center is a sweet little jewel of cherry jam that’s just waiting to surprise you.

But the real showstopper, the part that makes these cookies disappear from the plate in minutes, is the glaze. It’s a bright, zesty lemon glaze that cuts through all that sweetness and just wakes everything up in the best possible way. These have become my go-to for spring parties, baby showers, or honestly, just for brightening up a gloomy Tuesday. They look like little drops of sunshine and taste even better. You’re going to fall in love with them, I promise.
Table of Contents
Why You’ll Love These Cherry Lemon Cookies
Okay, beyond the fact that they’re just plain delicious, I’m pretty sure this recipe is going to become a new staple in your kitchen. If you’re not convinced yet, here are a few reasons why you’ll fall head over heels for these little guys:
- They’re so simple to make. Seriously! We’re talking about basic ingredients you probably have hanging out in your pantry and fridge right now. No weird steps, no fancy techniques. It’s just straightforward baking that gives you incredible results every single time.
- The perfect flavor explosion. This is what it’s all about. You get that rich, buttery cookie, the sweet pop of cherry jam in the middle, and then—BAM!—that zippy lemon glaze hits you. It’s a perfect sweet-and-tangy party in your mouth.
- They look like they came from a bakery. These cookies are just so cheerful and pretty! The bright red jam and the pale yellow glaze make them look way more complicated than they are. They are absolutely perfect for sharing at a potluck or making any regular Tuesday feel special.
Essential Equipment for Cherry Lemon Cookies
Good news! You don’t need a whole bunch of fancy gadgets to make these cookies. Most of this stuff is probably already hanging out in your kitchen. This is a pretty low-fuss recipe, which is another reason I love it so much. Here’s what you’ll want to have handy:
- Baking Sheets and Parchment Paper: A couple of sturdy baking sheets are all you need. And trust me, you want to line them with parchment paper. It’s a total lifesaver for cleanup and ensures your cookies don’t stick to the pan.
- Electric Mixer or a Whisk: An electric mixer, either a stand mixer or a handheld one, makes creaming the butter and sugar super quick. But don’t worry if you don’t have one! A bowl, a whisk, and a little bit of arm power will get the job done just fine.
- Mixing Bowls: Grab two of them. You’ll use one for your wet ingredients and another for whisking together all the dry stuff. Nothing complicated here.
- Wire Cooling Rack: This one is pretty important! Letting the cookies cool on a wire rack allows air to get underneath them, so they don’t get soggy on the bottom. It helps them firm up perfectly.
Ingredients for Cherry Lemon Cookies
Alright, let’s talk ingredients! I absolutely love this recipe because there are no weird, hard-to-find items on this list. It’s all about simple, good-quality pantry staples that come together to create something that tastes incredibly special. You’ve probably got most of this stuff in your kitchen right now. Let’s break down exactly what you’ll need for the soft cookie base and that bright, zesty glaze.
For the Cookie Dough
This is the foundation of our cookie, so using the right ingredients here is key to getting that perfect soft and buttery texture.
- 1 cup unsalted butter, softened to room temperature: This is so important! Let it sit on the counter for an hour or so. Softened butter creams beautifully, but melted butter will make your cookies spread.
- 1/2 cup granulated sugar: Just regular white sugar is perfect here.
- 2 large eggs: They help bind everything together and add richness.
- 1 teaspoon vanilla extract: Use the good stuff if you have it! It adds a wonderful warmth.
- 2 3/4 cups all-purpose flour: The backbone of our cookies.
- 1 teaspoon baking soda & 1/2 teaspoon baking powder: This combination gives our cookies the perfect lift and spread.
- 1/2 teaspoon salt: Don’t skip it! Salt balances all the sweetness.
- 1 cup cherry jam: I love a classic cherry jam, but you can use your favorite brand or thickness.
For the Zesty Lemon Glaze
This is where the magic happens! This simple glaze is what takes these cookies from great to absolutely unforgettable.
- 2 cups powdered sugar: Also called confectioners’ sugar. This will dissolve to make a super smooth glaze.
- 2-3 tablespoons fresh lemon juice: Please, please use juice from a real lemon! The flavor is so much brighter and better than the bottled kind. It makes all the difference.
- Zest of 1 lemon: This adds little specks of yellow and a huge punch of lemon oil and aroma.
- Yellow food coloring (optional): I sometimes add one tiny drop just to give the glaze a cheerful, sunny yellow color, but it’s totally up to you!
How to Make Perfect Cherry Lemon Cookies
Okay, this is where the fun really begins! Making these cookies is genuinely a joy, and the process is super straightforward. Just follow along, and I promise you’ll have a batch of the most delicious, sunshine-y cookies on your counter in no time. Let’s get our hands a little floury!
Preparing the Cookie Dough
First things first, let’s get that oven going. Crank it up to 350°F and get your baking sheets lined with parchment paper. This little step makes cleanup a breeze later, and you’ll thank yourself for it.
Now, grab your big mixing bowl and your softened butter. Remember, we want it soft, not a puddle of melted butter! Toss in the granulated sugar and cream them together. If you have an electric mixer, this will take just a minute or two. You’re looking for the mixture to get pale, light, and fluffy. It should look almost like a cloud. That’s how you know you’ve whipped enough air into it, which is the secret to a soft cookie.
Next, crack in your eggs, one at a time, mixing well after each one. Then, splash in that lovely vanilla extract. In a separate bowl, whisk together your dry ingredients: the flour, baking soda, baking powder, and salt. Just give them a quick mix to make sure everything is evenly distributed.
Here comes the most important tip: gradually add the dry mixture to your wet butter mixture, and mix only until it’s *just* combined. Seriously, stop as soon as you don’t see any more big streaks of flour. If you overmix here, your cookies can get tough, and we are aiming for melt-in-your-mouth tender!
Shaping and Baking Your Cherry Lemon Cookies
Time to form our little cookies! I like to use a tablespoon or a small cookie scoop to get uniform little balls of dough. Drop them onto your prepared baking sheets, leaving about 2 inches between them so they have room to spread a little.
Now for the thumbprint part! You can use your actual thumb, or I find the rounded back of a half-teaspoon measuring spoon works perfectly. Gently press an indentation into the center of each dough ball. Don’t press all the way through, just enough to make a little well for our jam. Then, fill each little pocket with a small spoonful of that delicious cherry jam. Don’t overfill, or it might bubble over the sides in the oven.
Pop those trays into your preheated oven and bake for about 10 to 12 minutes. You’ll know they’re ready when the edges are just starting to turn a light golden brown. They might look a little soft in the center, but that’s perfect! Let them cool on the baking sheet for a few minutes; this helps them set up before you gently move them over to a wire rack to cool completely.
Making and Applying the Lemon Glaze
Please, whatever you do, wait until the cookies are completely cool before you even think about the glaze! If they’re even a little bit warm, the glaze will just melt right off and make a sticky mess. Patience is key here!
Once they’re cool, whisk together the powdered sugar, lemon zest, and about 2 tablespoons of the fresh lemon juice in a small bowl. Keep whisking until it’s smooth. You’re looking for a consistency that’s thick but still pourable. If it’s too thick, add a tiny bit more lemon juice. If it’s too thin, add a little more powdered sugar. This is also when you’d add a tiny drop of yellow food coloring if you want that extra sunny look.
Now, the grand finale! You can use a spoon or a fork to drizzle that gorgeous lemon glaze all over your cooled cookies. I love the random, pretty patterns a fork makes. Let the cookies sit for a little while so the glaze can set and harden before you stack them up or serve them. And that’s it! You did it!
Pro Tips for the Best Cherry Lemon Cookies
I’ve made these cookies more times than I can count, and along the way, I’ve picked up a few little tricks that really make a difference. These are my secrets for getting them absolutely perfect every single time. Think of this as our little cheat sheet!
- Master the Butter Temperature. I know I keep saying this, but it’s the number one rule of good cookies! Your butter must be softened, not melted. Melted butter will make your cookies spread out into flat, greasy discs. The perfect test? Press your finger into the stick of butter. If it leaves a gentle indent, you’re golden. If it feels oily or your finger sinks right in, it’s too soft.
- A Cookie Scoop is Your Best Friend. If you want your cookies to look like they came from a fancy bakery, a small cookie scoop is the way to go. It ensures all your dough balls are the same size, which means they bake evenly. No more trays with one burnt cookie and one that’s still raw in the middle!
- When in Doubt, Chill Out. Is your dough feeling super sticky and impossible to work with? Don’t worry! This can happen, especially if your kitchen is warm. Just cover the bowl with plastic wrap and pop it in the fridge for about 30 minutes. This will firm up the dough just enough to make it easy to handle again.
- Don’t Overfill the Jam. It’s tempting to load up that little thumbprint with a huge dollop of jam, but try to resist! A little goes a long way. If you overfill it, the jam is more likely to bubble over in the oven and burn on your pan. A small spoonful is all you need for that perfect burst of cherry flavor.
Fun Variations for Your Cherry Lemon Cookies
Okay, while I think these cookies are pretty much perfect as is, one of the best parts of baking is playing around and making a recipe your own! This recipe is a fantastic starting point for getting creative in the kitchen. If you’re in the mood to experiment, here are a few of my absolute favorite ways to switch things up a bit.
- Swap out the jam. This is the easiest and most obvious change! While cherry is a classic, raspberry jam with the lemon glaze is a match made in heaven. Apricot or even strawberry jam would also be incredible. Use whatever you have in the fridge that sounds good!
- Play with the citrus. If lemon isn’t your favorite, feel free to change it! Using fresh lime juice and zest in the glaze gives these a super fun cherry-limeade vibe that’s perfect for summer. You could also try orange juice and zest for a slightly sweeter, warmer flavor.
- Add a hint of almond. This is my little secret for when I want these to taste extra special. Adding just a half teaspoon of almond extract to the cookie dough along with the vanilla gives them a sophisticated, almost cherry-bakewell flavor. It pairs beautifully with the jam!
- Go nuts! For a little extra texture and crunch, try mixing about a half cup of finely chopped almonds into the cookie dough. The nutty flavor is a perfect partner for the sweet cherry and tangy citrus.
Storage Instructions
Okay, on the off chance you have any of these Cherry Lemon Cookies left over (which, let’s be real, is a big ‘if’ in my house!), storing them is super easy. Once that lovely lemon glaze has completely set, just pop them into an airtight container. They’ll stay wonderfully soft and delicious on your counter for up to 4 days. I usually slip a piece of parchment paper between the layers to keep the pretty glaze from sticking together.
And yes, you can absolutely freeze them for later! For already-baked cookies, I like to freeze them in a single layer on a baking sheet first. Once they’re solid, I’ll toss them into a freezer-safe bag. They’ll be perfect for up to 3 months. Just let them thaw on the counter when a craving hits.
My favorite trick, though, is freezing the unbaked dough balls. Shape them, make the thumbprints, and freeze them on a sheet before bagging them. You can bake them straight from the freezer, no need to thaw! Just add a minute or two to the baking time. It’s my secret weapon for having fresh-baked cookies in a flash.
FAQs About Cherry Lemon Cookies
I get a lot of questions about this recipe, and I love it! It means you’re in your kitchen getting ready to bake, which makes me so happy. Here are the answers to a few of the most common things people ask. Hopefully, this helps you get perfect cookies on your very first try!
Can I use fresh cherries instead of jam for these Cherry Lemon Cookies?
That’s a great question! While I usually stick with jam because it has the perfect thick consistency and is super convenient, you can absolutely use fresh cherries if you’re feeling a little adventurous. You’ll just need to cook them down first.
Just pit and roughly chop about a cup of fresh cherries. Toss them in a small saucepan with a couple of tablespoons of sugar and a little squeeze of lemon juice. Let them bubble away over medium heat for about 10-15 minutes, stirring occasionally, until the cherries have broken down and the mixture has gotten nice and thick. The most important part is to let this homemade filling cool completely before you put it in your cookies!
Why did my cookies spread out too much?
Oh, the dreaded flat cookie! Don’t worry, it happens to all of us. Nine times out of ten, the culprit is your butter. If your butter was too soft or even slightly melted when you creamed it with the sugar, the fat will melt way too quickly in the oven before the cookie has a chance to set up. That’s what causes all that spreading.
The easy fix? Chill your dough! If your dough feels really soft or sticky after you mix it, just cover the bowl and pop it in the refrigerator for about 30 minutes. This will firm up the butter and give your cookies a much better chance of holding their shape. It’s a simple step that makes a huge difference.
Can I make the cookie dough ahead of time?
Oh, absolutely! This is one of my favorite things about this recipe. This dough is perfect for making ahead of time, which is a lifesaver when you’re busy. You have two options here. You can make the dough, wrap the bowl tightly in plastic wrap, and keep it in the refrigerator for up to 3 days. When you’re ready to bake, just scoop and go!
Even better, you can freeze it. I love to scoop the dough into balls, make the thumbprint indentations, and then freeze them in a single layer on a baking sheet. Once they’re solid, toss them into a freezer bag. They’ll keep for up to 3 months! You can bake them right from the freezer, no thawing needed. Just add an extra minute or two to the baking time.
Nutritional Information
Alright, for those of you who like to keep an eye on the details, here’s a quick peek at the numbers for one of these delicious cookies. Each cookie has about 180 calories, 18g of sugar, 7g of fat, and 2g of protein. It’s a perfect little treat to brighten your day!
Now, please remember that this is just my best estimate! The exact numbers can vary a little depending on the specific ingredients you use, like the brand of your jam or butter. Think of this as a helpful guideline, not a super-strict nutritional label. The most important thing is to enjoy them!
Share Your Cherry Lemon Cookie Creations
And there you have it! I am so excited for you to bake these and fill your kitchen with that amazing cherry and lemon smell. It’s one of my favorite things. If you make these cookies, I would absolutely love it if you’d come back and leave a comment and a star rating below. It truly makes my day to hear how they turned out for you!
Even better, let’s see them! Snap a photo of your beautiful little cookie creations and share it on Instagram @recipesbycharlotte. If you tag me, I’ll be sure to see it. Happy baking, everyone!
Print
Cherry Lemon Cookies
- Total Time: 32 minutes
- Yield: 24 cookies 1x
- Diet: Vegetarian
Description
These are delightful cherry lemon cookies perfect for any occasion. A bright citrus glaze wonderfully complements the sweet cherry filling inside a soft, buttery cookie.
Ingredients
- 1 cup unsalted butter, softened
- 1/2 cup granulated sugar
- 2 large eggs
- 1 teaspoon vanilla extract
- 2 3/4 cups all-purpose flour
- 1 teaspoon baking soda
- 1/2 teaspoon baking powder
- 1/2 teaspoon salt
- 1 cup cherry jam
- 2 cups powdered sugar
- 2–3 tablespoons lemon juice
- Zest of 1 lemon
- Yellow food coloring (optional)
Instructions
- Preheat your oven to 350°F (175°C). Line baking sheets with parchment paper.
- In a large bowl, cream together the softened butter and granulated sugar until light and fluffy.
- Beat in the eggs one at a time, then add the vanilla extract.
- In another bowl, whisk together the flour, baking soda, baking powder, and salt.
- Gradually add the dry ingredients to the wet ingredients, mixing until just combined.
- Drop rounded tablespoons of dough onto the prepared baking sheets, spacing them about 2 inches apart.
- Using your thumb or the back of a spoon, make an indentation in the center of each cookie and fill with a small amount of cherry jam.
- Bake for 10-12 minutes, or until the edges are lightly golden.
- Let the cookies cool on the baking sheets for a few minutes, then transfer them to wire racks to cool completely.
- In a small bowl, whisk together the powdered sugar, lemon juice, and lemon zest until smooth. Add yellow food coloring if desired.
- Drizzle the lemon frosting over the cooled cookies and let it set before serving.
Notes
- Ensure your butter is softened, not melted, for the best cookie texture.
- Do not overmix the dough after adding the flour to keep the cookies tender.
- Adjust the amount of lemon juice in the glaze to reach your desired consistency.
- Let the cookies cool completely before you add the glaze.
- Prep Time: 20 minutes
- Cook Time: 12 minutes
- Category: Cookies
- Method: Baking
- Cuisine: American
Nutrition
- Serving Size: 1 cookie
- Calories: 180 kcal
- Sugar: 18g
- Sodium: 140mg
- Fat: 7g
- Saturated Fat: 4g
- Unsaturated Fat: 3g
- Trans Fat: 0g
- Carbohydrates: 28g
- Fiber: 1g
- Protein: 2g
- Cholesterol: 35mg
Keywords: Cherry Lemon Cookies, Thumbprint Cookies, Lemon Glaze Cookies, Cherry Jam Cookies, Cookie Recipe


