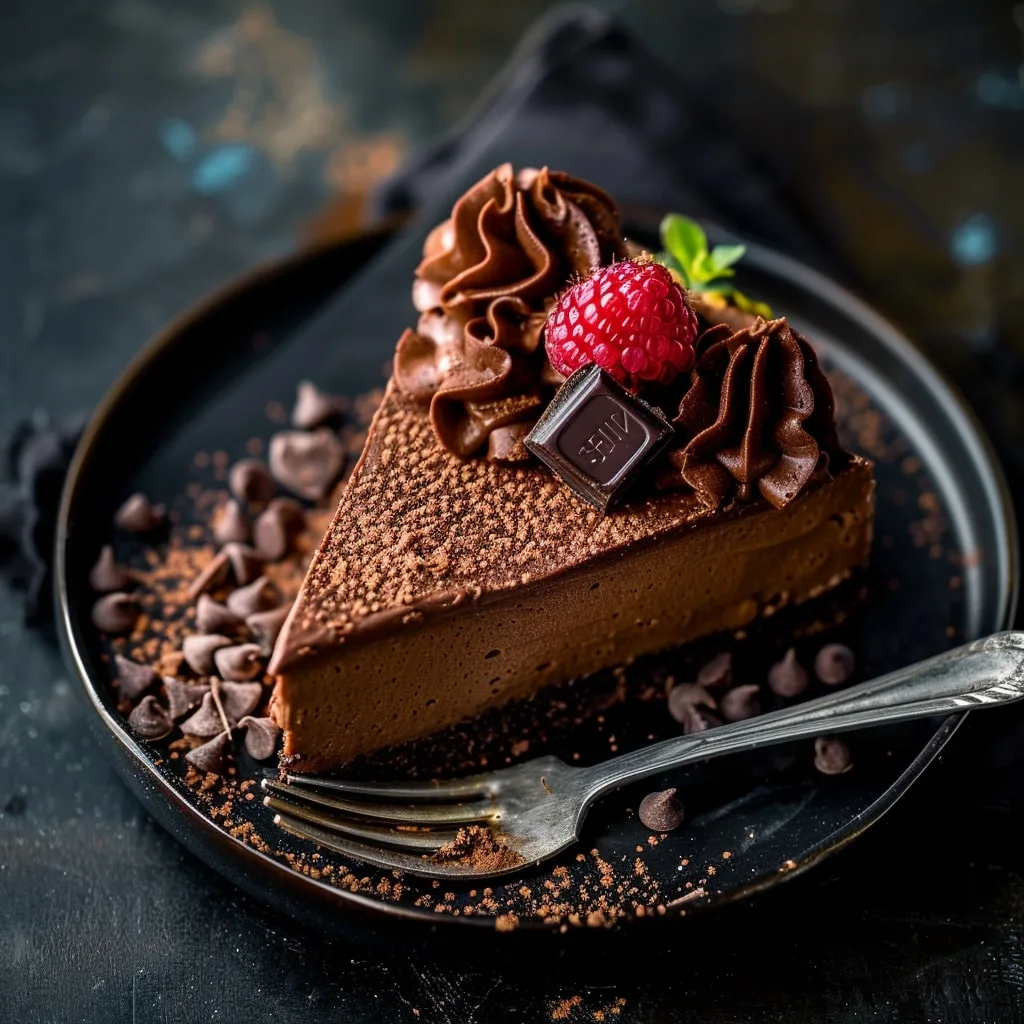
If you’ve ever found yourself torn between dessert and an after-dinner coffee, let me introduce you to your new obsession: this No-Bake Espresso Chocolate Cheesecake. I’ve spent years perfecting this recipe, balancing the rich bitterness of espresso with deep chocolate flavors in the creamiest cheesecake you’ll ever taste. And the best part? No oven required!
This decadent beauty came about during one of those late-night brainstorming sessions where my love for coffee shops and chocolate collided. After dozens of test batches (a hardship, I know), I landed on this magical combination of Oreo crust, espresso-kissed chocolate filling, and that glossy ganache topping that makes everyone’s eyes widen when you bring it to the table.
What I love most is how fancy it looks while being surprisingly simple to make. The hardest part is waiting those six hours while it chills, but trust me, that first velvety bite makes the anticipation completely worth it. Whether you’re hosting a dinner party or just treating yourself, this espresso chocolate cheesecake is about to become your go-to showstopper.
Table of Contents
Why You’ll Love This Espresso Chocolate Cheesecake
Let me count the ways this cheesecake will steal your heart (and probably your waistline)! First off – no baking means no stress about cracked tops or water baths. Just mix, chill, and devour. The flavor? Imagine your favorite chocolate dessert had a beautiful lovechild with espresso. That rich, slightly bitter depth cuts through the sweetness perfectly.
Here’s what makes it special:
- Creamy dreamy texture: Room-temperature ingredients blend into the smoothest filling you’ll ever scoop
- Two coffee punches: Espresso powder in both the crust and ganache means real flavor, not just a whisper
- Foolproof: If you can operate a food processor, you’ve got this
- Make-ahead magic: Actually tastes better after overnight chilling (if you can wait that long)
Seriously, this is the dessert that’ll have guests begging for the recipe while licking their plates.
Ingredients for Espresso Chocolate Cheesecake
Now let’s talk ingredients – because great desserts start with great components. I’m downright obsessive about quality here. That bittersweet chocolate? Splurge on the good stuff (I’m partial to Guittard or Valrhona). The espresso powder? Skip the instant coffee granules – King Arthur or Medaglia d’Oro make all the difference.
For the crust:
- 1 package (about 36) Oreo cookies (not Double Stuf!), crushed into fine crumbs (you’ll need exactly 2 ½ cups)
- 8 tablespoons (1 stick) unsalted butter, melted until just liquid but not hot
- ½ teaspoon espresso powder (yes, in the crust too – it makes magic happen)
For the filling:
- 14 ounces bittersweet chocolate (60-70% cacao), coarsely chopped
- 1 ½ teaspoons espresso powder
- 24 ounces (3 packages) full-fat cream cheese, room temperature – I mean seriously room temp, leave it out for 2 hours
- 1 cup granulated sugar
- ¼ cup light brown sugar, packed firmly
- 1 tablespoon Dutch-process cocoa powder (the darker, the better)
- 1 ½ teaspoons pure vanilla extract (none of that imitation stuff)
- 1 cup heavy cream, room temperature
For the ganache:
- 1 ⅓ cups semi-sweet chocolate, finely chopped
- 1 ¼ cups heavy cream
- ¼ cup unsalted butter, room temperature, cut into small cubes
- 1 teaspoon espresso powder
Ingredient Substitutions & Notes
Okay, real talk – while I’d love for you to follow this exactly, I know pantry emergencies happen. Here’s how to adapt:
- Oreo crust: Digestive biscuits or graham crackers work, but add an extra ½ tbsp espresso powder since they’re not chocolatey
- Cream cheese: Full-fat only – low-fat will give you a sad, weepy cheesecake (learned that the hard way)
- Dutch cocoa: Regular cocoa works in a pinch, but your cheesecake will be lighter in color
- Espresso powder: If desperate, use 2 tsp instant coffee – but grind it to powder first
- Chocolate: Never chocolate chips! They contain stabilizers that mess with texture
A quick pro tip: Measure your chocolate by weight, not cups – chocolate chunks vary wildly in how they pack!
Equipment You’ll Need
Don’t worry – you won’t need any fancy gadgets for this espresso chocolate cheesecake! Here’s what I always grab from my kitchen:
- 9-inch springform pan (the kind with the removable bottom – lifesaver for clean slices!)
- Food processor (for those Oreo crumbs and silky filling)
- Mixing bowls (one big one for melting chocolate, another for ganache)
- Silicone spatula (for scraping every last bit of that delicious filling)
- Measuring cups & spoons (precision matters with espresso powder!)
That’s it! Well, besides a fridge and some patience while it chills.
How to Make Espresso Chocolate Cheesecake
Alright, let’s dive into the fun part – making this showstopper! Don’t let the layers intimidate you. I’ve broken it down into simple steps with all my hard-earned tips. Just remember: patience and room temperature ingredients are your best friends here.
Preparing the Crust
First things first – that crunchy, coffee-kissed Oreo base. Here’s how to get it perfect:
- Crush those cookies – Toss whole Oreos (cream filling and all!) into your food processor and pulse until you’ve got fine, even crumbs. No processor? No problem – seal them in a bag and roll with a rolling pin like you’re taking out your daily frustrations.
- Butter magic – Drizzle in the melted butter and espresso powder. Mix until it looks like wet sand. Pro tip: Take a pinch – if it holds together when squeezed, you’re golden. If not, add another tablespoon of butter.
- Press it like you mean it – Dump the crumbs into your prepared pan and press firmly with the bottom of a glass or measuring cup. Get it packed tight against the sides and flat on top – gaps lead to crumbling disasters later! Pop it in the freezer for 15 minutes while you make the filling. This sets the crust so it won’t get soggy.
Making the Filling
Now for the star of the show – that velvety espresso chocolate filling. Here’s the secret: don’t rush the blending!
- Melt the chocolate – Use a double boiler or microwave in 30-second bursts, stirring between each. When it’s almost melted, take it off the heat and stir in the espresso powder – residual heat will dissolve it perfectly.
- Cream cheese time – In your (cleaned) food processor, blend the room temperature cream cheese until completely smooth. Like, baby-bottom smooth. Scrape down the sides twice – hidden lumps are the enemy!
- Bring in the team – Add both sugars, cocoa powder, vanilla, and cream. Process until silky, about 1 minute. Now here’s the key – fold in the melted chocolate by hand with a spatula. Gentle folds mean no air bubbles and maximum creaminess.
- The grand pour – Retrieve your crust from the freezer (it missed you) and pour in the filling. Smooth the top with an offset spatula if you’re fancy, or the back of a spoon if you’re me. Chill for at least 6 hours – overnight is even better. This patience pays off in perfect slices later.
Espresso Ganache Topping
Almost there! This glossy ganache is what takes it from “yum” to “oh my god.”
- Chop chop – Finely chop your semi-sweet chocolate and place it in a heatproof bowl. Tiny pieces melt evenly – no chocolate clumps allowed!
- Heat the cream – Warm the heavy cream until it just starts simmering (tiny bubbles at the edges). Pour it over the chocolate and let it sit untouched for 2 minutes – this is the “walk away and trust the process” step.
- Stir in luxury – Gently stir from the center outward until you’ve got a smooth, glossy pool. Now add the butter cubes and espresso powder, stirring until the butter disappears completely. Let it cool for 5 minutes – it should coat the back of a spoon but still be pourable.
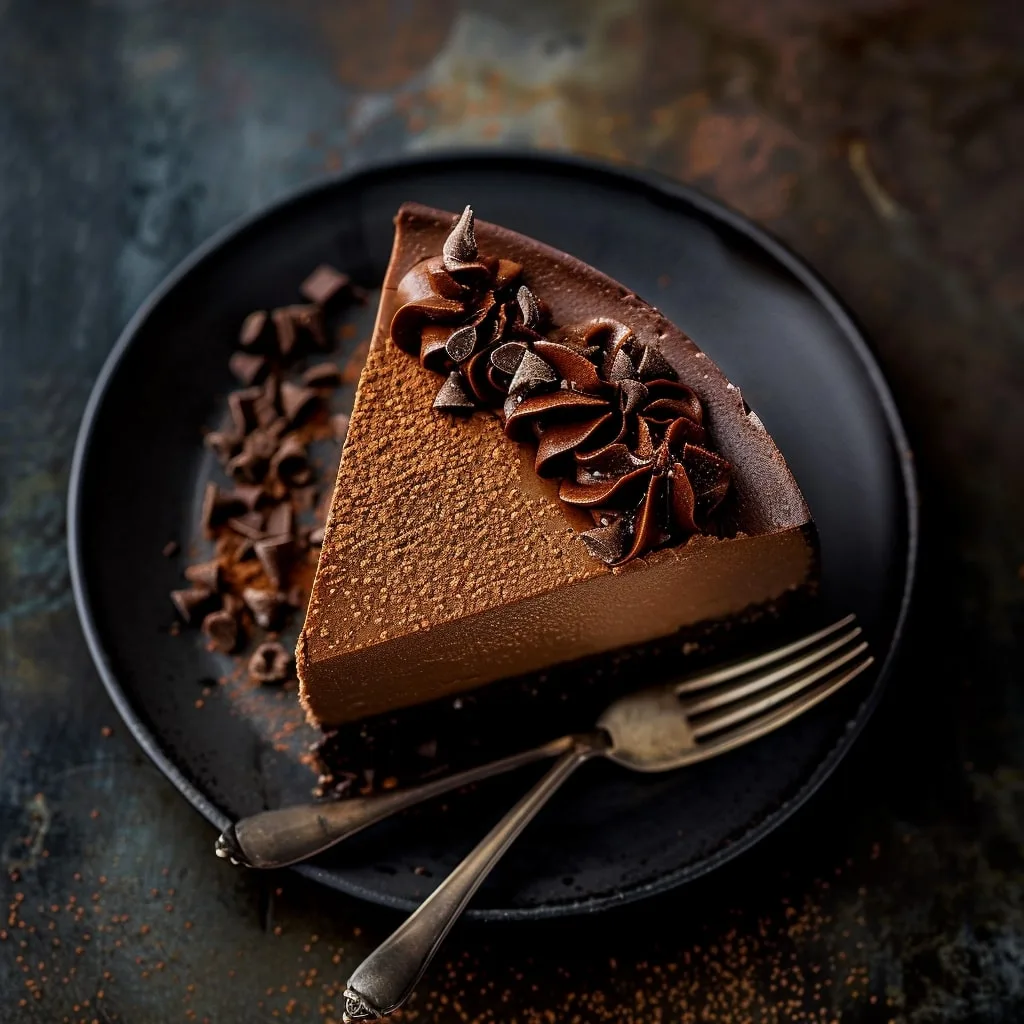
- Final flourish – Pour over your chilled cheesecake, tilting the pan to cover evenly. Toss on some espresso beans or chocolate shavings if you’re feeling extra. Chill just 1 more hour (I know, more waiting!) until set.
Now comes the best part – that first slice revealing all those gorgeous layers. Use a hot knife (run it under hot water and dry) for pristine cuts. Every bite is pure coffee-chocolate heaven!
Tips for the Perfect Espresso Chocolate Cheesecake
After making this espresso chocolate cheesecake more times than I can count (all in the name of “research,” of course), I’ve picked up some game-changing tricks. These are the little things that take your cheesecake from good to “can I have the recipe?” levels of amazing:
- Scrape like your life depends on it: That food processor bowl hides sneaky cream cheese lumps. Stop and scrape down the sides at least twice during blending – your smooth filling will thank you.
- Patience is a virtue: I know, I know – waiting is torture. But slicing into a cheesecake before it’s fully chilled leads to sad, messy slices. The full 6 hours (or overnight) makes all the difference.
- Temperature matters: Room temp ingredients aren’t just a suggestion! Cold cream cheese = lumpy filling. Cold cream = grainy texture. Set everything out 2 hours before you start.
- Hot knife magic: Want Instagram-worthy slices? Run your knife under hot water, dry it, then slice. Wipe between cuts for clean edges every time.
- Ganache timing: Let the ganache cool just until it coats the back of a spoon before pouring. Too hot and it’ll melt your cheesecake, too cold and it won’t spread smoothly.
Trust me – follow these tips and you’ll have people convinced you trained as a pastry chef!
Serving and Storing Espresso Chocolate Cheesecake
Okay, you’ve waited patiently (or maybe not so patiently) – now let’s talk about enjoying your masterpiece! For the full experience, let your espresso chocolate cheesecake sit at room temperature for about 10 minutes before slicing. Those flavors really wake up when they’re not ice-cold.
- Garnishing ideas: A dusting of cocoa powder looks elegant, or go all out with chocolate-covered espresso beans and fresh whipped cream. If you’re feeling fancy, gold leaf flakes make it look like a million bucks (and take about two seconds to apply).
- Storage tips: Cover tightly with plastic wrap or store in an airtight container. It keeps beautifully in the fridge for up to 5 days – though good luck keeping it around that long! The ganache actually gets shinier as it sits. Pro tip: Freeze individual slices wrapped in parchment for emergency dessert cravings – they thaw perfectly in about 30 minutes.
Espresso Chocolate Cheesecake Variations
Once you’ve mastered this espresso chocolate cheesecake (and trust me, you will), it’s time to play with variations! My favorite part about this recipe is how easily you can tweak it to match your mood. Craving something extra indulgent? Swirl melted peanut butter into the filling before chilling – the salty-sweet combo with coffee is unreal.
Other delicious twists:
- Mocha madness: Drizzle cooled espresso ganache over slices and sprinkle with cocoa nibs for crunch
- White chocolate dream: Swap half the bittersweet chocolate for white chocolate in the filling – so pretty swirled!
- Spiked version: Add 1 tbsp Kahlúa or Baileys to the ganache (adults only, obviously)
- Cookie crunch: Press crushed amaretti cookies into the sides after adding ganache
The possibilities are endless – just don’t tell my original recipe I’m cheating on it!
Nutritional Information
Let’s keep it real – this espresso chocolate cheesecake is an indulgence, not health food! But hey, balance is everything, right? These are rough estimates per serving (about 1/12th of the cake):
- Calories: 520 kcal
- Fat: 38g (22g saturated)
- Carbs: 45g
- Protein: 6g
Numbers will vary based on your exact ingredients – that gourmet chocolate or extra espresso beans add up. But honestly? Some treats are worth every delicious calorie.
No-Bake Espresso Chocolate Cheesecake FAQs
Can I use instant coffee instead of espresso powder?
You can, but it won’t pack the same punch! Instant coffee has a milder flavor – use 2 teaspoons instead of 1 teaspoon espresso powder. Grind it to a fine powder first so it dissolves properly. That said, I really recommend hunting down proper espresso powder (check the baking aisle!) for that deep coffee kick.
Help! My ganache is too runny – how do I fix it?
Don’t panic! If your ganache isn’t setting up, pop the whole cheesecake in the fridge for 15 minutes to firm up. Still too thin? Whisk in another 1/4 cup finely chopped chocolate while the ganache is still warm. Next time, let the ganache cool a bit longer before pouring – it thickens as it cools.
Can I make this espresso chocolate cheesecake ahead of time?
Absolutely! In fact, it tastes even better after 24 hours in the fridge. Just hold off on the ganache topping until the day you’re serving. The assembled cheesecake freezes beautifully too – wrap tightly in plastic and foil, then thaw overnight in the fridge.
Why did my cheesecake crack?
First – don’t stress! The ganache covers all sins. But cracks usually mean: 1) Ingredients weren’t room temp, causing uneven mixing, or 2) You overmixed the filling after adding chocolate, incorporating too much air. Next time, fold gently and scrape the bowl often!
Share Your Espresso Chocolate Cheesecake
I’d love to see your espresso chocolate cheesecake creations! Snap a photo of that gorgeous slice (I know you will) and tag me on Instagram or leave a comment below. Your feedback helps other bakers – and honestly, I just get giddy seeing your versions of this recipe. Happy baking, friends!
Print
No-Bake Espresso Chocolate Cheesecake
- Total Time: 6 hours 40 minutes
- Yield: 12 servings 1x
- Diet: Vegetarian
Description
A rich and creamy no-bake espresso chocolate cheesecake with a chocolate cookie crust and espresso ganache topping.
Ingredients
- 1 package Oreo cookies, crushed into fine crumbs
- 8 tablespoons unsalted butter, melted
- ½ teaspoon espresso powder
- 14 ounces bittersweet chocolate, coarsely chopped
- 1 ½ teaspoons espresso powder
- 24 ounces full-fat cream cheese, room temperature
- 1 cup granulated sugar
- ¼ cup light brown sugar, packed
- 1 tablespoon Dutch-process cocoa powder
- 1 ½ teaspoons vanilla extract
- 1 cup heavy cream, room temperature
- 1 ⅓ cups semi-sweet chocolate, finely chopped
- 1 ¼ cups heavy cream
- ¼ cup unsalted butter, room temperature, cut into cubes
- 1 teaspoon espresso powder
- Espresso beans and chocolate shavings for garnish (optional)
Instructions
- Grease a 9-inch springform pan.
- Mix Oreo crumbs, melted butter, and espresso powder; press firmly into the pan.
- Freeze the crust while preparing the filling.
- Melt chocolate and stir in espresso powder.
- In a food processor, blend cream cheese until smooth.
- Add sugars, cocoa powder, vanilla, and cream; blend.
- Fold in melted chocolate.
- Pour the filling over the crust and chill for 6 hours.
- Heat cream, pour over chocolate, and stir until smooth.
- Add butter and espresso powder.
- Pour ganache over the chilled cheesecake and set for 1 hour.
- Garnish with espresso beans and chocolate shavings if desired.
Notes
- Use room temperature ingredients for smoother blending.
- Chill the cheesecake thoroughly before adding ganache.
- For a stronger espresso flavor, adjust the amount of espresso powder.
- Prep Time: 40 minutes
- Cook Time: 0 minutes
- Category: Dessert
- Method: No Bake
- Cuisine: American
Nutrition
- Serving Size: 1 slice
- Calories: 520 kcal
- Sugar: 35g
- Sodium: 220mg
- Fat: 38g
- Saturated Fat: 22g
- Unsaturated Fat: 12g
- Trans Fat: 0g
- Carbohydrates: 45g
- Fiber: 3g
- Protein: 6g
- Cholesterol: 85mg
Keywords: espresso chocolate cheesecake, no bake cheesecake, chocolate dessert


