Okay, let’s talk about the perfect party dessert. You know the one I mean, something that looks absolutely stunning, tastes incredible, but secretly doesn’t take you all day to make. That’s my holy grail of baking! My absolute secret weapon for potlucks, holidays, or just a Tuesday that needs a little sparkle are these Mini Cherry Cream Cheese Pies. They are the ultimate single-serving treat, combining the best parts of a tangy cheesecake and a sweet cherry pie into one perfect little package.
I’ll never forget the first time I brought these to a family get-together. I set the platter down, and within what felt like ten minutes, they were completely gone. My cousin, who famously *hates* fruit desserts, was hunting me down for the recipe after eating three of them! That’s when I knew this wasn’t just a good recipe; it was a game-changer.
Each bite gives you that flaky, buttery crust, a rich and creamy cream cheese filling, and a burst of sweet cherry. They’re so easy to handle, no forks or plates required, which makes them a total crowd-pleaser. Seriously, get ready for these to become your new go-to dessert for just about everything.
Table of Contents
Why You’ll Love These Mini Cherry Cream Cheese Pies
Honestly, what’s not to love? These little pies have become one of my most requested recipes, and I think it’s because they tick all the right boxes. They are seriously the perfect little dessert for just about any time you need one!
- Perfectly Portioned: I love that there’s no slicing or messy serving involved. Everyone gets their own adorable little pie! This makes them an absolute dream for parties, picnics, and bake sales. Plus, it’s great for portion control… if you can stop at just one.
- So Easy with a Shortcut: We’re using store-bought refrigerated pie crust, and it’s a total game-changer. You get that wonderful flaky, buttery base without any of the stress of making dough from scratch. It’s all the glory with half the work!
- A Crowd-Pleasing Favorite: The combination of that rich, tangy cream cheese filling with the sweet burst of cherries is just classic. It’s a flavor pair that everybody seems to adore, from picky kids to my hard-to-please uncle.
- Super Fun to Customize: While cherry is my go-to, this recipe is so easy to switch up! You can try blueberries, chopped peaches, or even a swirl of apple pie filling. It’s a fantastic base for getting creative in the kitchen.
Ingredients for Mini Cherry Cream Cheese Pies
Okay, let’s talk about what goes into these little beauties. One of my favorite things about this recipe is how simple and straightforward the ingredient list is. We’re not hunting down anything fancy or hard-to-find! It’s all about combining a few classic, delicious things to create that perfect bite. You probably have most of this stuff in your kitchen right now, which is always a win in my book.
- 2 cups chopped cherries – You can absolutely use fresh, pitted cherries if they’re in season! If not, a can of pitted cherries works great. Just make sure you drain them really, really well before you chop them up.
- 1 cup cream cheese, fully softened to room temperature – Please don’t skip this! Just leave the block of cream cheese on your counter for an hour or so. This is the absolute key to getting a perfectly smooth, creamy filling without any lumps.
- 1/4 cup granulated sugar
- 1 teaspoon vanilla extract – The good stuff always makes a difference!
- 1 package refrigerated pie crusts – You know the kind that comes with two rolled-up crusts in the box. This is our glorious, time-saving shortcut!
- 1 large egg, beaten – This is for our egg wash, which will give the pies that beautiful, shiny, golden-brown top.
- 2 tablespoons apricot jam – This is totally optional, but I love to melt it and brush it on at the end. It gives the pies a gorgeous, professional-looking glaze.
Essential Baking Equipment
Okay, here’s some great news. You do not need to go out and buy any wild, expensive baking gadgets for these pies. I’m willing to bet you have everything you need tucked away in your kitchen already, which is my favorite kind of recipe! This is all about using your trusty, everyday tools.
Here’s the short and simple list of what you’ll want to grab from your cupboards:
- A 12-cup standard muffin tin: This is our secret weapon for getting those perfectly uniform, adorable little pie shapes.
- A round cookie or biscuit cutter: You’ll want one that’s about 4 inches across. Don’t have one? No worries! The rim of a wide drinking glass works perfectly in a pinch.
- Mixing bowls: Just a couple of standard bowls for mixing up that glorious cream cheese filling.
- A pastry brush: This little guy is key for giving the pies that beautiful golden-brown finish with the egg wash and for brushing on that shiny apricot glaze at the end.
How to Make Mini Cherry Cream Cheese Pies
Alright, this is where the magic happens! Don’t let the lattice tops scare you; this whole process is so much fun and way easier than it looks. I’m going to walk you through every single step, and before you know it, you’ll have a tray of the most delicious little pies you’ve ever made. Let’s get baking!
Step 1: Prepare the Pie Crusts
First things first, let’s get that oven going. You’ll want to preheat it to 375°F (190°C) so it’s perfectly hot and ready when our pies are assembled. While it’s heating up, lightly flour your counter and unroll one of the refrigerated pie crusts. Using a 4-inch round cookie cutter, or the rim of a wide-mouthed glass, which is a trick I use all the time, cut out as many circles as you can. I usually get about six from the first crust.
Now, gently take each dough circle and press it into one of the cups in your muffin tin. You want to make sure it’s snug against the bottom and comes up the sides to form a little cup. Use your fingers to press out any air pockets between the dough and the tin. This is my secret to avoiding a soggy bottom! Set that aside and we’ll move on to the best part: the filling.
Step 2: Make the Cream Cheese Filling
Okay, for the part that tastes like cheesecake! In a medium bowl, combine your softened cream cheese, the granulated sugar, and the vanilla extract. Please, please make sure your cream cheese is truly at room temperature. It makes all the difference between a lumpy, frustrating mess and a perfectly smooth, luscious filling. Trust me on this one!
You can use a hand mixer on low speed or just a sturdy spatula to mix everything together. Keep mixing until it’s completely smooth and creamy, with no little white specks of cream cheese left. It should look silky and irresistible. I always sneak a tiny taste at this point… for quality control, of course!
Step 3: Assembling Your Mini Cherry Cream Cheese Pies
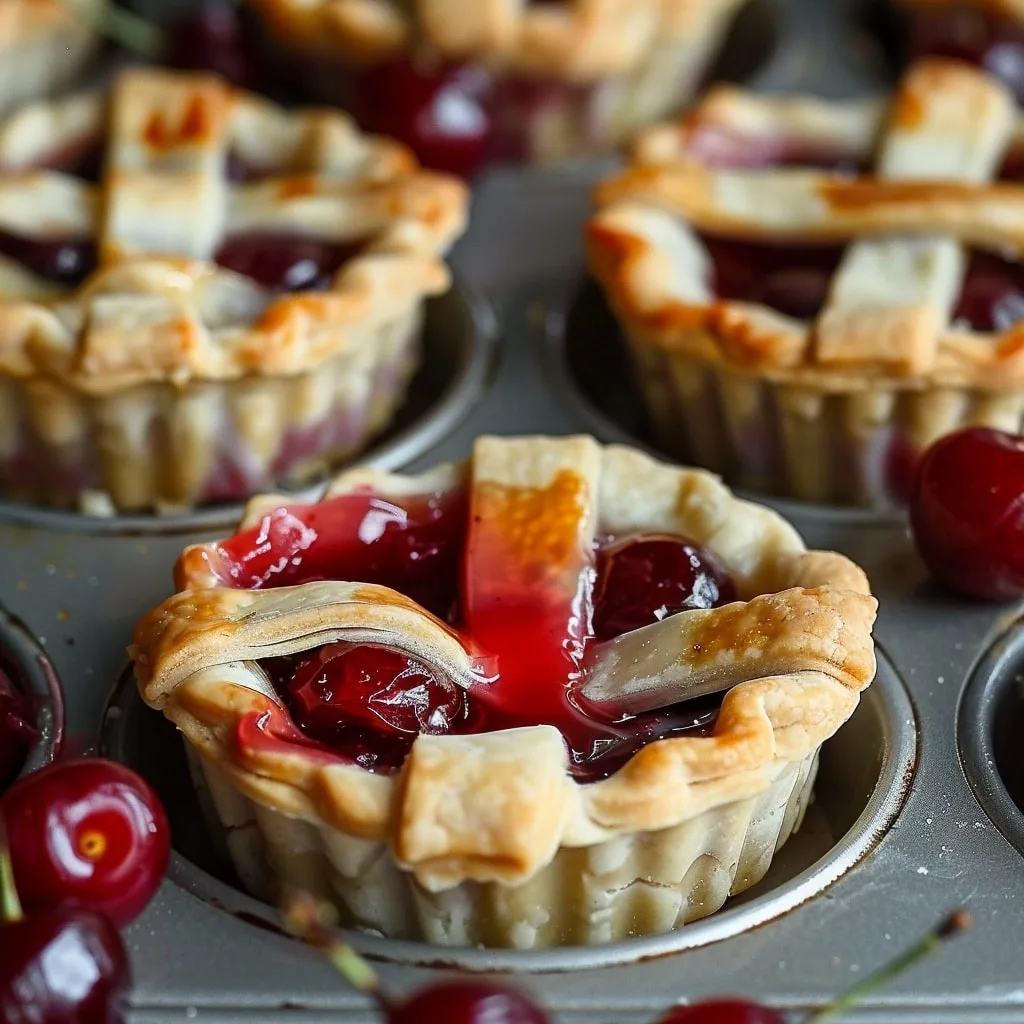
This is my favorite part, it’s like a fun little assembly line! Grab your muffin tin with the pie shells. Spoon about a tablespoon of that glorious cream cheese mixture into the bottom of each one. You don’t need to be too precise, just enough to cover the bottom in a nice little layer.
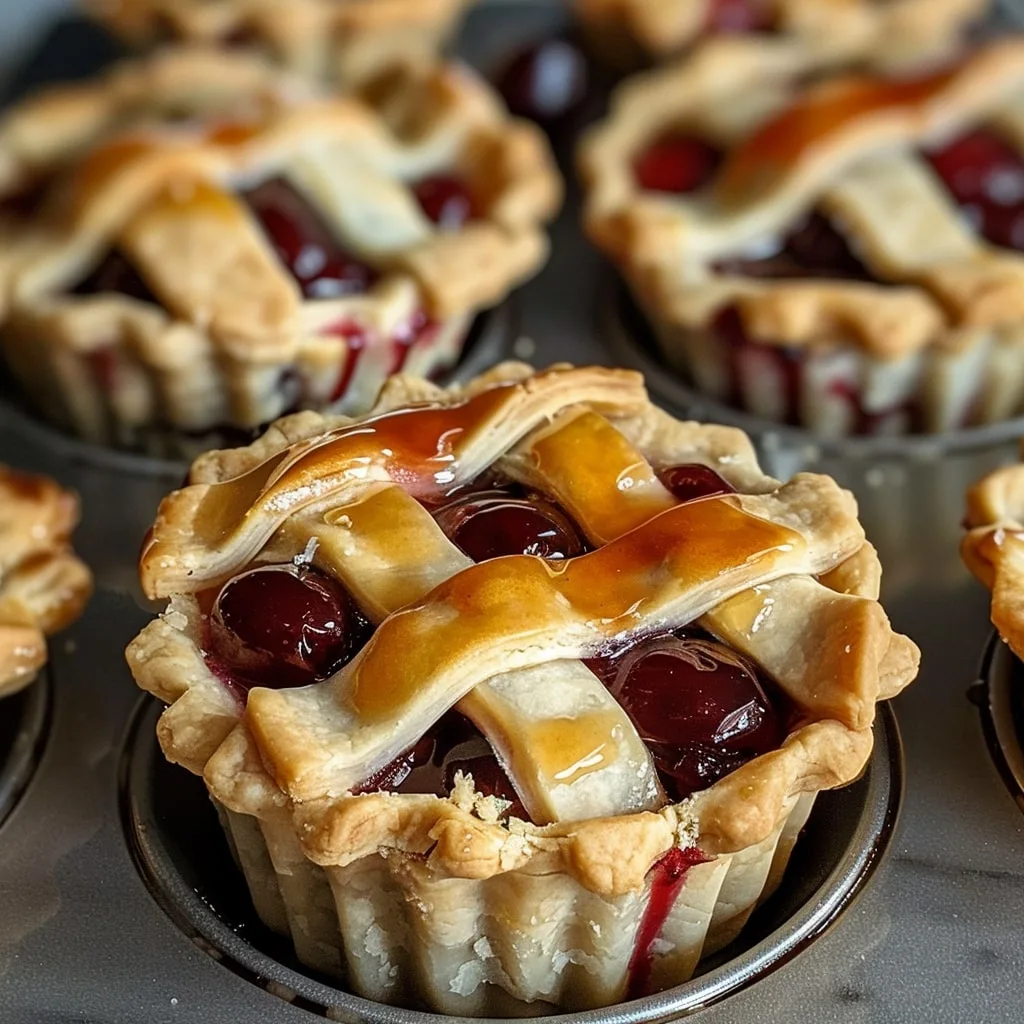
Next, spoon your chopped cherries right on top of the cream cheese. Try not to overfill them, as tempting as it is! If you pile them too high, the filling can bubble over and make a sticky mess in your oven. A generous spoonful is all you need. Now for the fancy-looking tops! Unroll your second pie crust and use a knife or a pizza cutter to slice it into thin strips. Weave a few strips over the top of each pie to create a lattice. Don’t worry about perfection! A rustic, slightly imperfect lattice looks charming and homemade.
Step 4: Baking and Glazing the Pies
We’re on the home stretch! Take your beaten egg and a pastry brush and gently brush the egg wash over all the lattice tops. This is what will give them that beautiful, shiny, golden-brown finish that makes them look so professional. It’s a small step that makes a huge difference.
Carefully place your muffin tin in the hot oven and bake for 20-25 minutes. You’ll know they’re done when the crust is a deep golden brown and you can see the cherry filling bubbling happily through the lattice. Your kitchen will smell absolutely incredible! Pull them out and let them cool in the pan for at least 10 minutes. This is crucial for helping them set up. If you’re doing the glaze, quickly melt the apricot jam in the microwave for about 15 seconds and brush it lightly over the warm pies. It adds a beautiful, glossy shine!
Pro Tips for the Best Mini Cherry Cream Cheese Pies
Over the years, I’ve made these pies more times than I can count, and I’ve definitely learned a few little tricks along the way! These are my non-negotiable tips for getting them absolutely perfect every single time. They’re small things that make a huge difference.
- Room Temperature Cream Cheese is a MUST: I know I’ve said it before, but it’s so important I’m saying it again! If your cream cheese is even a little bit chilly, you’ll fight with it and end up with a lumpy filling. Let it sit on the counter for a good hour. A truly soft, room-temp block of cream cheese is your secret weapon for that perfectly smooth, silky texture.
- Don’t Overfill the Pies: It is SO tempting to pile those cherries and cream cheese as high as you can, I totally get it. But trust me, I’ve learned this the hard way! If you overfill them, the filling will bubble up and spill over, creating a sticky, burnt mess on the bottom of your oven. A little bit of space at the top is your friend.
- Drain Your Cherries Well: If you’re using canned cherries, make sure you let them sit in a colander for a few minutes to get rid of all that extra liquid. Too much juice can make the bottom crust soggy, and nobody wants a soggy bottom! A quick pat with a paper towel doesn’t hurt, either.
- Patience During Cooling!: When these pies come out of the oven, they are molten hot and a little delicate. You absolutely have to let them cool in the muffin tin for at least 10-15 minutes. This gives the filling time to set up so the pies will hold their shape when you gently lift them out. If you try to move them too soon, they might fall apart on you.
Variations on this Mini Cherry Cream Cheese Pies Recipe
Okay, once you’ve nailed the classic version, this is where the real fun starts! I honestly think of this recipe as a perfect little template for all sorts of delicious ideas. It’s so easy to swap things out based on what’s in season, what you have in the fridge, or just what you’re craving. Don’t be afraid to play around and make them your own! Here are a few of my favorite ways to mix it up.
- Try Other Fruits: Seriously, almost any fruit works beautifully here. In the summer, I love using fresh blueberries or finely chopped peaches. If you use peaches, add a tiny pinch of cinnamon, it’s incredible! A mix of berries is also fantastic. Just remember to chop bigger fruits into small pieces.
- Add Some Zest for Brightness: This is my favorite little secret! Adding about a teaspoon of fresh lemon zest to the cream cheese filling is a total game-changer. It doesn’t make the pies taste sour or lemony; it just adds this amazing brightness that cuts through the richness and makes the fruit flavor really pop.
- For a Little Extra Crunch: If you want that bakery-style sparkle and texture, sprinkle a little coarse sugar (like turbinado or sparkling sugar) over the lattice tops right after you do the egg wash. It adds a satisfying crunch and looks so pretty when the pies come out of the oven.
- A Hint of Almond: A tiny, tiny drop of almond extract added to the cream cheese filling along with the vanilla is just heavenly, especially with cherries. It’s a classic flavor combination for a reason! Just be careful, a little goes a very long way.
Serving and Storing Instructions
Okay, your beautiful mini pies are out of the oven and cooling. Now for the best part, eating them! How you serve and store them will make sure every single bite is as delicious as the first. Here’s how I handle it in my kitchen.
Serving Suggestions
Honestly, there is no wrong way to enjoy these little gems. My absolute favorite way is to serve them while they’re still slightly warm. The crust is at its flaky best, and the cream cheese and cherry filling is just perfectly gooey and comforting. If you really want to take it over the top, place a warm pie in a small bowl with a little scoop of vanilla ice cream. Oh my goodness, the mix of the warm, tangy pie and the cold, sweet cream is just divine.
But they are also absolutely fantastic served at room temperature! This is why they’re my go-to party dessert. You can just arrange them on a pretty platter, and they become the perfect grab-and-go treat. No forks, no plates, no fuss. Everyone loves a dessert they can just pick up and enjoy.
Storage and Reheating
On the off chance you have any of these mini pies left over, storing them is a breeze. Because of that lovely cream cheese filling, you’ll need to keep them in the fridge. Just let them cool completely, then place them in an airtight container. They’ll stay fresh and delicious in the refrigerator for up to 3 days.
You can definitely enjoy them cold right out of the fridge, they taste like little cheesecake bites, which I personally love! But if you want to bring back that fresh-from-the-oven magic, it’s super easy. Just pop them in a toaster oven or a preheated oven at about 350°F for 3-5 minutes. This will gently warm them through and, most importantly, restore that wonderful crispness to the pie crust. It makes them taste like you just baked them!
Estimated Nutrition for Mini Cherry Cream Cheese Pies
Okay, for those of you who like to keep track of these things, here’s a quick look at the nutrition. I have to put on my serious hat for a second and say that this is totally an estimate! The final numbers can wiggle around a little bit depending on the exact brand of cream cheese or pie crust you grab at the store. So please, just think of this as a helpful ballpark figure, not a super strict rule.
For each one of these adorable little pies, you’re looking at roughly:
- Calories: 240
- Fat: 14g
- Carbohydrates: 26g
- Protein: 4g
FAQs About Mini Cherry Cream Cheese Pies
I get a lot of the same questions about these little pies, so I figured I’d gather them all in one place for you! Hopefully, this helps clear up anything you might be wondering about before you start baking.
Can I use homemade pie crust for this recipe?
Oh, absolutely! A thousand times, yes! If you have a go-to homemade pie crust recipe that you love, please use it. It will make these mini pies feel even more special.
I often use the refrigerated kind for speed when I’m in a hurry, but nothing beats the flavor of a truly buttery, flaky homemade crust. Just make sure your dough is well-chilled before you try to roll it out and cut the circles, it’ll make it so much easier to handle!
Can I make these mini pies ahead of time?
This is one of my favorite things about this recipe: they are PERFECT for making ahead. You have two options. You can assemble them completely, crusts, fillings, and lattice tops, and then cover the whole muffin tin tightly with plastic wrap and keep it in the fridge for up to 24 hours.
Then you just bake them off when you’re ready! Or, you can bake them completely, let them cool, and store them in an airtight container in the fridge. Both work great, but I personally love baking them fresh right before serving for that amazing just-baked smell.
Why did my cream cheese filling turn out runny?
Ah, the dreaded runny filling! It’s almost always caused by one of two culprits. The most common reason is extra moisture from the cherries. If you’re using canned cherries, it is so important to drain them *really, really* well.
I even give them a little pat with a paper towel to be safe. Any extra juice will sneak into the cream cheese and make it thin. The other thing to check is your cream cheese; make sure you’re using the full-fat, block-style kind. The lower-fat or whipped tub versions just don’t have the right structure to set up properly during baking.
Can I freeze these mini pies?
So, you technically *can* freeze them, but I’ll be honest with you, the texture of the cream cheese filling can change a little bit after it thaws. It’s not my favorite way to store them, but it works in a pinch! If you do want to freeze them, I recommend freezing them *after* baking.
Let them cool completely, then place the muffin tin in the freezer until the pies are solid. Once they’re frozen solid, you can pop them out and store them in a freezer bag for up to a month. To serve, let them thaw in the fridge, then warm them in the oven for a few minutes to crisp up the crust.
We’d Love to See Your Mini Cherry Cream Cheese Pies!
And that’s really all there is to it! I truly hope you have so much fun making these little pies and that they bring a little bit of joy and deliciousness to your kitchen. There’s honestly nothing better than pulling a tray of these beauties from the oven.
If you give this recipe a try, I would absolutely love it if you came back to leave a comment and a star rating below! I read every single one, and it’s so helpful to hear how they turned out for you. My favorite part of all is seeing your creations, so if you share a picture on Instagram, please be sure to tag us. It seriously makes my entire day to see these little pies being enjoyed in your homes. Happy baking!
More Dessert Recipes You’ll Love
If you enjoyed these Mini Cherry Cream Cheese Pies, here are more delicious and crowd-pleasing recipes to try:
- Lemon Curd Cheesecake
- Funfetti Cake with Chocolate Frosting
- Buttermilk French Toast
- Blueberry Cheesecake Ice Cream
Each one is creamy, flavorful, and perfect for sharing with family and friends.
Print
Mini Cherry Cream Cheese Pies
- Total Time: 45 minutes
- Yield: 12 mini pies 1x
- Diet: Vegetarian
Description
These mini pies feature a rich cream cheese filling and sweet cherries inside a buttery pie crust. They are a delightful treat suitable for any occasion.
Ingredients
- 2 cups fresh or canned cherries, chopped
- 1 cup cream cheese, softened
- 1/4 cup granulated sugar
- 1 teaspoon vanilla extract
- 1 package refrigerated pie crusts (2 crusts)
- 1 egg, beaten (for egg wash)
- 2 tablespoons apricot jam (optional, for glazing)
Instructions
- Preheat your oven to 375°F (190°C).
- Roll out the pie crusts and cut circles large enough to fit into a muffin tin.
- Press the crust circles into the muffin tin to form pie shells.
- In a medium bowl, mix together the cream cheese, granulated sugar, and vanilla extract until smooth.
- Spoon the cream cheese mixture into the bottom of each pie shell.
- Add the chopped cherries on top of the cream cheese.
- Cut the remaining pie crust into strips and create a lattice top on each mini pie.
- Brush the lattice tops with the beaten egg.
- Bake for 20-25 minutes, until the crust is golden and the filling is bubbly.
- If using, melt the apricot jam and brush it over the tops of the pies for a glaze.
- Let the mini pies cool slightly before removing them from the muffin tin. Serve warm or at room temperature.
Notes
- The apricot jam glaze is optional but adds a nice shine.
- You can use fresh or canned cherries for the filling.
- Serve these pies either warm or cooled to room temperature.
- Prep Time: 20 minutes
- Cook Time: 25 minutes
- Category: Dessert
- Method: Baking
- Cuisine: American
Nutrition
- Serving Size: 1 mini pie
- Calories: 240
- Sugar: 18g
- Sodium: 160mg
- Fat: 14g
- Saturated Fat: 8g
- Unsaturated Fat: 5g
- Trans Fat: 0g
- Carbohydrates: 26g
- Fiber: 1g
- Protein: 4g
- Cholesterol: 45mg
Keywords: Mini Cherry Cream Cheese Pies, Mini Cherry Pies, Cream Cheese Dessert, Hand Pies Recipe


