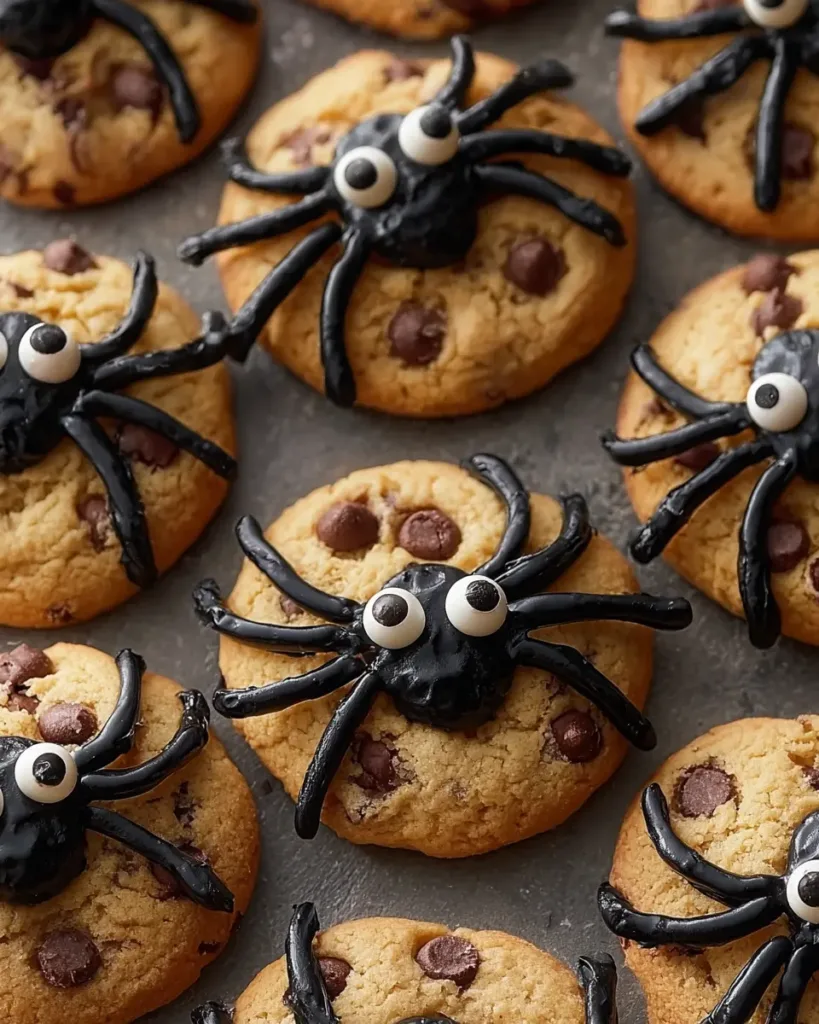
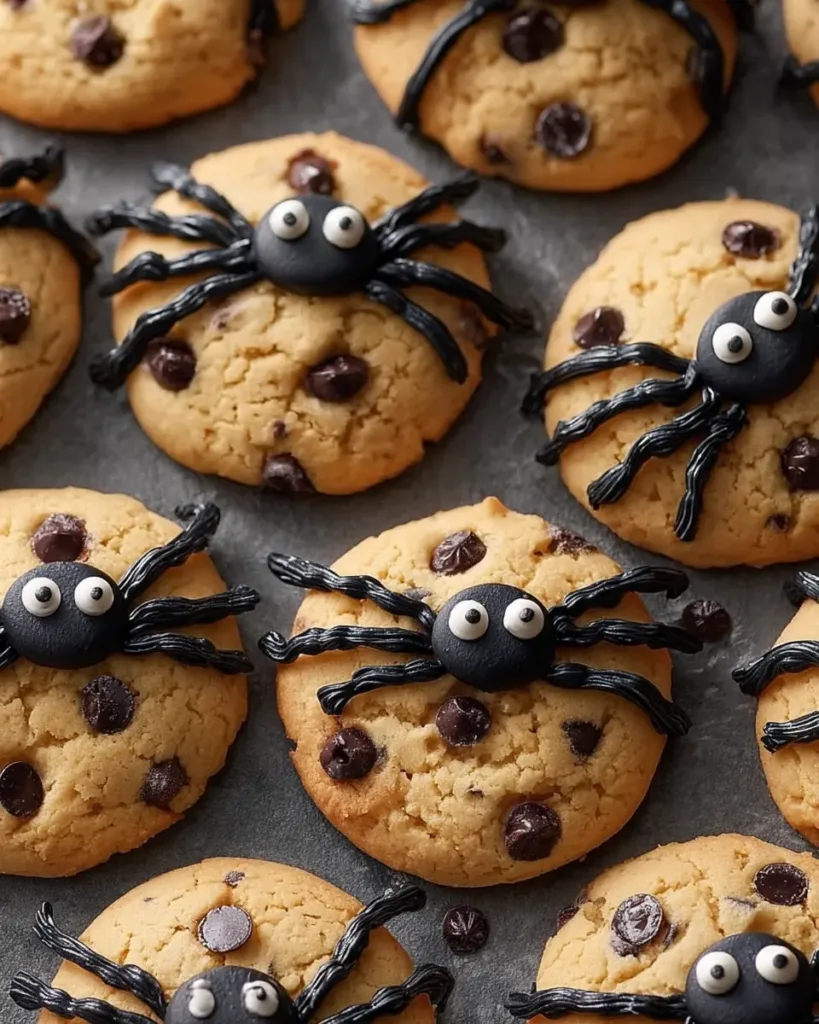
Halloween is the season when kitchens fill with creativity, and Spider Cookies always steal the spotlight. These spooky yet delightful treats bring together soft, chewy cookies with a playful chocolate spider design that makes both kids and adults smile. For many families, baking a batch of spider cookies is more than just making dessert, it is a tradition filled with laughter and memories.
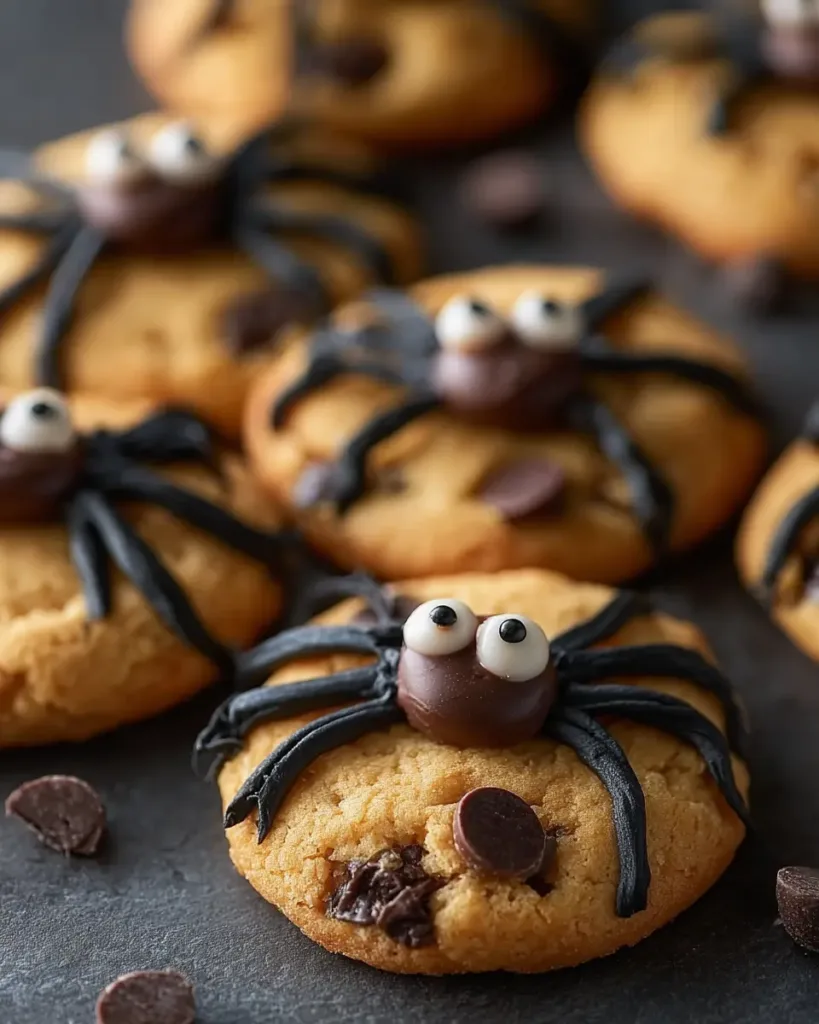
Imagine little hands pressing chocolate chips into dough, waiting eagerly for the magic to happen in the oven. The result is a kid-friendly Halloween treat that looks spooky but tastes sweet and comforting. These cookies are perfect for parties, school events, or a cozy night in where fun meets flavor. With simple ingredients and easy steps, even beginner bakers can whip up a tray of these festive spider cookies. They are proof that the best holiday memories often start in the kitchen.
Table of Contents
Why This is the Best Spider Cookies Recipe
When it comes to Halloween baking, spider cookies stand out for their charm and taste. This recipe delivers not only in flavor but also in fun, making it one you will want to return to every October. Here is why this version is the best:
- Quick & Easy: You only need pantry staples like butter, sugar, flour, and chocolate chips. There is no chilling step, so the dough is ready to bake right away.
- Soft & Chewy: Using melted butter gives the cookies a rich, moist texture that stays chewy for days. Each bite has the perfect balance of crisp edges and tender centers.
- Super Fun to Decorate: Kids love helping with these cookies. Adding the chocolate chip “spiders” and piping on icing legs turns baking into a creative Halloween activity.
- Customizable: You can easily make these cookies your own. Swap in white chocolate chips for “ghost spiders,” use colored icing for festive webs, or add candy eyes for extra creepiness.
These spider cookies are more than a sweet snack, they are a holiday experience. They save time in the kitchen, taste incredible, and invite everyone to join in the decorating fun. Whether you are baking for a party or enjoying a quiet family night, this recipe guarantees smiles and plenty of spooky cheer.
Ingredients You’ll Need
To make the best spider cookies, you only need a handful of everyday ingredients. These staples come together quickly to create a soft, chewy base and the spooky spider decoration. Here’s what you’ll need:
- ½ cup butter, melted
- ¾ cup brown sugar
- ¼ cup white sugar
- 1 large egg
- 2 teaspoons vanilla extract
- 1 ⅔ cups all-purpose flour
- 1 teaspoon baking soda
- ½ teaspoon salt
- ½ cup chocolate chips (plus extra for decorating)
- 1 tube black writing icing
Melted Butter
Using melted butter, instead of softened, is the secret to a chewy texture. It helps the sugars dissolve better, which gives the cookies their rich flavor. Another bonus is that you don’t need to wait for butter to come to room temperature, so you can start baking right away.
Brown & White Sugar
This recipe uses both sugars for balance. Brown sugar keeps the center soft and moist, while white sugar adds just enough crispness around the edges. Together, they create the perfect bite.
Chocolate Chips
You’ll need chocolate chips both in the dough and on top for the spider “bodies.” Semi-sweet chips are the best choice since they offer a classic chocolate flavor without being overly sweet. You can also experiment with milk or dark chocolate depending on your taste.
These simple ingredients make spider cookies not only easy to prepare but also a guaranteed Halloween hit.
How to Make Spider Cookies (Step-by-Step)
Baking spider cookies is as fun as it is simple. These steps will guide you through mixing, shaping, and decorating so you end up with cookies that are soft, chewy, and spooky.
Step 1: Combine Wet Ingredients
Start by melting the butter and letting it cool slightly so it does not scramble the egg. In a large bowl, whisk together the melted butter, brown sugar, and white sugar until smooth and glossy. Add the egg and vanilla extract, mixing until everything is fully blended. This step gives your cookies a strong flavor base and ensures a chewy texture.
Step 2: Add Dry Ingredients
In a separate bowl, whisk the flour, baking soda, and salt. Slowly add this mixture to the wet ingredients. Stir with a spatula or mixer until just combined. Avoid overmixing, as this can make the cookies tough. The dough should be thick but easy to scoop.
Step 3: Scoop and Shape the Cookies
Line a baking sheet with parchment paper. Using a medium cookie scoop or spoon, portion the dough into 12 even balls. Place them a few inches apart to allow for spreading. For extra even baking, press each ball slightly on top with your hand.
Step 4: Add the “Spider” and Bake
Press one or two chocolate chips upside down into the top of each dough ball. These will form the “spider bodies.” Bake at 350°F for about 9 minutes. The cookies should look soft in the center but set around the edges. Do not overbake, as they will continue to firm up as they cool.
Step 5: Decorate Your Spiders!
Let the cookies cool completely before decorating. Use black writing icing to pipe eight thin legs around each chocolate chip spider body. Keep the strokes short and curved for a realistic look. If you want to get creative, add candy eyes or pipe small spider webs for extra Halloween fun.
Pro Tip: If you’re baking with kids, let them handle the decorating. It’s a perfect way to keep them engaged and adds a personal touch to each cookie.
With these easy steps, you’ll have spider cookies that are not only delicious but also the star of your Halloween spread.
Pro Tips for Perfect Cookies
Even simple recipes like spider cookies can be improved with a few smart baking tricks. Follow these tips to make sure your cookies turn out soft, chewy, and decorated with the neatest spiders.
- Don’t Overmix the Flour: Once you add the dry ingredients, stir only until the flour disappears. Overmixing works the gluten, which can make the cookies dense instead of tender. A light hand keeps the texture soft and chewy.
- The 9-Minute Bake is Key: These cookies should come out of the oven looking slightly underbaked in the center. As they cool, they set perfectly while staying soft. If you bake them longer, they may lose that chewy bite. Trust the process and pull them at nine minutes.
- For Cleaner Legs: Be patient and let the cookies cool completely before decorating. If they are warm, the icing melts and smudges, which makes the spider legs messy. Cooling gives you a stable surface for clean designs.
- Use a Piping Tip: While a store-bought icing tube works, transferring the icing into a piping bag with a small round tip gives better control. Your spider legs will look thinner, straighter, and more professional.
These little adjustments make a big difference. With the right technique, your spider cookies will not only taste amazing but also look like they came straight from a Halloween bakery.

Fun Spider Cookie Variations
One of the best things about spider cookies is how versatile they are. With a few easy swaps, you can give this Halloween favorite a fun new twist. Try these creative variations to keep your treats exciting year after year.
Peanut Butter Spider Cookies
If you love peanut butter, swap the cookie base for a classic peanut butter dough. For the spider body, press a mini peanut butter cup or chocolate truffle on top before decorating. The rich, nutty flavor pairs perfectly with the chocolate.
Sugar Cookie Spiders
Want a lighter, buttery flavor? Use sugar cookie dough as the base instead of chocolate chip. These cookies hold their shape well and provide a sweet, simple backdrop for the spider design.
Different Spider Bodies
Chocolate chips aren’t your only option. Try Rolos, Whoppers, Maltesers, or even chocolate-covered nuts for the spider “bodies.” Each candy adds a unique texture and taste, making your cookies extra special.
Add Some Color
For a festive touch, roll your cookie dough balls in orange, black, or purple sprinkles before baking. The sprinkles give your spider cookies extra Halloween flair while making them stand out on any party table.
With these variations, you can mix and match to create your own spooky spin on spider cookies. Whether you stick with the original or try a new version, these ideas ensure your cookies will always be a crowd-pleaser.
Storing Your Halloween Cookies
To keep your spider cookies fresh and chewy, store them in an airtight container at room temperature. They will stay soft and delicious for up to 5 days. Make sure the cookies are completely cooled before storing, and allow the icing legs to set fully before stacking them. If you rush this step, the icing can smear and ruin the spider design. For extra care, place a sheet of parchment paper between layers.
If you need to make them ahead, you can also freeze the undecorated cookies for up to 2 months. Simply thaw at room temperature, then add the icing legs before serving. This way, your spider cookies look just as spooky and taste as fresh as the day you baked them.
Spider Cookies FAQs
Can I make the dough ahead of time?
Yes. You can prepare the dough up to 2 days in advance. Simply cover the bowl tightly with plastic wrap and store it in the refrigerator. When you are ready to bake, let the dough sit at room temperature for about 15 minutes so it scoops more easily. This is a great option if you want to save time on party day.
Can I freeze these cookies?
Yes, spider cookies freeze well. For best results, place baked and decorated cookies in a single layer on a tray and freeze until solid. Once frozen, transfer them to an airtight container with parchment paper between the layers. Thaw at room temperature before serving. This method helps keep the icing designs intact.
How do I make these without nuts?
The main recipe for spider cookies is nut-free. However, some variation ideas, like peanut butter spider cookies, do include nuts. If you need a nut-free version, stick with the basic recipe and check candy labels carefully. Use plain chocolate chips, Rolos, or nut-free chocolates for the spider bodies.
Why did my cookies spread too much?
Cookies usually spread too much if the butter is too hot or if the flour measurement is off. Make sure the melted butter has cooled slightly before mixing, and always measure flour by spooning it into the cup and leveling it off with a knife. This helps maintain the right balance for thick, chewy cookies.
More Spooky Treats to Try
If you’re loving the spider cookies, why not round out your Halloween spread with more playful and delicious treats? Try the sweet Ghost Cookies (buttery sugar cookies shaped like friendly ghosts and decorated with royal icing) for a charming dessert that pairs perfectly with your spider creations.
For a savory twist, the Halloween Monster Chicken Sliders offer tender BBQ chicken piled into buns and topped with funny monster eyes, perfect for a main dish that’s both cute and satisfying.
Both recipes add fun, flavor, and festive flair to keep your party guests delighted and coming back for more.
These recipes, along with spider cookies, give you everything you need to build the ultimate Halloween party spread. Try them all and keep the spooky fun going!
The Perfect Spider Cookies for Halloween
Spider cookies are more than just a dessert, they are a fun Halloween tradition that brings family and friends together. With their soft, chewy centers, rich chocolate flavor, and playful spider decorations, these cookies are guaranteed to impress at any party. They are quick to make, kid-friendly, and easy to customize, making them the perfect Halloween treat for every occasion.
Now it’s your turn to bake a batch of these spooky delights. Try the recipe, share it with your family, and watch the smiles appear as you decorate together. Don’t forget to leave a comment below to let me know how your spider cookies turned out. For more fun recipes and seasonal ideas, follow along on Instagram and Pinterest and never miss a chance to make your kitchen a little more magical.
Print
Spider Cookies
- Total Time: 29 minutes
- Yield: 12 cookies 1x
- Diet: Vegetarian
Description
These spooky Spider Cookies are soft, chewy, and decorated with chocolate chip spiders for a fun Halloween treat. They’re easy to make, kid-friendly, and perfect for parties or festive gatherings.
Ingredients
- 1/2 cup butter, melted
- 3/4 cup brown sugar
- 1/4 cup white sugar
- 1 large egg
- 2 teaspoons vanilla extract
- 1 2/3 cups all-purpose flour
- 1 teaspoon baking soda
- 1/2 teaspoon salt
- 1/2 cup chocolate chips (plus extra for decorating)
- 1 tube black writing icing
Instructions
- Preheat the Oven: Preheat oven to 350°F (175°C). Line a baking sheet with parchment paper.
- Mix Wet Ingredients: In a large bowl, beat melted butter, brown sugar, and white sugar with a mixer until combined. Mix in the egg and vanilla.
- Add Dry Ingredients: Add flour, baking soda, and salt. Mix until just combined.
- Stir in Chocolate: Fold in chocolate chips by hand.
- Shape Cookies: Scoop 12 balls of dough onto the baking sheet using a medium cookie scoop.
- Make Spider Bodies: Press 1–2 chocolate chips upside down on top of each cookie to form spider bodies.
- Bake: Bake for 9 minutes. Cookies will look slightly underbaked but will firm as they cool.
- Add Spider Legs: Once cooled, use black icing to pipe spider legs around each chocolate chip.
- Serve: Enjoy immediately or store in an airtight container for up to 5 days.
Notes
For variety, use mini peanut butter cups or malted milk balls instead of chocolate chips for spider bodies. Let cookies cool fully before decorating to prevent melted chocolate from smudging.
- Prep Time: 10 minutes
- Cook Time: 9 minutes
- Category: Halloween
- Method: Baking
- Cuisine: Halloween Treats
Nutrition
- Serving Size: 1 cookie
- Calories: 244
- Sugar: 22g
- Sodium: 150mg
- Fat: 12g
- Saturated Fat: 7g
- Unsaturated Fat: 4g
- Trans Fat: 0g
- Carbohydrates: 32g
- Fiber: 1g
- Protein: 3g
- Cholesterol: 35mg
Keywords: spider cookies, halloween cookies, halloween chocolate chip cookies


