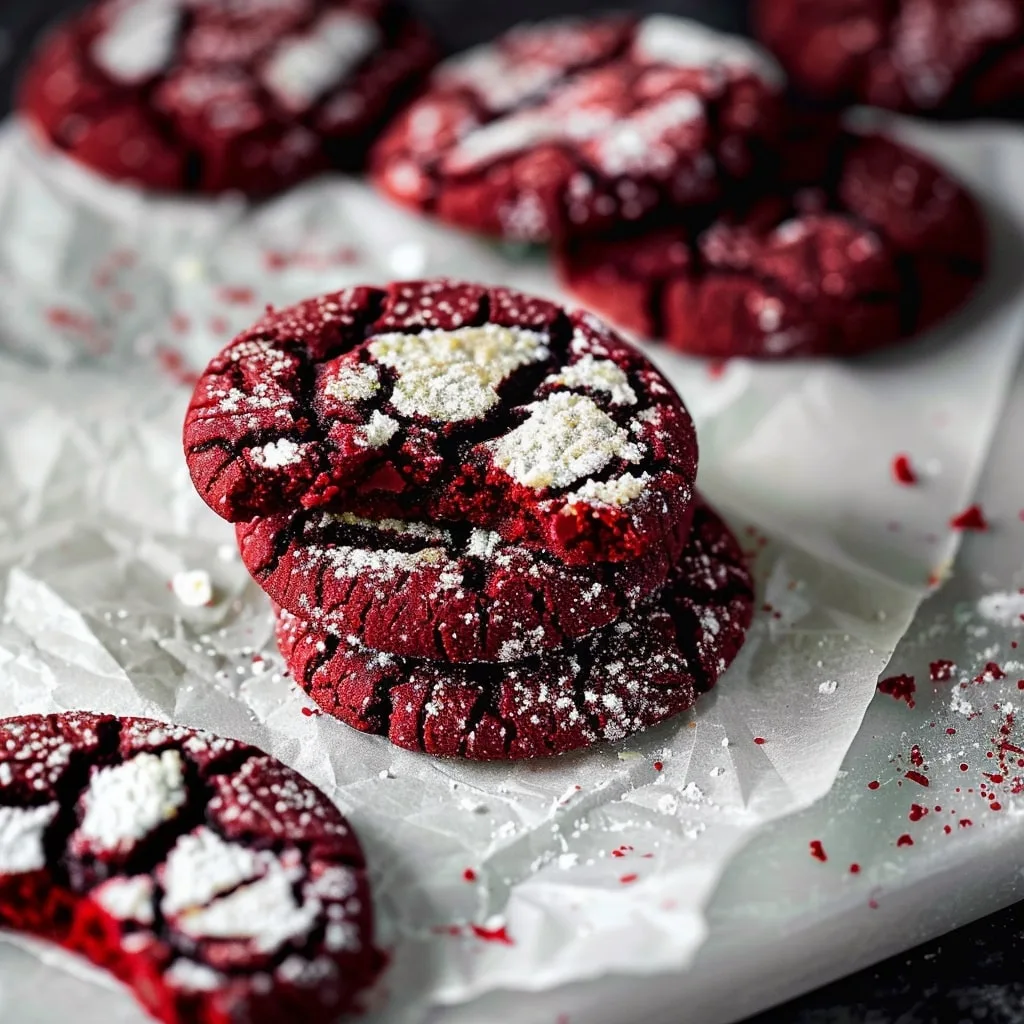
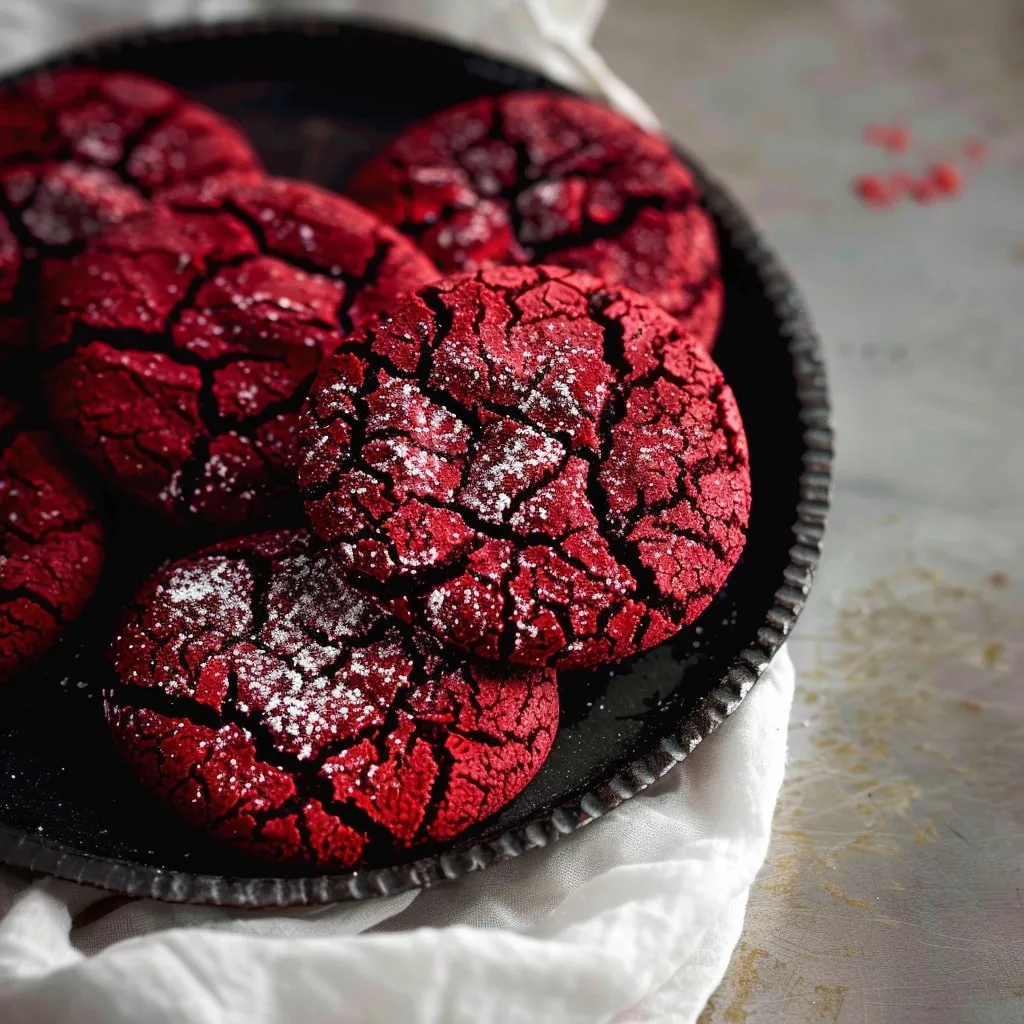
There’s something magical about pulling a tray of Red Velvet Crinkle Cookies from the oven – that deep crimson color peeking through a snowy dusting of powdered sugar just screams celebration. I first made these for a holiday cookie swap years ago, and let me tell you, they disappeared faster than you could say “Santa’s coming!” The rich cocoa flavor paired with that soft, slightly chewy center? Absolute perfection.
What I love most about these cookies (aside from how ridiculously festive they look) is how simple they are to make. No fancy piping, no complicated steps – just good old-fashioned cookie dough with a vibrant red twist. My kids now associate these crinkly beauties with holiday baking season, and honestly? I wouldn’t have it any other way. That moment when you bite into one and get that perfect balance of sweet powdered sugar and chocolatey red velvet? Pure joy.
Pro tip from my many batches: don’t skimp on the food coloring! Gel works best for that signature bold red color that makes these cookies so special. Trust me, when these show up on your cookie tray, they’ll be the first to go.
Table of Contents
Why You’ll Love These Red Velvet Crinkle Cookies
Okay, let me count the ways these cookies will steal your heart (and probably your willpower). First off, that texture – soft, slightly chewy, with just enough crinkle to make every bite interesting. They’re like little edible hugs! Plus, they’re ridiculously easy to make – no fancy equipment needed, just a bowl, a spoon, and some love.
The festive look? Absolute showstopper. That deep red peeking through snowy powdered sugar makes them perfect for holidays, Valentine’s Day, or honestly any Tuesday when you need a pick-me-up. My favorite thing? They bake up beautifully every single time – no cookie cutter skills required. Just roll, coat, bake, and watch the magic happen.
Oh, and did I mention they smell incredible while baking? That rich cocoa aroma mixed with vanilla will have your whole house feeling like a holiday movie set. Basically, these cookies are happiness in edible form.
Ingredients for Red Velvet Crinkle Cookies
Alright, let’s talk ingredients – because using the right stuff makes all the difference with these beauties. First rule? Measure your flour correctly! I always spoon it into the measuring cup and level it off – packing it down gives you dry cookies, and nobody wants that.
Here’s what you’ll need:
- 1½ cups (180g) all-purpose flour – the backbone of our cookies
- ½ cup (40g) unsweetened cocoa powder – I use the regular kind, not Dutch-process
- 1 teaspoon baking soda – fresh is best for maximum lift
- ½ teaspoon salt – just enough to balance the sweetness
- ½ cup (57g) unsalted butter, softened – leave it out for about 30 minutes before baking
- ½ cup (100g) granulated sugar – for that classic sweetness
- ½ cup (100g) firmly packed light brown sugar – adds moisture and depth
- 2 large eggs, room temperature – cold eggs don’t mix as well
- 1 teaspoon vanilla extract – the good stuff if you’ve got it
- 2 tablespoons (30mL) red food coloring – gel works best (I swear by Americolor Super Red)
- Powdered sugar for rolling – lots of it for that snowy look
Pro tip: If your butter’s too soft? Pop it in the fridge for 5 minutes. Too hard? Microwave in 5-second bursts. You want it just soft enough to leave a fingerprint when pressed.
How to Make Red Velvet Crinkle Cookies
Alright, let’s get baking! These cookies come together so easily, but there are a few key steps that make all the difference. Don’t worry – I’ll walk you through each one like I’m right there in the kitchen with you (pretend I’m the friend who keeps sneaking tastes of the dough).
Mixing the Dough
First things first: whisk together your dry ingredients – that’s the flour, cocoa powder, baking soda, and salt. I like to do this right in the bowl so I don’t have to wash an extra dish. Now, grab your mixer (or a sturdy spoon if you’re going old-school) and beat that softened butter with both sugars until it’s light and fluffy. This takes about 2 minutes – you’ll know it’s ready when the color lightens up.
Next comes the fun part – add those eggs one at a time, mixing well after each. Now pour in the vanilla and that gorgeous red food coloring. Don’t be shy with the color! The dough should look like Christmas threw up in your bowl (in the best possible way). Gradually add your dry ingredients, mixing just until combined. Overmixing is the enemy of tender cookies, so as soon as you don’t see flour streaks, stop!
Chilling the Dough
Here’s where patience comes in – cover that beautiful red dough and pop it in the fridge for at least 2 hours. I know, I know, waiting is hard, but trust me! Chilling does three magical things: 1) It firms up the butter so your cookies don’t spread into pancakes, 2) It lets the flour hydrate properly for that perfect texture, and 3) It intensifies all those delicious flavors.
Pro tip from someone who’s been there: if you’re in a hurry, you can chill for just 30 minutes, but the texture won’t be quite as perfect. If I’m planning ahead, I’ll often make the dough the night before – it keeps beautifully in the fridge for up to 3 days.
Baking the Cookies
Okay, game time! Preheat your oven to 350°F (177°C) and line your baking sheets with parchment paper. Now, pour about a cup of powdered sugar into a shallow bowl. Scoop out tablespoon-sized portions of dough (I use my #50 cookie scoop – about 1.5 tablespoons) and roll them into balls. Drop each ball into the powdered sugar and roll it around until it’s completely coated – really pack that sugar on there for maximum crinkle effect!
Space the cookies about 2 inches apart on your baking sheet – they’ll spread a bit. Bake for 10-11 minutes. You’ll know they’re done when the edges look set but the centers still seem a tiny bit soft. They’ll firm up as they cool, I promise! Let them sit on the baking sheet for 5 minutes before transferring to a wire rack – this keeps them from falling apart when they’re super soft and hot.
Now comes the hardest part – waiting for them to cool enough to eat without burning your mouth. But oh, that first bite of warm, chocolatey, slightly chewy perfection? Worth every second of waiting.
Tips for Perfect Red Velvet Crinkle Cookies
After making these cookies more times than I can count (and eating even more), I’ve picked up some foolproof tricks for crinkle perfection. First – and I can’t stress this enough – use gel food coloring! The liquid stuff waters down your dough and gives you pink cookies instead of that gorgeous deep red we’re after.
Chilling the dough isn’t just a suggestion – it’s the secret to that perfect chewy texture. I once got impatient and baked them straight away (okay, maybe more than once). The result? Flat, crispy cookies that looked more like red velvet pancakes. Not cute.
When rolling your dough balls, aim for even sizes – I use a cookie scoop for consistency. And really pack on that powdered sugar! Roll them twice if needed – the extra coating creates those beautiful cracks as they bake. Oh, and don’t crowd your baking sheet! Give them room to spread into perfect crinkly circles.
One last thing – these cookies continue to bake slightly on the hot tray after you pull them out. Taking them out when the centers still look slightly underdone is actually perfect timing. They’ll set up beautifully as they cool.
Ingredient Substitutions & Notes
Okay, let’s talk swaps! If you’re out of regular cocoa powder, Dutch-process will work in a pinch, but your cookies might spread a bit more (add ¼ tsp cream of tartar to help). Vegan? Swap the butter for plant-based sticks and use flax eggs (1 tbsp ground flax + 3 tbsp water per egg).
No brown sugar? Use all white sugar but add 1 tsp molasses to keep that moisture. Gel food coloring is best, but if you only have liquid, reduce another liquid (maybe the vanilla by half). And if you’re using salted butter, just skip the added salt in the recipe.
One important note: natural cocoa powder reacts with baking soda to create lift – so don’t swap it for cacao powder unless you’re ready to adjust leaveners!
Storing and Freezing Red Velvet Crinkle Cookies
Here’s the beautiful thing about these cookies – they keep like a dream! Just pop them in an airtight container at room temperature, and they’ll stay soft and delicious for up to
Nutritional Information
Okay, let’s be real – we’re not eating cookies for their health benefits, but I know some of you like to keep track! These numbers are estimates (your exact counts will vary based on brand choices and cookie size), but here’s the general breakdown per cookie:
Each gorgeous red velvet crinkle clocks in at about 84 calories, with 3g fat (2g saturated), 13g carbs (7g sugar), and 1g protein. They’ve got a touch of fiber too – about 1g per cookie from that cocoa powder.
Remember, these values can change if you tweak ingredients or make bigger/smaller cookies. But let’s be honest – when that chocolatey, slightly chewy goodness hits your tongue, numbers are the last thing on your mind!
FAQs About Red Velvet Crinkle Cookies
Q1. Can I use liquid food coloring instead of gel?
You can, but I don’t recommend it! Liquid food coloring adds extra moisture to the dough, which can throw off the texture. Plus, you’ll need way more to get that vibrant red color – we’re talking like 4-5 tablespoons! Gel food coloring (like Americolor Super Red) gives you bold color without watering down your dough. Trust me, it’s worth keeping some gel colors in your baking stash.
Q2. Why did my cookies spread too much and go flat?
Oh no! This usually happens for three reasons: 1) Your butter was too soft when creaming (it should leave a slight indent when pressed), 2) You skipped chilling the dough (that fridge time is crucial!), or 3) Your baking soda might be old. Next time, try chilling longer and checking your leavener’s freshness. And always bake a test cookie first!
Q3. Can I make these ahead and freeze the dough?
Absolutely! These cookies freeze beautifully. Roll the dough balls before chilling, then freeze them on a baking sheet. Once frozen solid, transfer to a freezer bag. When ready to bake, let them sit at room temp for 10 minutes, roll in powdered sugar, and bake as usual – just add a minute or two to the baking time.
Q4. Why aren’t my cookies crinkling properly?
The crinkles come from that thick coating of powdered sugar cracking as the cookies expand. Make sure you’re rolling the dough balls generously – I often do two coats! Also, don’t overbake them; the cookies need to puff up enough to crack that sugar shell.
Q5. Can I reduce the sugar in this recipe?
You can try, but sugar affects both sweetness and texture in baking. If you cut back too much, you might end up with dry, cakey cookies instead of that perfect chewy texture. I’d suggest keeping the sugar amounts but making smaller cookies if you’re watching portions!
Share Your Results!
I’d absolutely love to see how your red velvet crinkle cookies turn out! Snap a photo of your gorgeous crinkly creations and tag me on Instagram – nothing makes me happier than seeing these festive cookies brightening up someone else’s kitchen. Or leave a comment below telling me how they turned out! Did your family go crazy for them? Did they disappear as fast as mine always do? Spill all the delicious details!
Print
Red Velvet Crinkle Cookies
- Total Time: 2 hours 21 minutes
- Yield: 30 cookies 1x
- Diet: Vegetarian
Description
A simple recipe for soft and chewy Red Velvet Crinkle Cookies with a rich cocoa flavor and festive look.
Ingredients
- 1½ cups (180g) all-purpose flour
- ½ cup (40g) unsweetened cocoa powder
- 1 teaspoon baking soda
- ½ teaspoon salt
- ½ cup (57g) unsalted butter, softened
- ½ cup (100g) granulated sugar
- ½ cup (100g) firmly packed light brown sugar
- 2 large eggs, room temperature
- 1 teaspoon vanilla extract
- 2 tablespoons (30mL) red food coloring
- Powdered sugar for rolling
Instructions
- Whisk together flour, cocoa powder, baking soda, and salt.
- Beat butter and sugars until light and fluffy. Add eggs, vanilla, and food coloring.
- Add dry ingredients to wet, mix until combined. Chill dough for at least 2 hours.
- Preheat oven to 350°F (177°C). Line a baking sheet with parchment paper.
- Roll dough into balls, coat in powdered sugar. Bake for 10-11 minutes.
- Cool on baking sheet for 5 minutes, then transfer to wire rack to cool completely.
Notes
- Chill dough for best texture.
- Use gel food coloring for vibrant color.
- Store in an airtight container for up to 5 days.
- Prep Time: 2 hours 10 minutes
- Cook Time: 11 minutes
- Category: Dessert
- Method: Baking
- Cuisine: American
Nutrition
- Serving Size: 1 cookie
- Calories: 84 kcal
- Sugar: 7g
- Sodium: 75mg
- Fat: 3g
- Saturated Fat: 2g
- Unsaturated Fat: 1g
- Trans Fat: 0g
- Carbohydrates: 13g
- Fiber: 1g
- Protein: 1g
- Cholesterol: 18mg
Keywords: red velvet crinkle cookies, easy cookie recipe, holiday cookies


