Oh, let me tell you about the first time I made these Chocolate Peanut Butter Rice Krispie Treats. It was pure magic! My niece had begged me for a “no-bake dessert we can make together,” and when I pulled out the peanut butter jar, her eyes lit up like I’d promised her Disneyland. That’s the thing about this recipe, it turns ordinary pantry staples into something extraordinary with almost zero effort.
There’s something about that sweet-salty combo of chocolate and peanut butter that makes these treats completely irresistible. And when you add that crispy Rice Krispie texture? Wow. Just wow. I’ve made these for bake sales, potlucks, and those “I need chocolate NOW” emergencies more times than I can count. They always disappear faster than you can say “second helping.”
The best part? You probably have everything you need in your kitchen right now. Marshmallows? Check. Peanut butter? Check. That half-empty bag of chocolate chips hiding in your pantry? Perfect. Let’s make some magic happen.
Table of Contents
Why You’ll Love These Chocolate Peanut Butter Rice Krispie Treats
Listen, if you’re looking for a dessert that’ll make you look like a kitchen wizard with minimal effort, these Chocolate Peanut Butter Rice Krispie Treats are your golden ticket. Here’s why they’ve become my go-to recipe for every occasion:
- No oven required: Seriously, just a stovetop and microwave. Even my teenager can make these without burning down the house.
- Kid-approved magic: That satisfying crunch gets them every time. My little nephew calls them “peanut butter crackles” and begs me to make them.
- Party superstar: Cut them into squares for bake sales or fancy them up with sprinkles for birthdays. They disappear faster than you can say “seconds please!”
- Rich flavor bomb: The chocolate-peanut butter combo is legendary for a reason. It’s like your favorite candy bar got upgraded.
- Emergency dessert savior: Got unexpected guests? You’re 30 minutes away from hero status.
Trust me, once you make these Chocolate Peanut Butter Rice Krispie Treats, you’ll understand why my recipe card is splattered with chocolate fingerprints.
Ingredients for Chocolate Peanut Butter Rice Krispie Treats
Okay, let’s gather our ingredients, this is where the magic starts! I’ve learned through many batches that quality matters here, so don’t skimp on the good stuff. Here’s exactly what you’ll need:
- 4 tablespoons unsalted butter: This gives our base that rich, melt-in-your-mouth quality. I always use real butter, no substitutes!
- ½ cup creamy peanut butter: The smooth kind works best here. I’ve used natural before, but the oil separation can make things tricky.
- 1 (10-ounce) bag miniature marshmallows: The small ones melt faster and smoother. If you only have large ones, just chop them up a bit first.
- 1 teaspoon vanilla extract: That little splash makes all the difference. Pure vanilla if you’ve got it!
- 6 cups Rice Krispies cereal: Measure this after it settles in the box, not packed down. And yes, it has to be Rice Krispies, other cereals just don’t give the same magical crunch.
Now for the showstopping chocolate topping:
- 2 ½ cups semi-sweet chocolate chips: I’ve tested this with every kind, and semi-sweet gives the perfect balance with the sweet marshmallow base.
- ½ cup peanut butter baking chips: These little gems take the peanut butter flavor over the top!
- 1 teaspoon coconut oil or vegetable shortening: This helps the chocolate spread smoothly. I usually use coconut oil because I love the subtle hint it adds.
See? Nothing fancy, just pantry staples that come together to make something extraordinary. Now let’s get cooking!
Equipment You’ll Need
Before we dive in, let’s grab our kitchen tools, nothing fancy, I promise! Here’s what you’ll need within arm’s reach:
- Large pot: Big enough to hold all that marshmallow goodness without overflowing
- 9×13-inch baking dish: My trusty glass pan works perfectly every time
- Mixing spoon: A sturdy wooden one won’t melt like plastic can
- Microwave-safe bowl: For that dreamy chocolate topping
That’s it! No special gadgets required, just basic kitchen essentials we all have.
How to Make Chocolate Peanut Butter Rice Krispie Treats
Alright, let’s get to the fun part: Making these irresistible Chocolate Peanut Butter Rice Krispie Treats! I’ll walk you through each step just like I’m standing right there in your kitchen with you. Don’t worry, it’s foolproof, but I’ve got all my best tips to make sure yours turn out perfect.
Step 1: Prepare the Pan
First things first, grab that 9×13-inch baking dish and give it a quick butter massage. I use about a teaspoon of butter and rub it all over the bottom and sides with my fingers (or a paper towel if you’re fancy). This little step makes all the difference when it’s time to remove your Chocolate Peanut Butter Rice Krispie Treats later. No stuck-on messes here!
Step 2: Melt the Peanut Butter Mixture
Now, the real magic starts. In your large pot, melt the butter and peanut butter together over medium-low heat. Here’s my secret: Stir CONSTANTLY. I’m not kidding, peanut butter can go from “perfectly melted” to “oh no it’s burning!” in seconds. Use that wooden spoon and keep it moving until you’ve got a smooth, dreamy mixture that smells like heaven.
Step 3: Add Marshmallows and Vanilla
Dump in that whole bag of marshmallows and keep stirring! They’ll start melting almost immediately. I like to use the spoon to press them against the side of the pot to help them dissolve faster.
Once everything is completely smooth (no marshmallow lumps allowed!), turn OFF the heat and stir in that teaspoon of vanilla. The vanilla adds this incredible depth of flavor that most people can’t quite put their finger on, but they’ll know something’s special about your Chocolate Peanut Butter Rice Krispie Treats.
Step 4: Mix in the Rice Krispies
Time for the crispy part! Add all 6 cups of Rice Krispies at once. Here’s where you need to work quickly but gently. Use a folding motion to coat every last Krispie with that sticky peanut butter mixture, but don’t crush them! I like to imagine I’m tucking each one into a marshmallow blanket. The mixture should be evenly coated but still nice and airy.
Step 5: Press into the Pan
Now transfer your mixture to the prepared pan. Here’s my pro tip: butter your hands lightly (or use a piece of parchment paper) to press the mixture evenly into the pan. Don’t pack it down too hard; you want these Chocolate Peanut Butter Rice Krispie Treats to stay light and crispy, not dense like a brick. Just firm enough so they hold together when cut.
Step 6: Melt the Chocolate Topping
While your base sets for a few minutes, let’s make that luscious chocolate topping. Combine the chocolate chips, peanut butter chips, and coconut oil in your microwave-safe bowl. Microwave in 30-second bursts, stirring well between each one. Mine usually takes about 1 minute 30 seconds total, but microwaves vary, so watch it like a hawk! Stop when just a few lumps remain, the residual heat will melt them as you stir to a silky smooth finish.
Step 7: Spread and Set
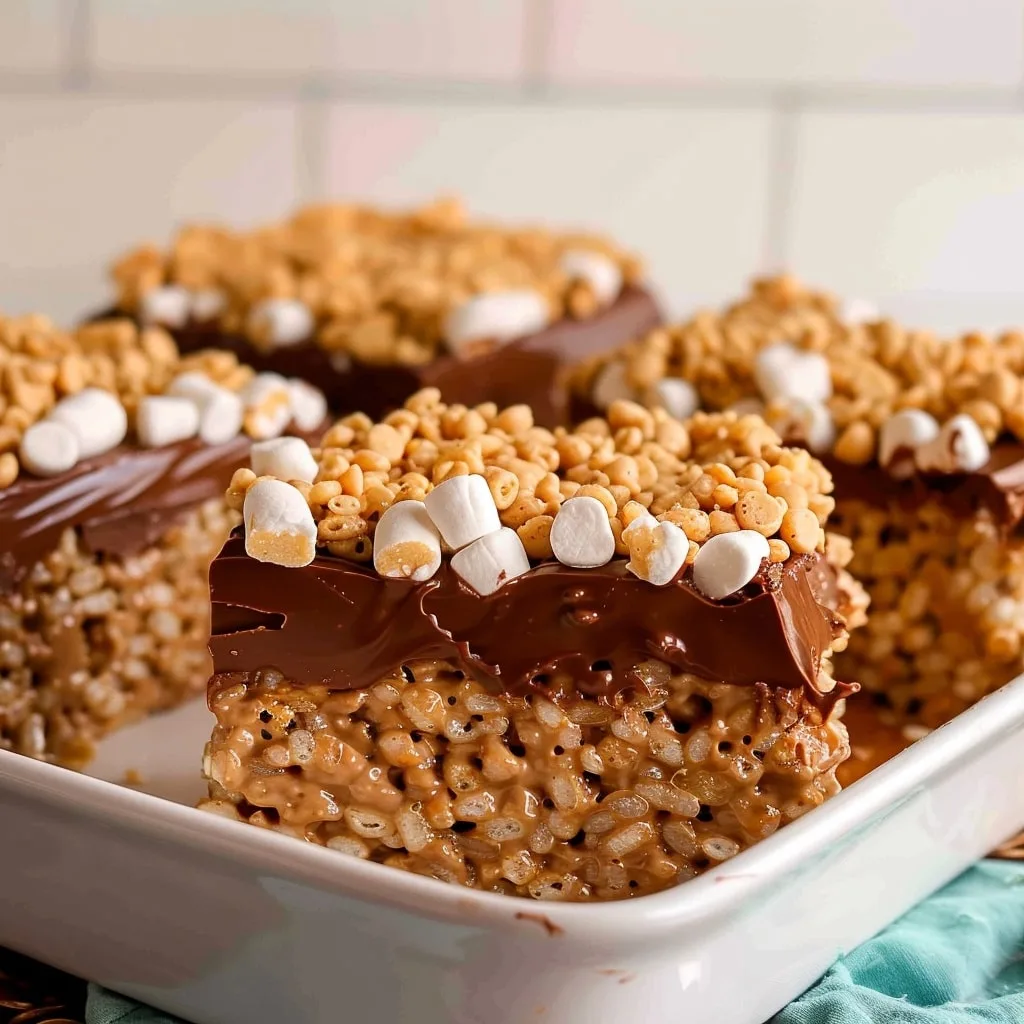
Pour that glorious chocolate over your Rice Krispies base and spread it evenly with a spatula. I like to give the pan a gentle shake to help it settle into all the nooks and crannies. Now comes the hardest part: Waiting! Let your Chocolate Peanut Butter Rice Krispie Treats sit at room temperature for at least an hour before cutting. Trust me, the anticipation makes them taste even better.

Tips for Perfect Chocolate Peanut Butter Rice Krispie Treats
After making these Chocolate Peanut Butter Rice Krispie Treats more times than I can count, I’ve picked up some tricks that make all the difference between “good” and “OH MY GOSH I NEED THE RECIPE!” Here are my can’t-live-without tips:
- Fresh marshmallows are non-negotiable:That half-opened bag from last month’s camping trip? Toss it. Stale marshmallows just don’t melt right and can leave your treats tasting… off. I always buy a fresh bag specifically for this recipe.
- Warm your knife before cutting: Here’s how I do it: run your knife under hot water, dry it quickly, then make clean cuts through that chocolate topping. Wipe the blade between cuts for perfect squares every time.
- Let them set at room temperature: I know it’s tempting to pop them in the fridge, but resist! The chocolate sets up nicer when it’s not rushed, giving you that perfect snap when you bite in.
- Measure your Rice Krispies correctly: No packing them down in the measuring cup, just gently pour until you reach 6 cups. Too many and your treats will be dry; too few and they won’t hold together.
Variations and Substitutions
One of my favorite things about these Chocolate Peanut Butter Rice Krispie Treats is how easily you can mix things up! Here are some delicious twists I’ve tried over the years that always get rave reviews:
- Dark chocolate chips: Swap the semi-sweet for dark chocolate if you prefer a richer, less sweet topping. My brother-in-law insists this is the only way to go!
- Almond butter instead of peanut butter: Works beautifully if you’re out of peanut butter or want a slightly different flavor. Just make sure it’s the creamy kind.
- Festive sprinkles: Press them into the chocolate topping before it sets for birthday parties or holidays. Kids go wild for this colorful touch.
- Coconut oil substitute: No coconut oil? Vegetable shortening works just as well for helping the chocolate spread smoothly.
- Crushed pretzel topping: Sprinkle crushed pretzels over the melted chocolate for an extra salty crunch that’s to die for.
The best part? You can’t really mess this up. Play around and make it your own special version of these irresistible treats!
Storing and Serving Chocolate Peanut Butter Rice Krispie Treats
Now that you’ve made these glorious Chocolate Peanut Butter Rice Krispie Treats, let’s talk about keeping them fresh (if they last that long!). I always store mine in an airtight container at room temperature, no refrigeration needed. They stay perfectly crisp and delicious for up to 3 days this way. Just be sure to put parchment between layers if you’re stacking them so that the chocolate topping doesn’t stick together.
When serving these beauties, room temperature is key! The chocolate layer will have that perfect snap, and the peanut butter marshmallow base stays wonderfully chewy. I like to cut them into squares for casual snacking or fancy them up by cutting them into triangles for parties. Either way, be prepared for people to ask for seconds. These Chocolate Peanut Butter Rice Krispie Treats disappear fast!
Nutritional Information
Here’s the scoop on nutrition for these Chocolate Peanut Butter Rice Krispie Treats, but remember, these are estimates (your exact brands and measurements may vary slightly). Each delicious square contains about 416 calories with that perfect balance of sweet and salty. They’re definitely a treat, but hey, life’s too short not to enjoy the good stuff sometimes!
FAQs About Chocolate Peanut Butter Rice Krispie Treats
Can I use crunchy peanut butter instead of creamy?
Oh boy, I’ve tried both! Creamy gives you that smooth, perfect texture we love, but crunchy can add fun little peanut bits if that’s your thing. Just know the texture will be different, the peanut pieces might make your treats a bit crumblier when cutting.
How long do these actually last?
Honestly? In my house, maybe 24 hours! But properly stored in an airtight container, they’ll stay fresh and delicious for about 3 days at room temperature. After that, they start losing their perfect crispness (though they’ll still taste amazing).
Can I freeze chocolate peanut butter Rice Krispie treats?
Absolutely! They freeze beautifully for up to a month. Just wrap them tightly in plastic wrap first, then pop them in a freezer bag. Thaw at room temperature when the craving hits, no microwave needed!
Why did my chocolate topping get cloudy?
Ah, this happens if moisture gets to it. Make sure your treats are completely cooled before storing, and never refrigerate them; that’s usually the culprit! If it happens, they’ll still taste great, just not as pretty.
Can I make these gluten-free?
Yes indeed! Just use gluten-free Rice Krispies (they make them now!) and double-check that all your other ingredients are GF. The texture and taste are exactly the same; no one will know the difference!
More Easy No-Bake Treats to Try
If you can’t get enough of this chocolate and peanut butter combo, you will love these other easy, no-bake desserts. They are perfect for satisfying your sweet tooth without ever turning on the oven!
- Peanut Butter Haystacks: Whip up these crunchy, butterscotch and peanut butter noodles in minutes.
- Chocolate Peanut Clusters: Enjoy the classic combination of peanuts and chocolate in bite-sized clusters.
- No Bake Peanut Butter Oatmeal Cookies: Try these chewy, oat-filled cookies that are ready in a flash.
- Rice Krispie Treat Monsters: Have some fun with these cute, decorated treats for your next party.
Whether you need a last-minute dessert or a fun snack for the kids, these recipes are quick, delicious, and hassle-free. Give them a try and enjoy the sweet crunch!
Final Thoughts
There you have it, my absolute favorite way to make Chocolate Peanut Butter Rice Krispie Treats! I can’t wait for you to experience that first magical bite where the crispy cereal meets the creamy peanut butter and rich chocolate. These treats have saved me at potlucks, made me the “cool aunt,” and satisfied more midnight cravings than I can count.
Now it’s your turn, give this recipe a try and let me know how it goes! Did your family go crazy for them? Did you add any fun twists? Leave a comment below or snap a photo of your masterpiece and tag me on Instagram @recipesbycharlotte. Happy baking (or should I say, happy no-baking)!
Print
Chocolate Peanut Butter Rice Krispie Treats
- Total Time: 30 minutes
- Yield: 12 servings 1x
- Diet: Vegetarian
Description
Easy and delicious Chocolate Peanut Butter Rice Krispie Treats with a rich chocolate topping.
Ingredients
- 4 tablespoons unsalted butter
- ½ cup creamy peanut butter
- 1 (10-ounce) bag miniature marshmallows
- 1 teaspoon vanilla extract
- 6 cups Rice Krispies cereal
- 2 ½ cups semi-sweet chocolate chips
- ½ cup peanut butter baking chips
- 1 teaspoon coconut oil or vegetable shortening
Instructions
- Lightly butter a 9×13 inch baking dish and set aside.
- In a large pot, melt the butter and peanut butter over medium-low heat, stirring often.
- Add marshmallows, stirring until completely melted and smooth. Turn off the heat and stir in vanilla extract.
- Mix in the Rice Krispies cereal until well combined.
- Press the mixture into the prepared pan.
- In a microwave-safe bowl, melt chocolate chips, peanut butter chips, and coconut oil or shortening in 30-second increments, stirring until smooth.
- Spread melted chocolate over the Rice Krispies mixture and allow it to set at room temperature before cutting into bars.
Notes
- Store in an airtight container at room temperature for up to 3 days.
- Use a sharp knife to cut clean slices.
- Prep Time: 10 minutes
- Cook Time: 20 minutes
- Category: Dessert
- Method: Stovetop
- Cuisine: American
Nutrition
- Serving Size: 1 bar
- Calories: 416 kcal
- Sugar: 32g
- Sodium: 180mg
- Fat: 22g
- Saturated Fat: 10g
- Unsaturated Fat: 8g
- Trans Fat: 0g
- Carbohydrates: 48g
- Fiber: 3g
- Protein: 6g
- Cholesterol: 15mg
Keywords: chocolate peanut butter rice krispie treats, easy dessert recipe, no-bake treats


